
4.1 Remote Site Settings
To establish a secure connection between Salesforce and QuickBooks, add the following sites to the remote site settings inside the client org:
-
Intuit_Auth: https://oauth.platform.intuit.com
-
Intuit_Prod_Environment: https://quickbooks.api.intuit.com
-
Intuit_Sandbox_Environment: https://sandbox-quickbooks.api.intuit.com
-
QB_AuthOrg: https://cloudmaveninc.my.salesforce-sites.com
These settings enable secure API communication between the systems, ensuring smooth data flow.
Steps to open Remote Site Settings -
-
Click the ⚙️ Gear icon in the top-right corner.
-
Select Setup.
-
In the Quick Find box (left panel), type Remote Site Settings.
-
Click Remote Site Settings from the results.
-
Click New Remote Site (if you want to create one).
-
Enter:
-
Remote Site Name
-
Remote Site URL
-
-
Check Active ✅
-
Click Save
4.2 Salesforce Site Configuration
A Salesforce Site is required to securely expose specific Salesforce data and functionality through a custom web interface. It grants limited access to Site Guest Users, allowing them only to view or edit permitted data and complete actions such as authentication with Quickbooks and Receiving Webhook notifications.
4.2.1 Create a Salesforce Site or Configure an Existing One
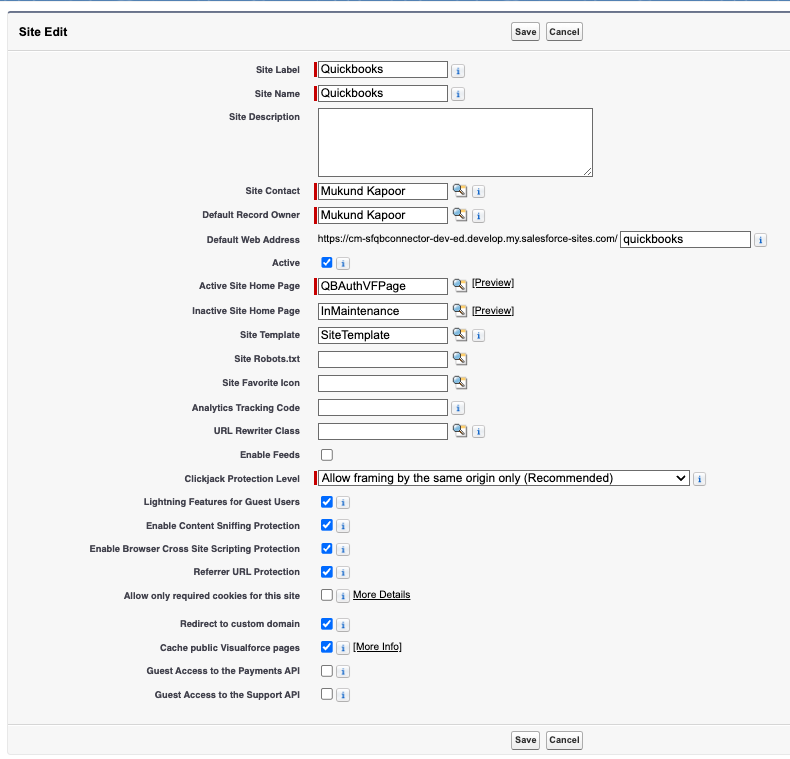
To integrate QuickBooks with Salesforce, create a Salesforce site and configure it as follows:
-
Active Site Home Page:
QBAuthVFPage -
Lightning Features for Guest Users:
true -
Enable Content Sniffing Protection:
true -
Enable Browser Cross Site Scripting Protection:
true -
Referrer URL Protection:
true -
Redirect to custom domain:
true -
Cache public Visualforce pages:
true -
Site Contact: The user which will be the record owner for the records created by Site Guest User.
-
Default Record Owner: The user which will be the record owner for the records created by Site Guest User.
-
Make sure that the site is Active.
Once the site is created, add cm_finance.QBAuthVFPage to the Site Visualforce Pages list.
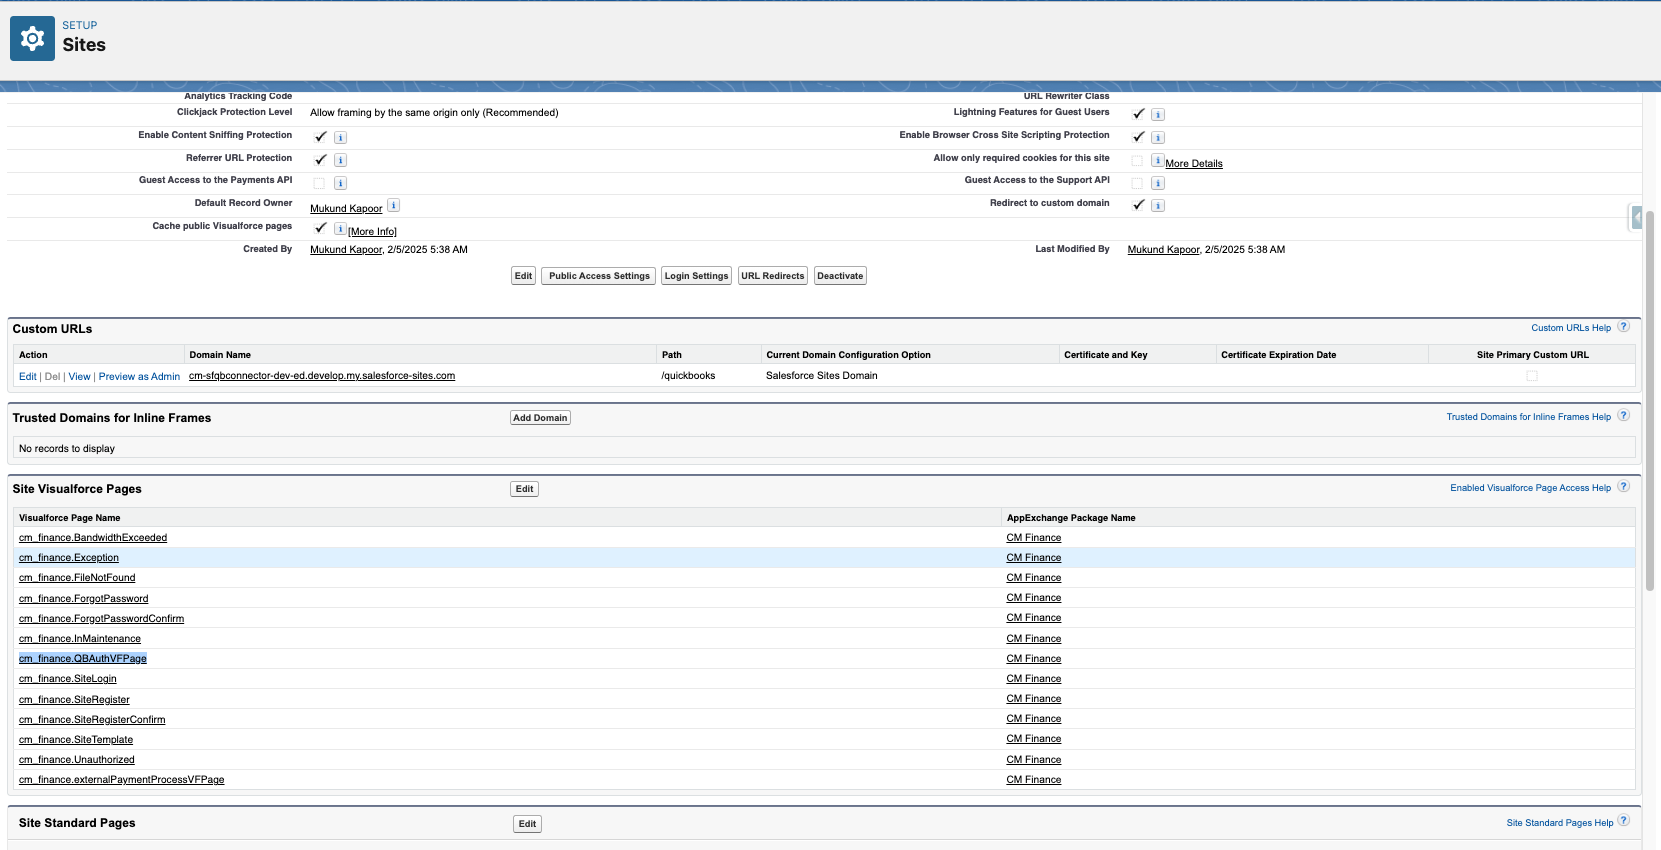
This configuration is essential to allow QuickBooks authentication and ensure smooth data processing.
4.3 Site Guest User Profile Configuration
Navigate to the Profile of the Site Guest User for the created site and provide access to the following:
4.3.1 Apex Classes Access
Grant Apex Class Access
-
Inside the Guest User Profile, scroll to Enabled Apex Class Access.
-
Click Edit.
-
Move your required Apex Class from Available Apex Classes → Enabled Apex Classes.
-
Click Save ✅
To allow data processing and synchronization, grant access to the following Apex classes:
-
cm_finance.QBAuthController -
cm_finance.Webhook_QBChangeHandler -
cm_finance.BatchQBSFAccountWebhook -
cm_finance.BatchQBSFCustomerWebhook -
cm_finance.BatchQBSFInvoiceWebhook -
cm_finance.BatchQBSFProductWebhook -
cm_finance.BatchQBSFPaymentWebhook -
cm_finance.BatchQBSFVendorWebhook -
cm_finance.CMQBConnectorUtility -
cm_finance.BatchQBSFSalesReceiptWebhook -
cm_finance.BatchQBSFPaymentMethodWebhook -
cm_finance.BatchQBSFBillWebhook -
cm_finance.BatchQBSFBudgetWebhook
4.3.2 Object Settings Access
Provide the necessary access to QuickBooks-related custom objects:
Step: Open Object Settings
-
Inside the Guest User Profile
-
Scroll to Object Settings
-
Click Object Settings
-
Select the Object Name (Select one by one for below list)
-
cm_finance__Custom_Field_Mapping__c -
cm_finance__Quickbooks_Company__c -
cm_finance__Quickbooks_Account__c -
cm_finance__Quickbooks_Customer__c -
cm_finance__Quickbooks_Invoice_Item__c -
cm_finance__Quickbooks_Invoice__c -
cm_finance__Quickbooks_Product__c -
cm_finance__Quickbooks_Vendor__c -
cm_finance__Quickbooks_Journal_Entry__c -
cm_finance__Quickbooks_Journal_Entry_Item__c -
cm_finance__Payment_Transaction__c -
cm_finance__Payment_Method__c -
cm_finance__Payment_Gateway__c -
cm_finance__Quickbooks_Sales_Receipt__c -
cm_finance__Quickbooks_Sales_Receipt_Item__c -
cm_finance__Quickbooks_Bill__c -
cm_finance__Quickbooks_Bill_Item__c -
cm_finance__Quickbooks_Budget__c -
cm_finance__Quickbooks_Budget_Detail__c
Step: Grant Object Permissions
-
Click Edit
-
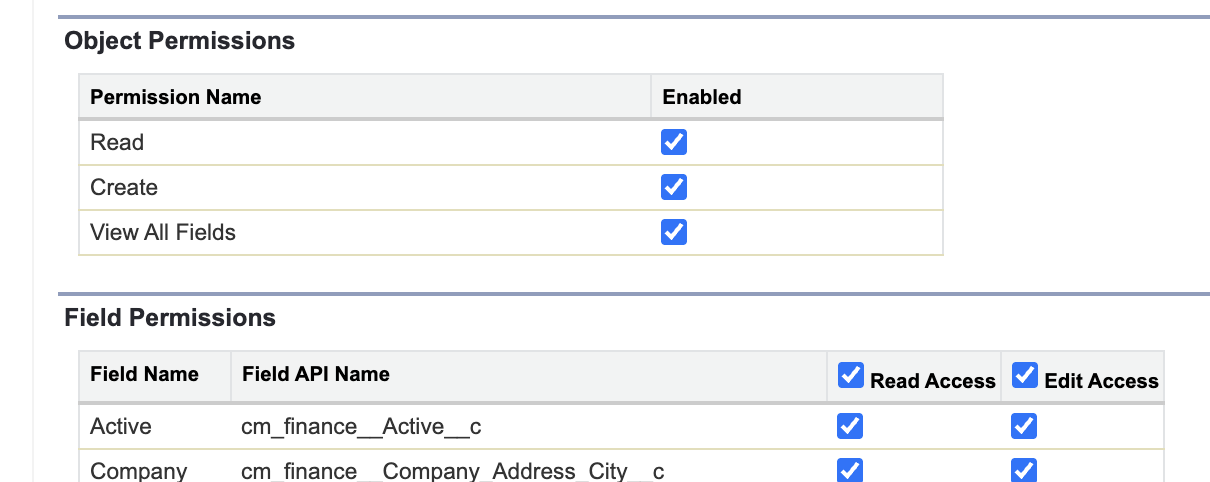
Enable Object permissions:
-
Read
-
Create
-
View All Fields
-
-
Enable Field permissions:
-
Read Access All
-
Edit Access All
-
-
Click Save
4.3.3 Visualforce Page Access
Ensure that the guest user has access to the Visualforce page handling authentication:
Step: Grant Visualforce Page Access
-
Scroll to Enabled Visualforce Page Access
-
Click Edit
-
Move the required Visualforce Page from Available Visualforce Pages ➝ Enabled Visualforce Pages
-
Click Save ✅
-
cm_finance.QBAuthVFPage
This configuration is necessary to allow external authentication and seamless QuickBooks integration.
4.3.4 Package License Access
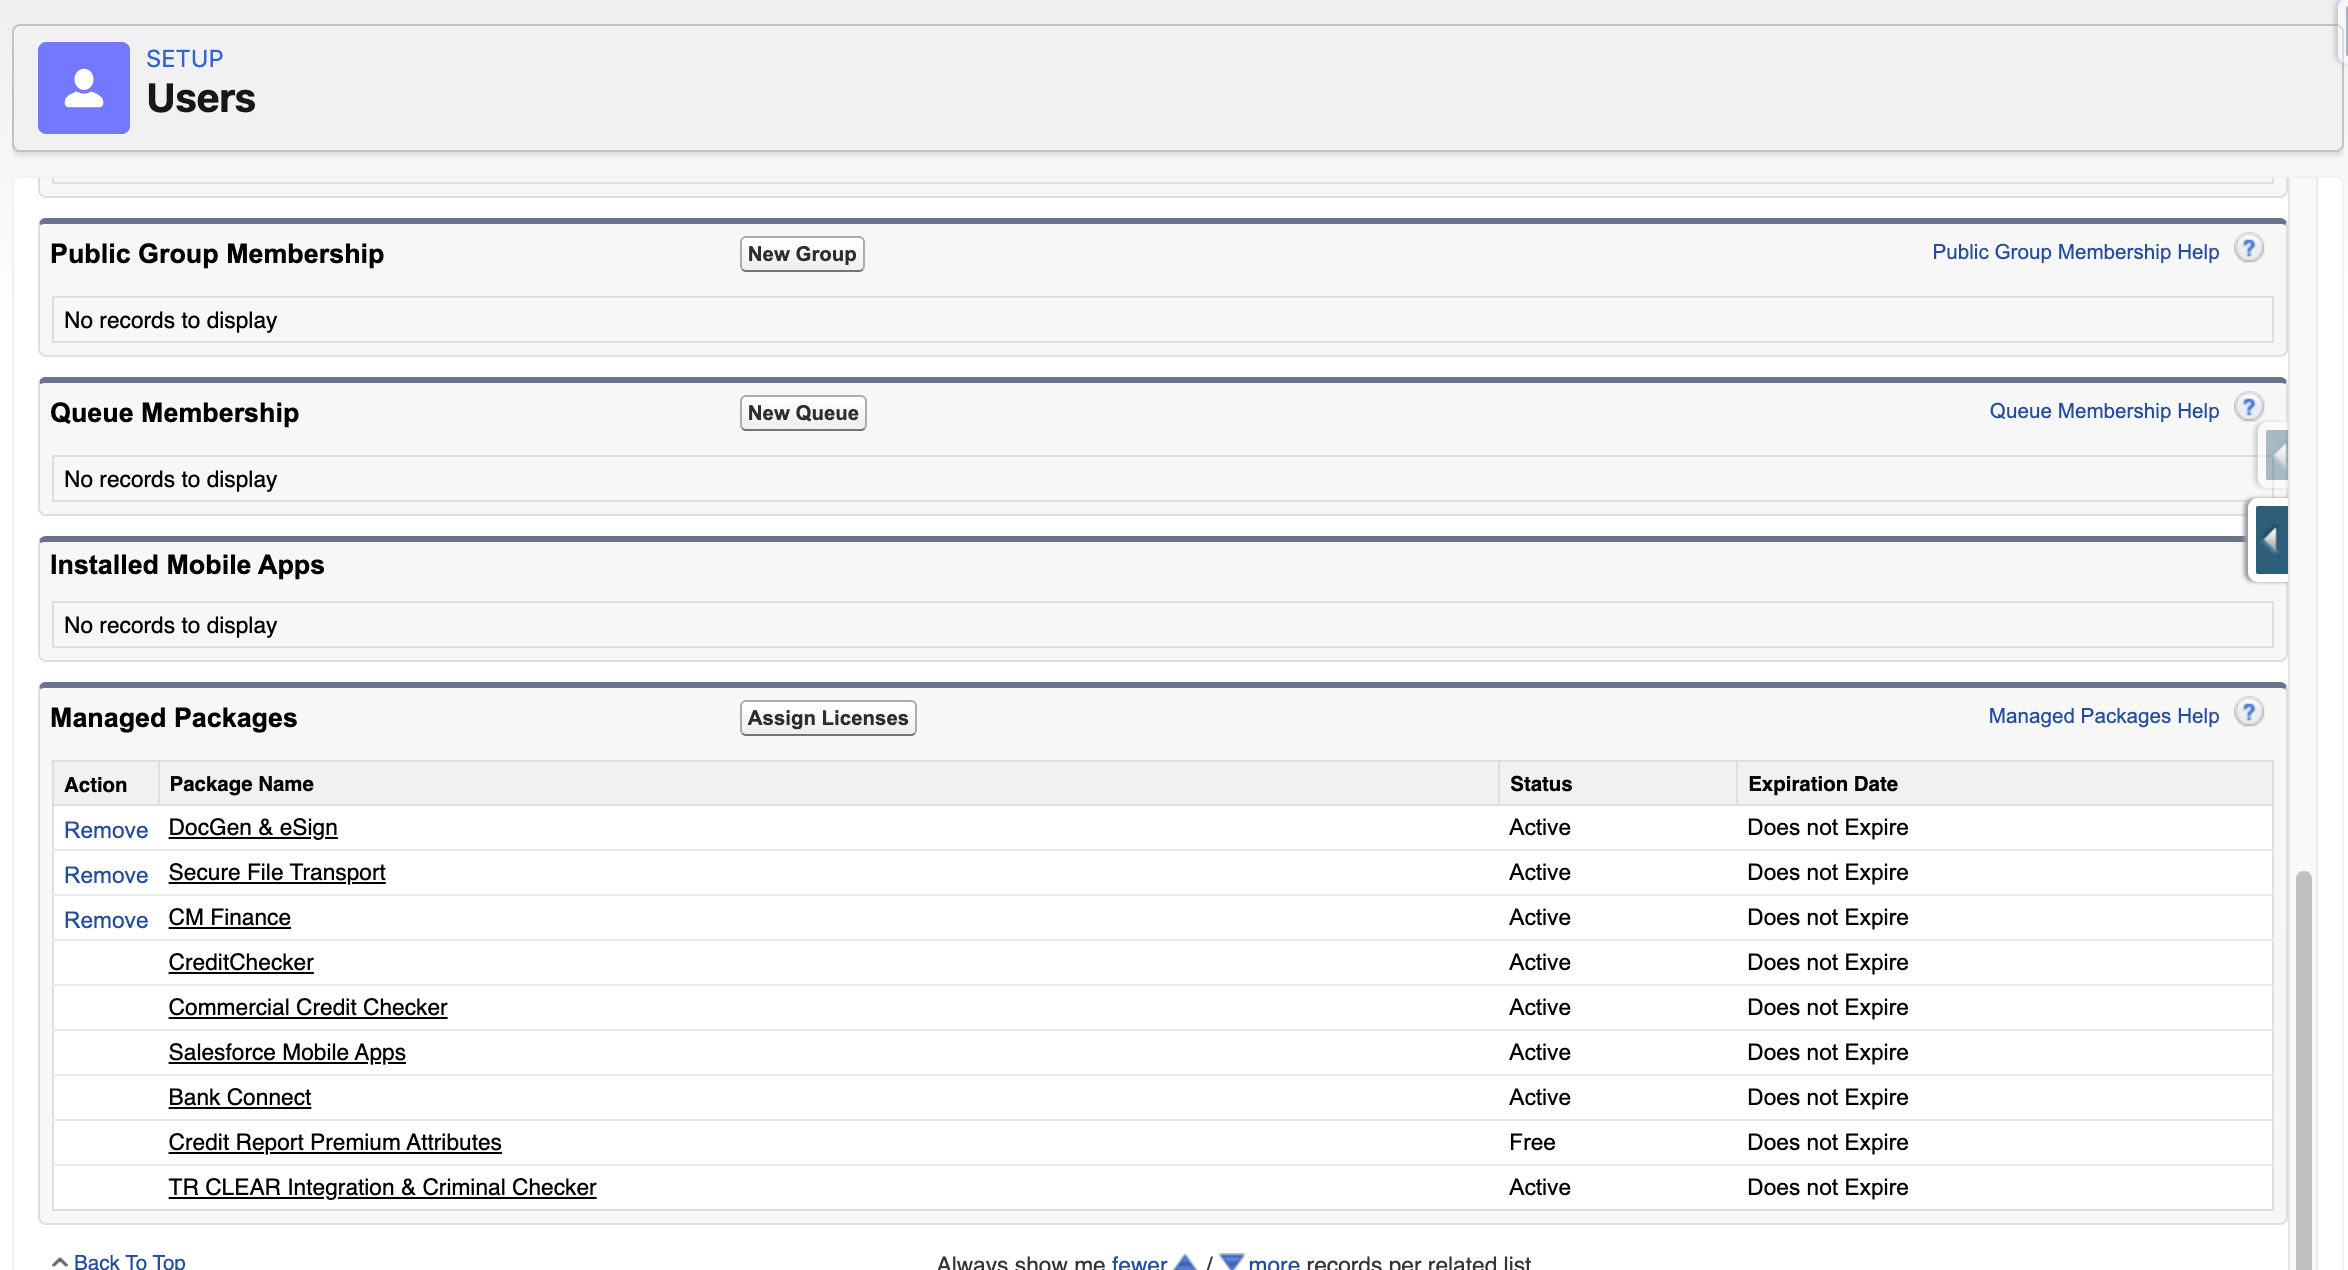
Ensure that Site Guest User has License assigned for “CM Finance” application.
Follow these steps:
-
Open the Site Guest User record.
-
Scroll down to the Managed Packages section.
-
Click Assign Licenses.
-
Assign the CM Finance license to the Site Guest User.
4.4 Populate the State URL and Client Id and Client Secret in Quickbooks Credentials
4.4.1 If the backend access is available
-
Navigate to setup.
-
Search Custom Settings and find “Quickbooks Credentials”.
-
Click Edit on Default Credentials.
-
Populate the state URL as follows: {enter the site domain} + '/' + {site path} + '/cm_finance__QBAuthVFPage'
Example of stateURL
https://cm-sfqbconnector-dev-ed.develop.my.salesforce-sites.com/quickbooks/cm_finance__QBAuthVFPage
-
Get the Client Id and Client Secret from Cloud Maven, Inc team and populate them in respective fields.
4.4.2 Run the Following Code Snippet in Developer Console (if backend access is not available)
Execute the following Apex code snippet to update QuickBooks credentials within Salesforce:
cm_finance.AdminServices.ServicesDataWrapper oWrapper = new cm_finance.AdminServices.ServicesDataWrapper();
oWrapper.stateURL = {enter the site domain} + '/quickbooks/cm_finance__QBAuthVFPage';
oWrapper.clientId = '';
oWrapper.clientSecret = '';
oWrapper.apiInstance = 'Production';
cm_finance.AdminServices.updateQBCredentials(oWrapper);
Get the Client Id and Client Secret from Cloud Maven, Inc team.
Example of stateURL: You can take reference to the below example as it follows the structure
{site domain} + '/' + {site path} + '/cm_finance__QBAuthVFPage'
https://cm-sfqbconnector-dev-ed.develop.my.salesforce-sites.com/quickbooks/cm_finance__QBAuthVFPage
This step ensures that QuickBooks authentication is correctly routed through the designated Salesforce site.
4.5. Internal Step: Add Site to Cloud Maven’s Subscriber Org
As an internal step, add the created Salesforce site to the remote site settings of Cloud Maven’s Subscriber org to enable communication between the environments.
Steps to open Remote Site Settings -
-
Click the ⚙️ Gear icon in the top-right corner.
-
Select Setup.
-
In the Quick Find box (left panel), type Remote Site Settings.
-
Click Remote Site Settings from the results.
-
Click New Remote Site (if you want to create one).
-
Enter:
-
Remote Site Name
-
Remote Site URL (URL of the remote site will be the same as the site created/used in step 4.2.1).
-
-
Check Active ✅
-
Click Save
4.6 Configure Quickbooks Common Settings
Refer to this page for configuring Quickbooks common settings.
4.7 Assign Users to Permission Sets
Permission Set is assigned to users to grant additional permissions or functionality beyond their existing profile settings.
Steps to Open Permission Sets
-
Click the ⚙️ Gear icon in the top-right corner.
-
Select Setup.
-
In the Quick Find box (left panel), type Permission Sets.
-
Click Permission Sets from the results.
To ensure proper role-based access control, assign the following permission sets:

-
Assign "CM Quickbooks Connector - System Admin" permission set to System Admin users.
-
Assign "CM Quickbooks Connector - Standard User" permission set to Standard Users based on business requirements.
These permission sets grant appropriate access levels to different users, ensuring smooth workflow execution.
Note (QuickBooks Budgets): Users who need to view QuickBooks Budgets must have Read access to the cm_finance__Quickbooks_Budget__c and cm_finance__Quickbooks_Budget_Detail__c objects and their fields. If the permission sets above do not include these objects, grant the access through a separate permission set.
4.8. Create QuickBooks Sync Button
'QuickBooks Sync' button allows users to push data from Salesforce to create corresponding records in QuickBooks, and also to pull updated data from QuickBooks back into Salesforce.
4.8.1. Steps to create a "QuickBooks Sync" button
-
Navigate to Object Manager:
-
Go to "Setup" within your Salesforce instance.
-
Select "Object Manager."
-
Choose the source object whose data will be used for QuickBooks synchronization.
-
For example, if you intend to create QuickBooks Customers from Account records, select the "Account" object.
-
-
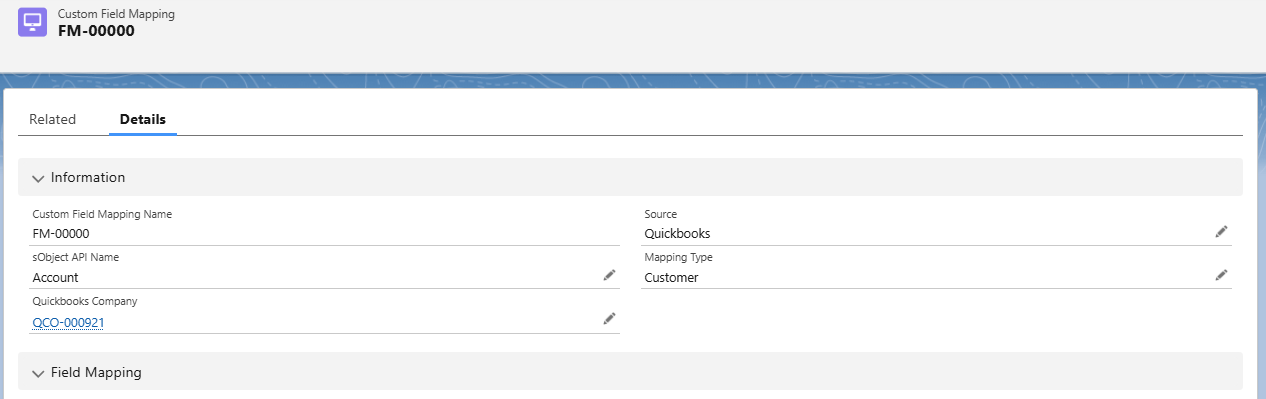
Note: The button's functionality is dependent on the presence of a valid Custom Field Mapping record. If no such record exists, the button may not perform as expected, or an error may occur. To use this button for QuickBooks Customer integration on an Account, ensure a corresponding mapping record exists. Refer to the screenshot below for an example.
-
Create a New Action:
-
Within the selected object's settings, click "Buttons, Links, and Actions."
-
Click the "New Action" button.
-
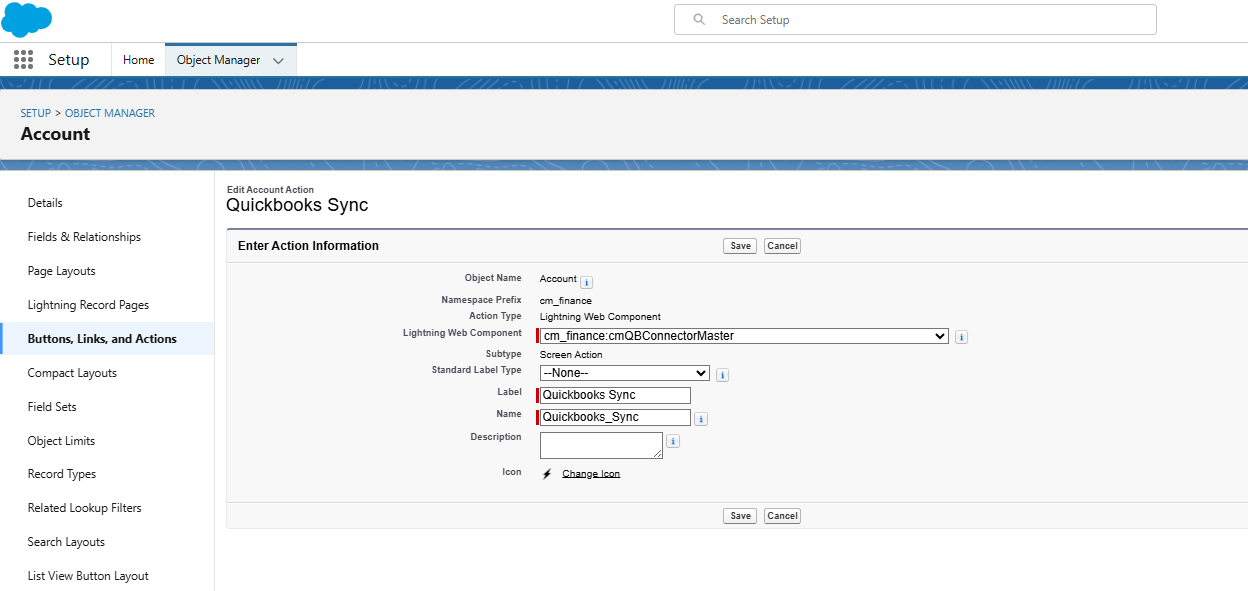
Configure the action with the following details:
-
Action Type: Select "Lightning Web Component."
-
Lightning Web Component: Enter
cm_finance:cmQBConnectorMaster. -
Label: Enter "QuickBooks Sync."
-
-
Click "Save."
-
-
Add the Button to the Page Layout:
-
Navigate back to the selected object's settings.
-
Click "Page Layouts."
-
Select the page layout where the button needs to be added.
-
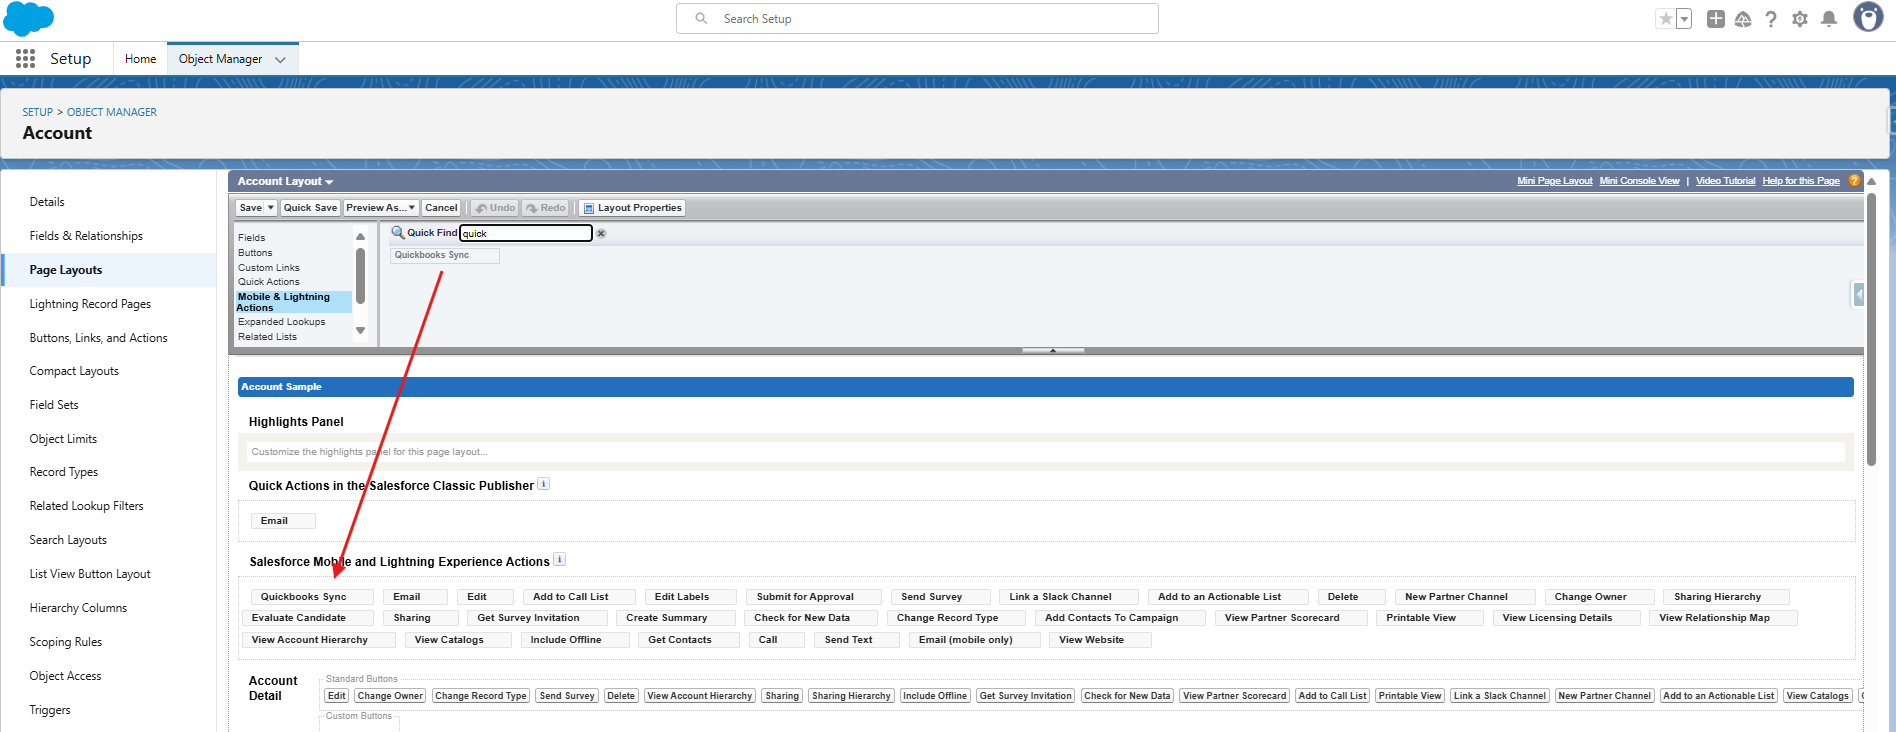
Locate the "QuickBooks Sync" button within the "Mobile & Lightning Actions" or "Buttons" section.
-
Drag and drop the "QuickBooks Sync" button onto the desired location on the page layout.
-
Click "Save."
-
Note: This same component also drives Bill creation (via the embedded Bill Creator screen) for any source object where a Custom Field Mapping record of Mapping Type "Bill" exists — no separate button or component is needed for Bills.
4.8.2. Steps to add the QuickBooks Related tab
-
Navigate to Object Manager:
-
Go to Setup within your Salesforce instance.
-
Select Object Manager.
-
Select the object where the QuickBooks-related records need to be displayed.
-
-
Open Page Layouts:
-
Within the selected object's settings, click Page Layouts.
-
Select the page layout that is assigned to the required users.
-
-
Add the QuickBooks Related List:
-
Scroll down to the Related Lists section.
-
Locate the appropriate QuickBooks-related list.
-
Drag and drop the related list into the Related Lists section of the page layout.
-
-
Configure the Related List:
-
Click the wrench icon on the related list to configure it.
-
Select the fields that should be displayed in the related list.
-
Configure the required columns, such as:
-
QuickBooks ID
-
Name/Reference
-
Sync Status
-
Sync Date
-
Amount, where applicable
-
Other relevant QuickBooks fields
-
-
Click OK.
-
-
Save the Page Layout:
-
Click Save to save the page layout changes.
-
-
Verify the Related List:
-
Open a record of the selected object.
-
Navigate to the Related tab.
-
Verify that the QuickBooks-related list is displayed.
-
Note: The related list will display records only when the corresponding QuickBooks relationship/lookup is populated on the record. Ensure that the required QuickBooks lookup or relationship fields are available on the object and that users have the necessary field and object permissions.
Note (QuickBooks Budgets): Budgets are synced from QuickBooks only and do not use the QuickBooks Sync button. To let users view them, make a Quickbooks Budgets tab available (create a custom object tab for cm_finance__Quickbooks_Budget__c if one does not exist) and add the Quickbooks Budget Details related list to the Quickbooks Budget page layout.
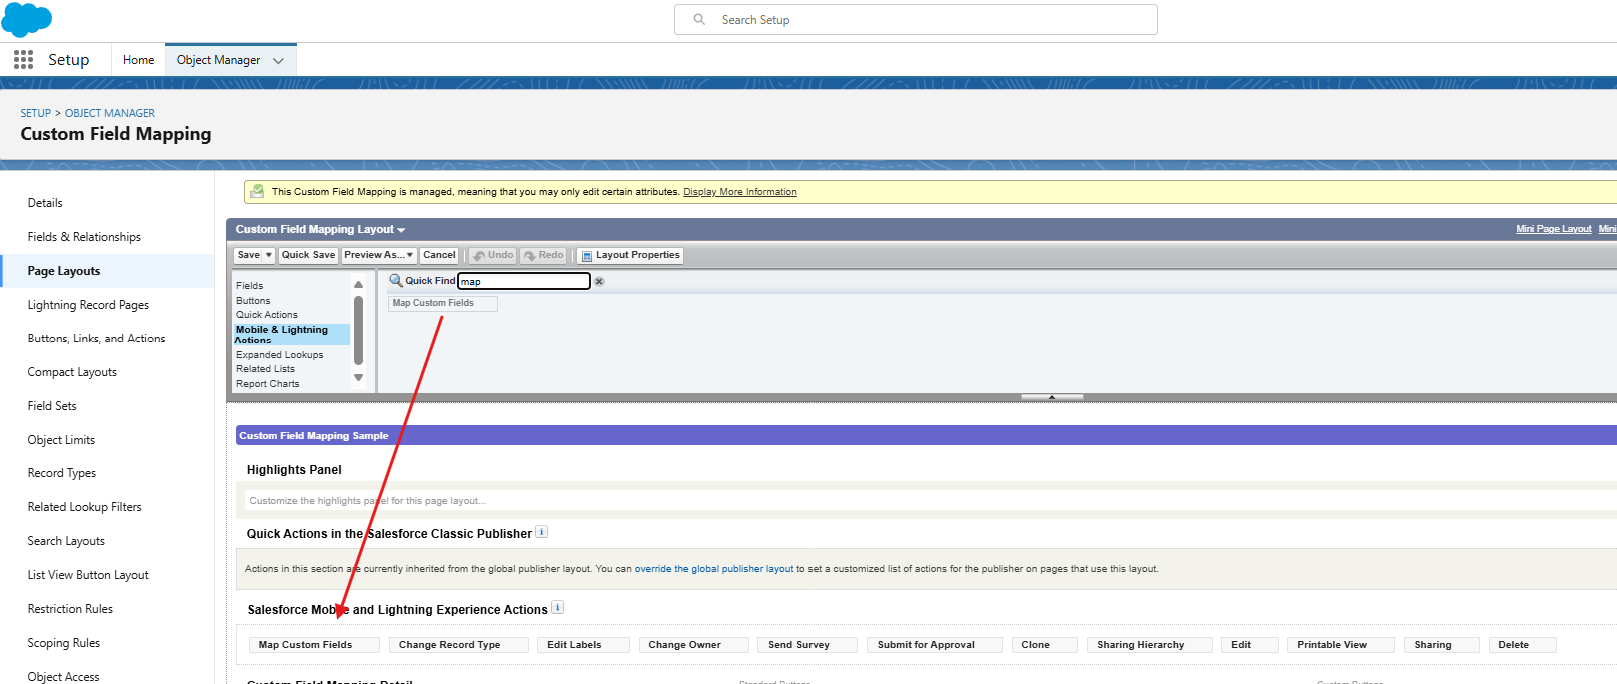
4.9 Create Map Custom Fields button
The 'Map Custom Fields' button enables users to establish connections between QuickBooks custom fields and Salesforce fields. Currently, this functionality is limited to Invoices and supports a maximum of three QuickBooks custom fields due to API restrictions.
4.9.1 Steps to Create Map Custom Fields button
-
Navigate to Object Manager:
-
Go to "Setup" within your Salesforce instance.
-
Select "Object Manager."
-
Choose ‘Custom Field Mapping’.
-
-
Create a New Action:
-
Within the object's settings, click "Buttons, Links, and Actions."
-
Click the "New Action" button.
-
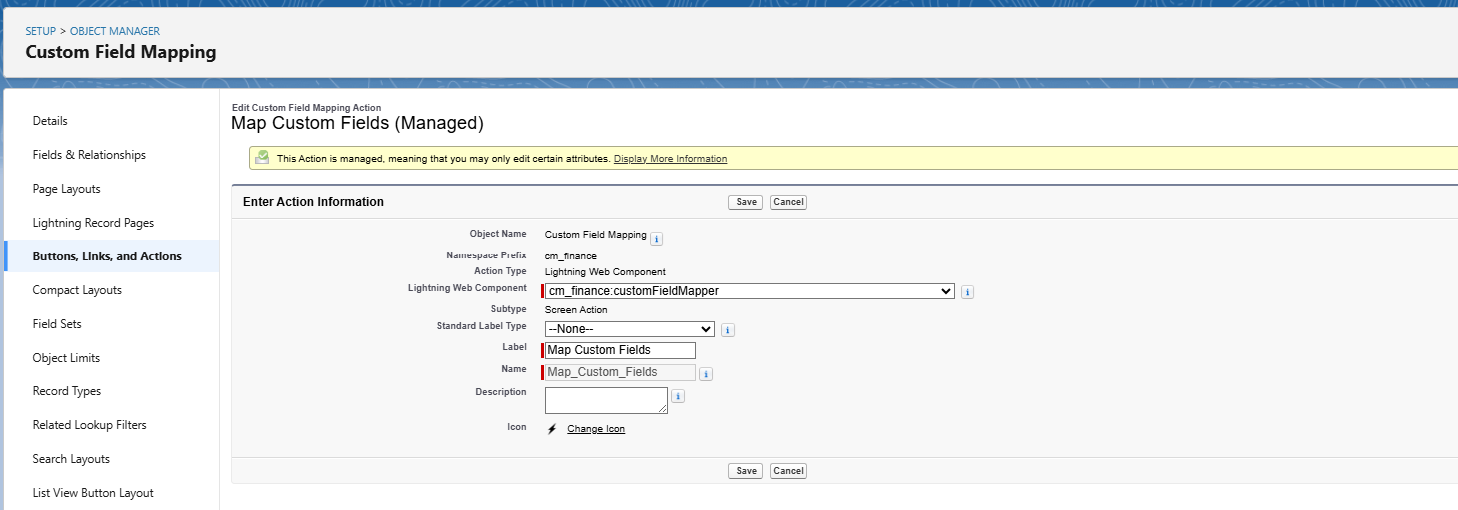
Configure the action with the following details:
-
Action Type: Select "Lightning Web Component."
-
Lightning Web Component: Enter
cm_finance:customFieldMapper. -
Label: Enter "Map Custom Fields"
-
-
Click "Save."
-
-
Add the Button to the Page Layout:
-
Navigate back to the selected object's settings.
-
Click "Page Layouts."
-
Select the page layout where the button needs to be added.
-
Locate the "Map Custom Fields" button within the "Mobile & Lightning Actions" or "Buttons" section.
-
Drag and drop the "Map Custom Fields" button onto the desired location on the page layout.
-
Click "Save."
-
The administrator must create the Custom Field Mappings for the appropriate parent object record, enabling users to use QuickBooks integration.
5. Configure Custom Field Mappings
Customize field mappings to align with business requirements and facilitate data synchronization between Salesforce and QuickBooks.
For detailed Mappings Information, Click Here.