
Cloud Maven’s Secure Email solution integrates seamlessly with Paubox to allow Salesforce users to send and receive HIPAA-compliant encrypted emails directly from within Salesforce.
This Post-Installation Guide walks administrators through the configuration steps required after installing the package.
Please ensure that you have the appropriate Salesforce administrative privileges before proceeding with the installation and configuration process.
Click here to Discover the full range of features offered by the Secure Email
2. Intended Users
-
Salesforce Admins – Responsible for setup and configuration
-
End Users – Business users who use Secure Email for exchanging secure emails.
-
Developers – Those integrating with external systems.
3. Prerequisites
3.1 System Requirements
Salesforce Professional, Enterprise, Unlimited, or Developer Edition
Required Salesforce permissions (System Admin access)
3.2 User Roles & Permissions
Admin Access – Required for installation and configuration
4. Installation
5. Post Installation Steps
5.1 Assign Licenses to Intended Users
Every user who needs to access Secure Email must be assigned a license. A license determines the baseline set of features available to that user.
Steps:
-
Click on Gear(⚙️ ) icon → Select Set up--> Quick Find Installed Packages
-
Find Paubox Secure Email under Installed Packages.
-
Click Manage Licenses.
-
From here, you can:
-
Add Users → Assign licenses to new users.
-
Remove Users → Revoke licenses from users who no longer need access.
-
💡 Tip: Always assign licenses only to those users who will actively send/receive secure emails to avoid license wastage.
5.2 Assign Required Permission Set
Permission Sets extend user capabilities beyond their profile. For Secure Email, the CM-Secure Email Permission Set is required.
Steps:
-
Navigate to Setup → Permission Sets.
-
Open CM-Secure Email Permission Set.
-
Click Manage Assignments → Add Assignments.
-
Select the intended users → Assign → Save.
Users now have the required permissions to access Secure Email functionality.
5.3 Remote Site Settings
-
Click on Gear(⚙️ ) icon → Select Set up--> Quick Find Remote Site Settings
-
Create an Entry for URL: https://api.paubox.net if it doesn’t exists.
-
Make it Active & Save.
5.4 Enable Secure Email Feature (Protected Setting)
-
Now, Go to Custom Settings and Click on Manage of “Features Entitlement“.
-
Mark the checkbox true for Secure Email.
In case we do not have the backend access, you can run the below code snippet to enable the feature since it is protected setting.
cmsecureemail.AdminUtilityServices.enableSecureEmailFeature(true);
5.5 Update Credentials (Protected Settings)
5.5.1 Domain Activation
-
Email support@cloudmaveninc.com with your sending domain (e.g.,
@yourcompany.com). -
Cloud Maven will activate your domain in Paubox.
5.5.2 DNS Verification
Update DNS records on your domain host:
-
SPF Record
-
Host: Your domain
-
Value:
v=spf1 include:_spf.paubox.com -all
-
⚠️ Without this, Paubox will reject outbound emails.
5.5.3 Generate API Key
-
Log into Paubox Portal.
-
Select your domain → Click Add API Key.
-
Save the key securely.
5.5.4 Update Credentials in Salesforce Org
After domain verification, add API credentials.
Run this in Execute Anonymous:
cmsecureemail.AdminUtilityServices.createPauBoxCredentials(<instanceName>,<apiKey>,<username>);
-
instanceName:TestorProduction -
apiKey&username: Provided by Cloud Maven
5.5.5 Enforce Paubox Portal
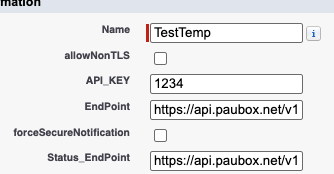
If you want to enforce the use of the Paubox Secure Portal for every Secure Email message, enable the Force Secure Notification setting in the Paubox Credentials configuration.
Setting:
-
Force Secure Notification (
forceSecureNotification)
When this setting is enabled, all Secure Email messages are delivered through the Paubox Secure Portal, regardless of whether they would otherwise qualify for direct encrypted delivery.
5.6 Update Custom Settings
Go to Custom Settings > Data Transfer Settings and create the following entries:
-
API Connection: Test/Production
-
Possible Error Status: soft bounced,soft bounced - mailbox full,hard bounced,Internal error. Please check back later
-
Enable Dynamic Template: set to true
-
SObject Name Inbox: Field API used as parent display name in inbox.
5.7 Create a Send Secure Email Button
-
Click on Gear(⚙️ ) icon → Select Set up--> Object Manager → Search for Source Object
-
Navigate to Buttons, Links, and Actions.
-
Click New Action and configure:
-
Action Type: Lightning Component
-
Component:
cmsecureemail:sendSecureEmailAura -
Height: 450px
-
Label: Send Secure Email
-
This makes the Secure Email component accessible from the record page.
5.8 Update Page Layouts
-
Click on Gear(⚙️ ) icon → Select Set up--> Object Manager → Search for Source Object
-
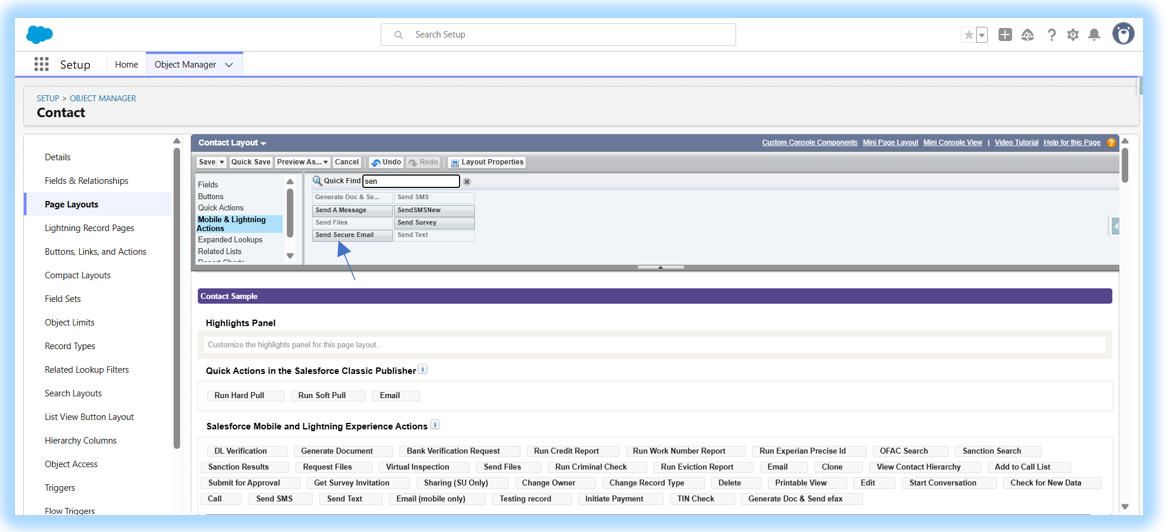
Go to Page Layouts. Open the Layout to update.
-
Drag Send Secure Email into Mobile & Lightning Actions.
-
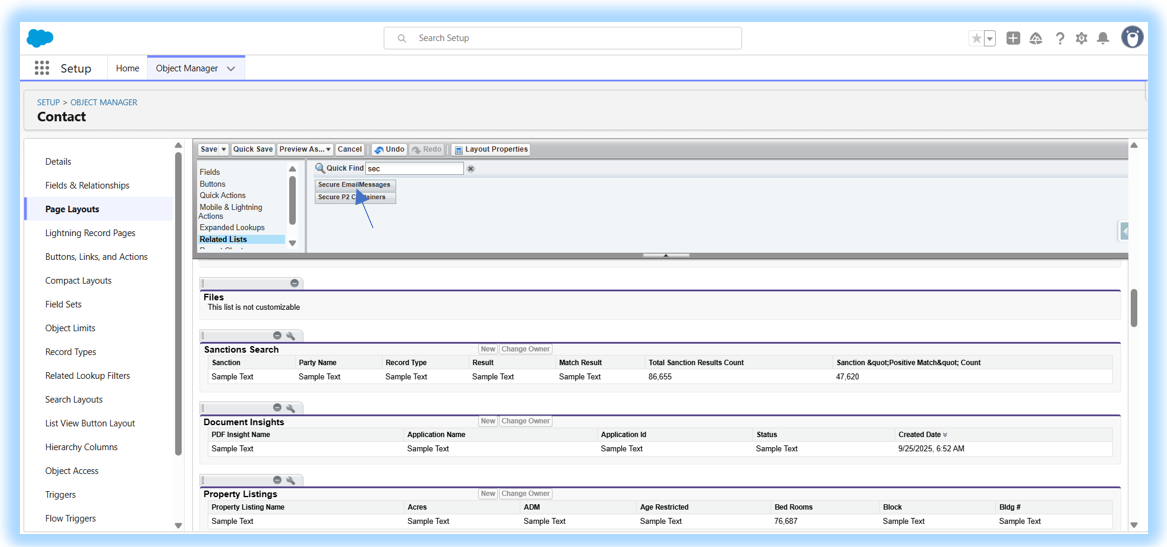
Add Secure EmailMessages related list to track encrypted communications. Make sure to add atleast 6-8 fields while adding the related list sorting them in descending order of the CreatedDate.
-
Make sure to have the below fields:
-
From Address
-
Recipients
-
Subject
-
Email Status
-
CreatedDate (Order by DESC)
-
5.9 Connect Source Object with Secure EmailMessage
For objects other than Contact, Account, or Lead:
-
Check if a lookup relationship exists between Secure EmailMessage and the Source Object.
-
If not:
-
Create a new lookup field on Secure EmailMessage.
-
Use a Flow to auto-populate this lookup whenever an email is sent from the Source Object.
-
5.10 Update Custom Metadata : Email Configuration
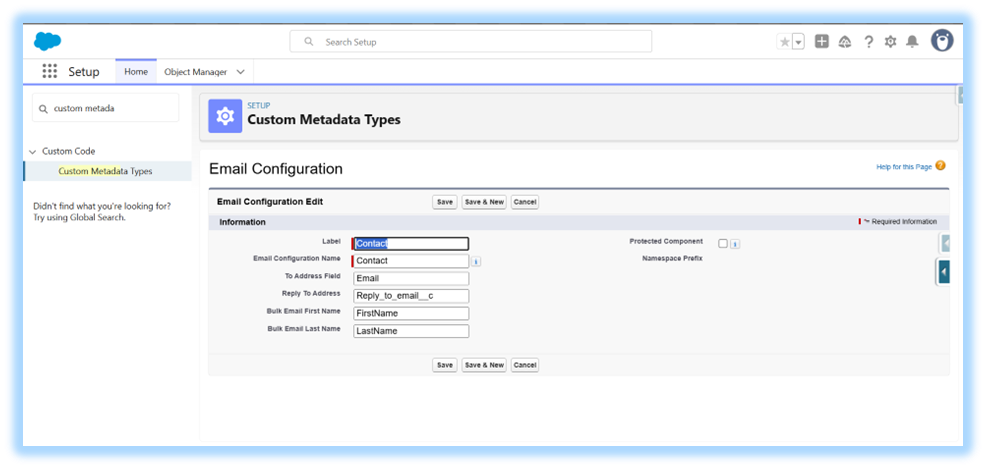
This is required to auto populate To Address on the Send Secure Email Component
-
Go to Setup → Custom Metadata Types → Email Configuration.
-
Create a new Entry. Set the Label as the Object Name API
-
Map the Source Object’s email field(s) with the Secure Email “To” field.
5.11 Enable Multiple To Address Mapping (Optional)
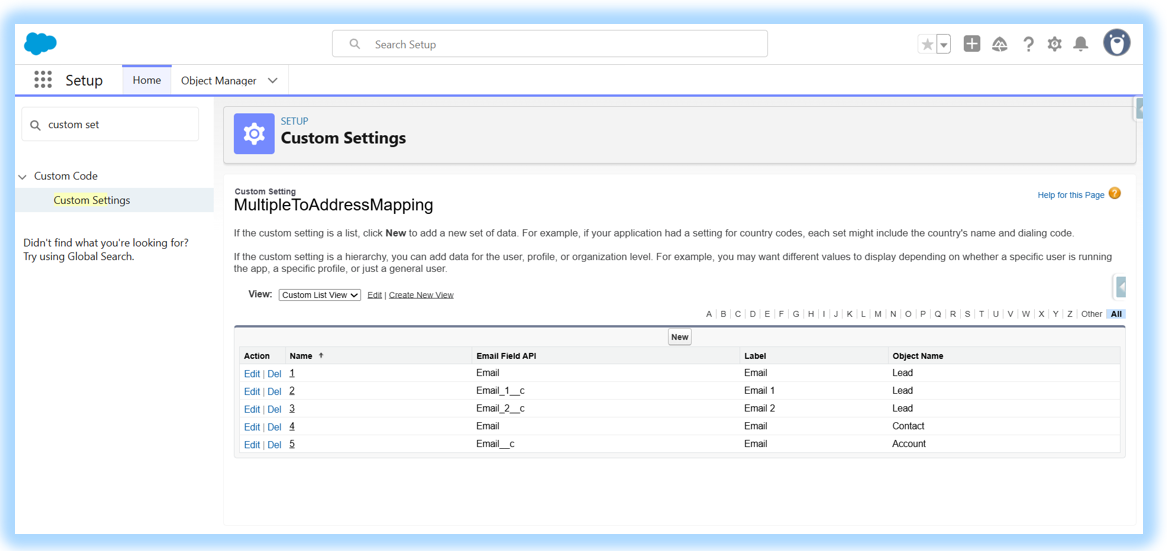
This allows users to select from multiple email fields when sending the Secure Email
-
Navigate to Setup → Custom Settings → MultipleToAddressMapping → Click manage
-
Click New Entry → Map additional email fields from the Source Object.
5.12 Create Lightning Email Templates
Setup Lightning Email Templates
5.13 Flow to Refresh Email Status
Create a Record-Triggered Flow on Secure EmailMessage:
-
Trigger: When record is Created or Updated.
-
Scheduled Path: 1 hour before Next Run Time.
-
Condition: Email Status = Processing.
-
Action: Call Invocable Apex
cmsecureemail__InvocableUpdateEmailDeliveryStatus, passing the record Id.
This ensures email status (Delivered, Bounced, etc.) is kept up to date.
5.14 Steps to enable Secure Portal Delivery
-
Login to the Subscriber Org from the backend.
-
Go to Setup--> Custom Settings –> Paubox Credentials
-
Click Manage against the environment you want to make a change.
-
Check the checkbox forceSecureNotification
-
Click Save
5.15 Flow to update the Lookup on Secure Email Message Record
Populate a Custom Lookup via Fast Field Update
5.15 Batch Job for Status Updates
BatchPullSecureEmailStatus: Batch to Get Latest Status of Secure Email
6 Inbound Functionality Setup
Click here to view more details
6.1 Create an Organisation-Wide Email Address
-
Navigate to Setup → Organisation-Wide Addresses → Add.
-
Verify the email.
-
Use only the OWEA for inbound routing.
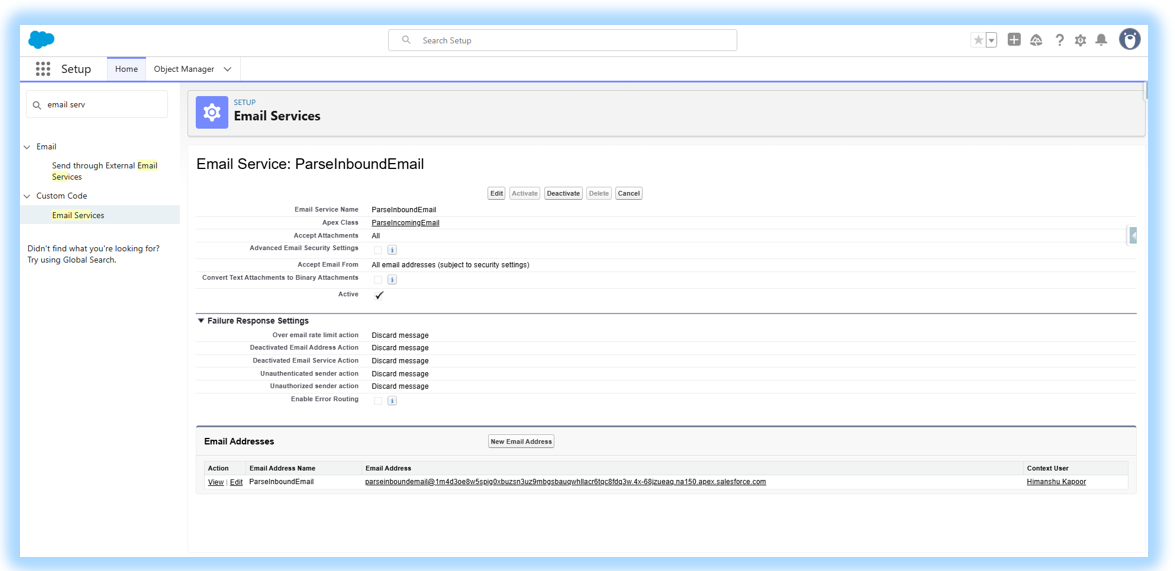
6.2 Create Email Service
-
Navigate to Setup → Email Services → New.
-
Enter details → Save → Create new Salesforce-generated email address.
6.3 Forwarding Rule
-
Forward all inbound messages from the Org-Wide Email Address to the Salesforce-generated email address.
📥 Now, all replies to secure emails will be captured inside Salesforce.
7. Inbox Setup
How to initiate the Secure Email via Paubox portal
🎉 Congratulations!
You have successfully completed the Secure Email Post-Installation steps:
-
Licenses assigned
-
Permissions applied
-
Buttons and layouts configured
-
API domain verified
-
Inbound routing enabled
-
Status updates automated
Your Salesforce org is now ready for seamless, HIPAA-compliant secure communications.