
Introduction
Secure File Transport is a native Salesforce AppExchange application that lets users securely send and receive files directly inside Salesforce, without passwords, PINs, logins, or external apps.
The P2 Container feature extends Secure File Transport with a container-based exchange: a single secure container can carry multiple push (send) and pull (request) items in one session with the end user, with status tracked back into Salesforce via webhooks.
Intended Users
-
Salesforce Admins – Responsible for setup and configuration.
-
End Users – End users who receive/upload files.
-
Salesforce Users – Responsible for requesting or sending files to end users.
Prerequisites
System Requirements
-
Salesforce Professional, Enterprise, Unlimited, or Developer Edition
-
Secure File Transport managed package installed (see Section 4)
-
A BotDoc account with an API key and a registered email per profile/business unit
User Roles & Permissions
-
Admin Access – Required for installation and configuration
-
Author Apex permission – Required to run the setup scripts in the Developer Console
-
Access to Setup → Sites and Domains to expose the webhook endpoint
Installation
Post-Installation Setup
Assign the License
Every user must be assigned a user license to access the App Secure File Transport . A user's license determines the baseline of features that the user can access.
-
Navigate to Setup.
-
Use the Quick Find or Search Setup box to search for and select the specific user requiring the Secure File Transport license.
-
Click on the user's name to access their detailed user record.
-
Scroll down the user detail page to locate the "Managed Packages" related list.
-
Click the "Assign Licenses" button associated with the "Managed Packages" section.
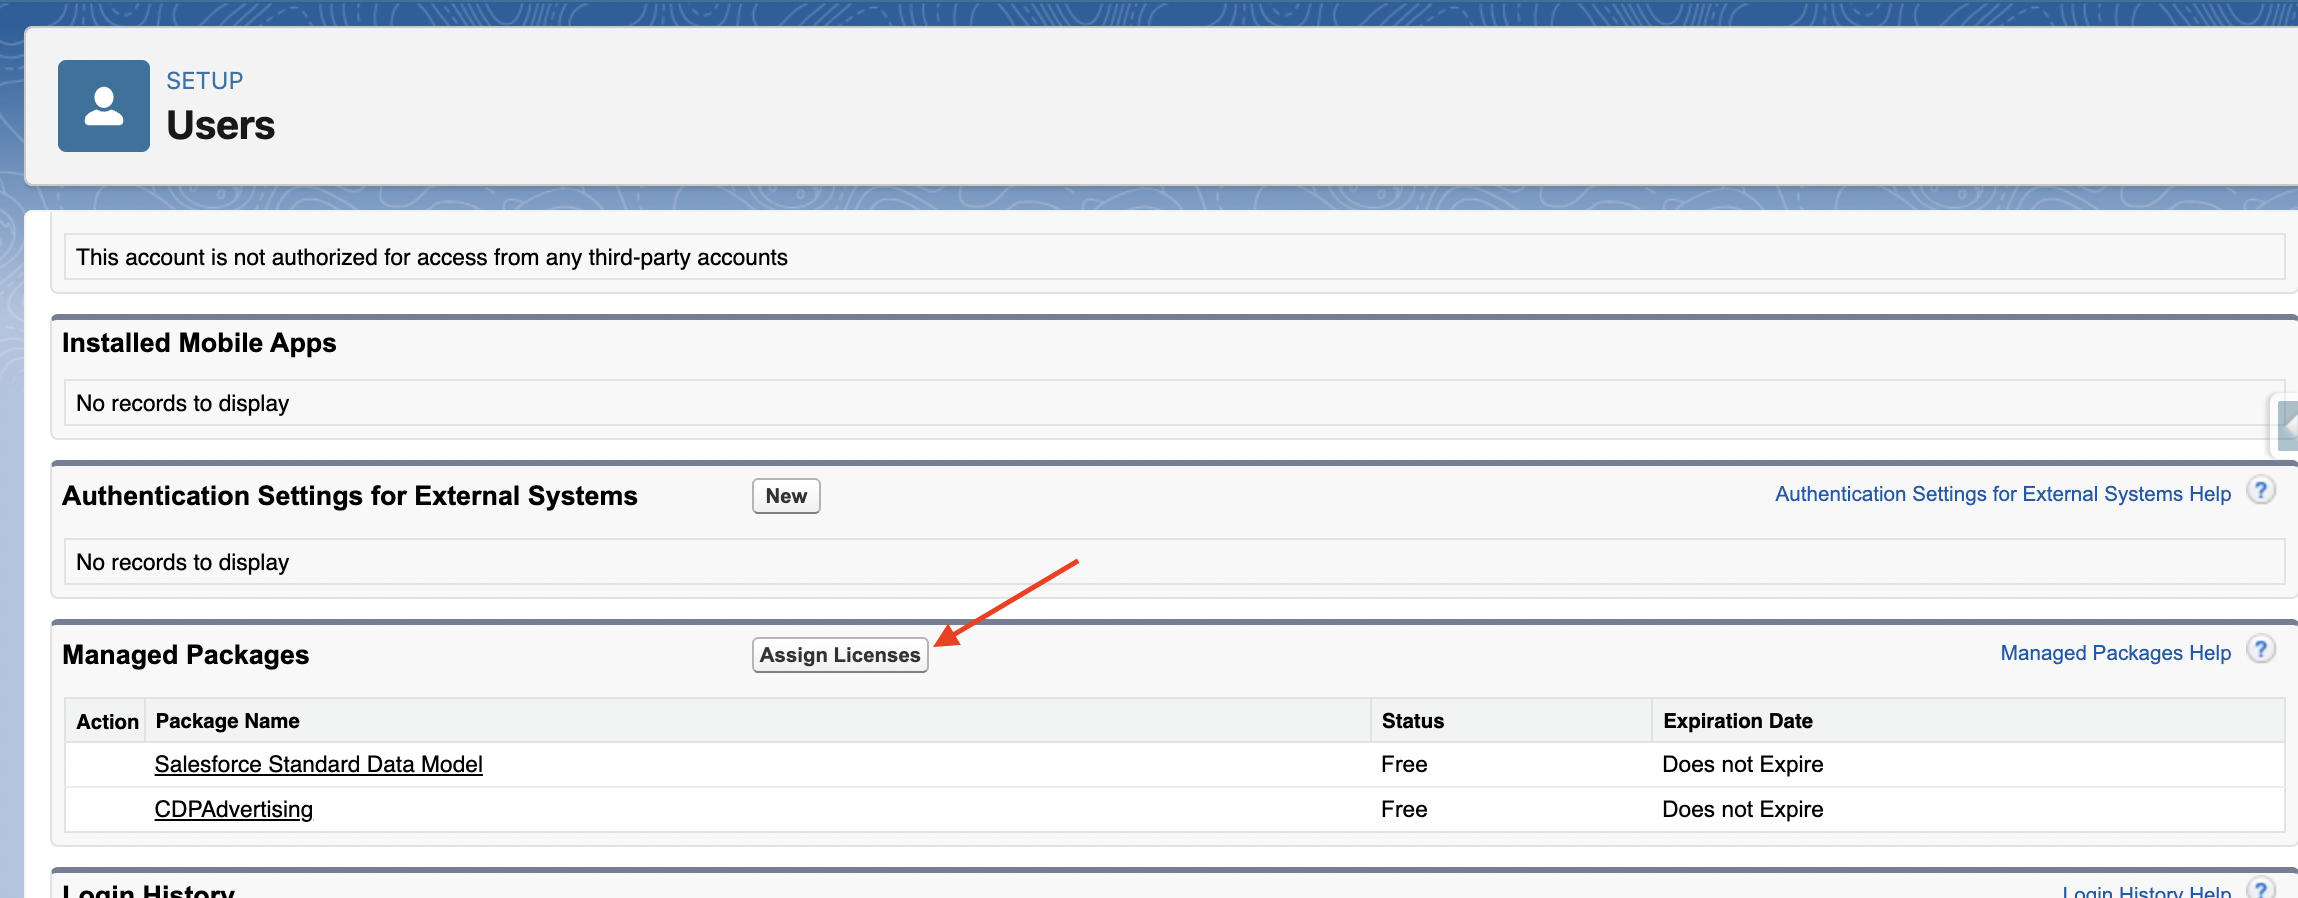
-
Click the "Add" button to assign the selected "Secure File Transport" license to the user.
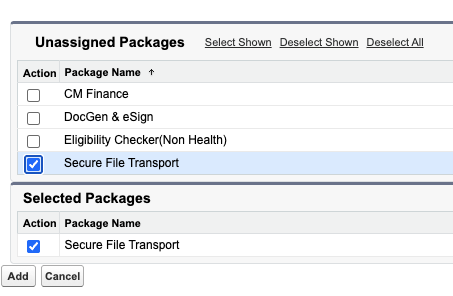
Assign the Required Permission Set
-
Navigate to Setup.
-
Use the Quick Find box to search for "Permission Set".
-
Locate the "Cloud Maven's - SFT - P2 Permissions" permission set from the list.
-
Click on "Manage Assignments".
-
Assign the permission set to the relevant users.
Enable the P2 Feature
The P2 feature is disabled by default and must be switched on per org.
-
Open the Developer Console.
-
Go to Debug → Open Execute Anonymous Window.
-
Run:
cm_datatransfer.AdminUtilityServices.enableP2Feature(true);
-
Confirm the execution completed successfully in the log.
Source Object Field Mapping
This setting will be used to auto-populate the P2 Request form with the values from the Source Object. Make an entry in this setting to Map the Field of Source Object(Account, Contacts any Standard or Custom Object) with required parameters.
-
Click on the Gear Icon and go to setup.
-
Search for Custom Setting in Quick Find Box.
-
Click on Manage of “File Request Field Mappings”.
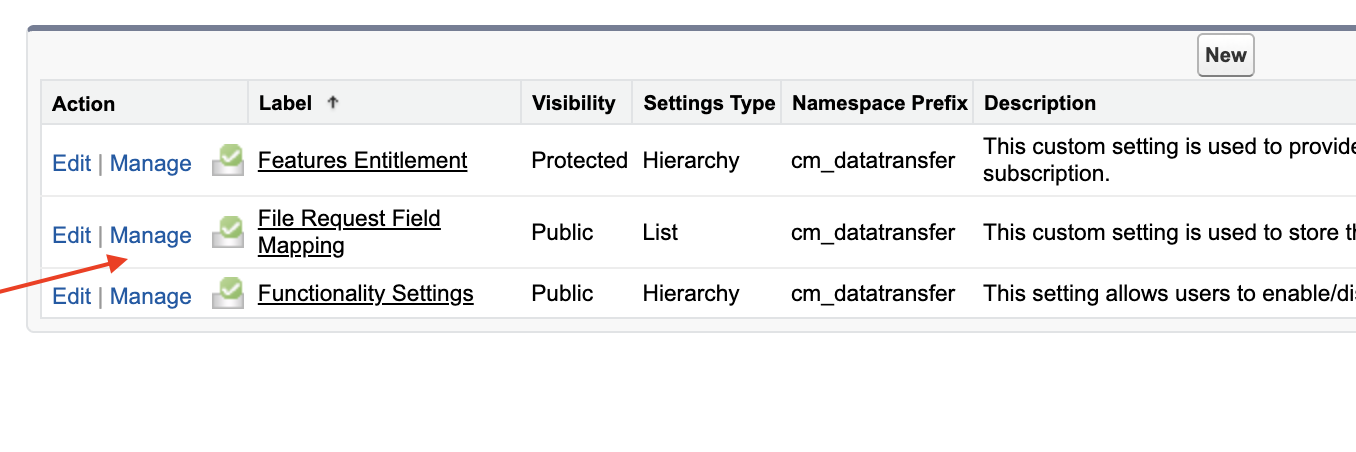
-
Create below Entries for P2 Request Type:
-
First Name
-
Last Name
-
Phone
-
Email
-
-
Click on New to Create New Entry for Pull Request.
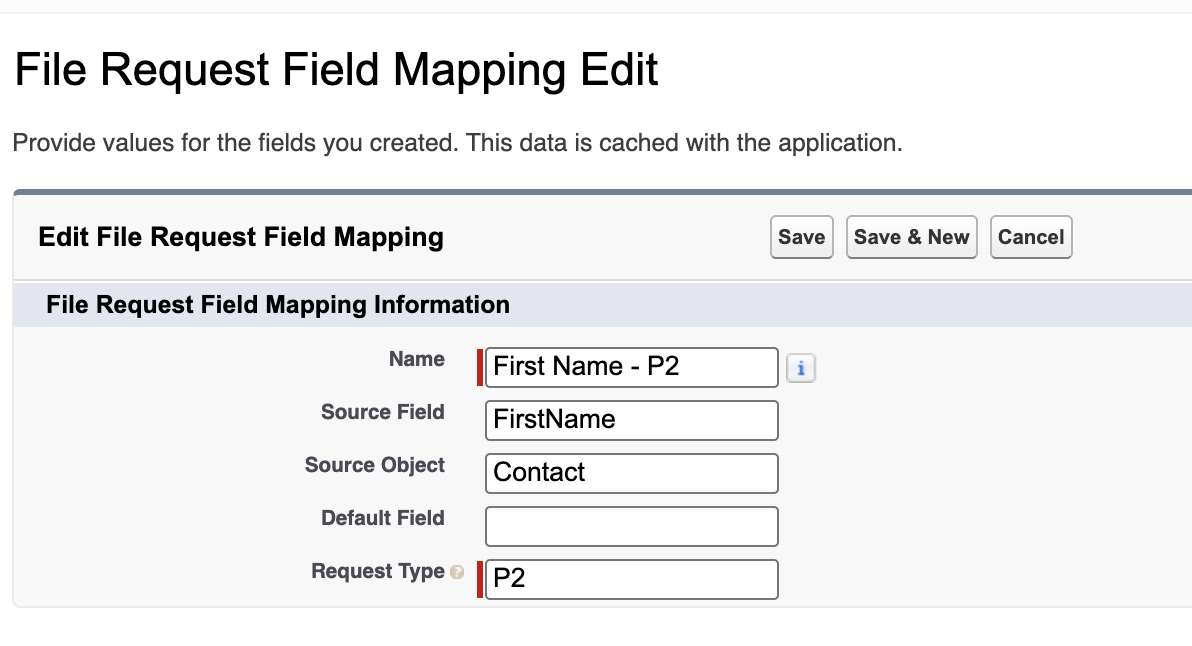
Note: Similarly complete the entries for the above-mentioned fields.
Configure the Common Settings
Navigate to Setup -> Custom Settings -> Data Transfer Settings
Update the below fields as per Requirement
-
RequestByEmail
-
True if request to initiate a P2 container is made using Email
-
-
RequestByPhone
-
True if request to initiate a P2 container is made using SMS
-
-
TfaMethod
-
Method to receive the
-
Two-factor authentication Code.
-
Populate the Value with SMS or Email
-
-
TfaRequired
-
True if Two-factor Authentication is Required
-
-
ErrorBatchMessages
-
time,Unavailable,Bad,reset,Server,error,failed
-
-
P2StatusNextRunTime
-
Provide the time-frequency to run the batch that updates the container Status.
-
It only picks the Secure P2 Container records that are in Sending status and Created in Last 50 Days
-
For Example - If you want the batch to run in every 2 minutes, Populate the value field with 2.
-
Insert BotDoc Credentials for Profiles
Run the below script to enter the credentials for BotDoc
cm_datatransfer.AdminUtilityServices.saveBotDocP2Credentials(
    <env_name>, <api_key>, <email>, <endpoint>, <iframeURL>
);
(Optional) P2 also can stores credentials per profile, so that each profile picks up its own email + API key combination when connecting to BotDoc. Run the script below once per profile:
cm_datatransfer.AdminUtilityServices.saveBotDocP2Credentials(
    <profile_name>, <api_key>, <email>, <endpoint>, <iframeURL>
);
|
Parameter |
Description |
|---|---|
|
|
Sandbox or Production |
|
|
Name of the Salesforce profile the credentials apply to. Required because P2 supports multiple keys across profiles. |
|
|
API key from the BotDoc portal |
|
|
Email address configured in the BotDoc portal |
|
|
|
|
|
|
Configure the Site to Receive Webhooks
Create a Site
-
Go to Setup → User Interface → Sites and Domains → Sites.
-
Create a new Site, or use an existing one.
Grant Apex class access to the Site User
Give the Site user access to:
-
WebhookP2Container
Grant Apex class access to the Site Guest User
Give the Site guest user access to:
-
P2FeatureTriggerHandler -
P2ContainerTriggerHandler
Note: Check the Webhook URL in the postman before storing in BOTDOC Credentials.
Update the Webhook (Callback) URL in the Credentials
For every set of credentials created in Section 5.6, run:
cm_datatransfer.AdminUtilityServices.updateCallbackURL(<profile name>, <callbackURL>);
|
Parameter |
Description |
|---|---|
|
|
Profile name or Environment used when inserting the credentials |
|
|
Built from your Site domain (see below) |
Callback URL format:
<Site Domain>/<path if present>/services/apexrest/cm_datatransfer/processP2ContainerStatus
Example (sandbox):
https://<your-org>--full.sandbox.my.salesforce-sites.com/services/apexrest/cm_datatransfer/processP2ContainerStatus
Update the Email Template in the Credentials
For every set of credentials created, run:
cm_datatransfer.AdminUtilityServices.updateEmailTemplateSlug(<profile name>, <template name>);
|
Parameter |
Description |
|---|---|
|
|
Profile name or Environment used when inserting the credentials |
|
|
Template slug from the BotDoc portal |
Combined Script: Credentials, Callback URL and Email Template
Rather than running Sections 5.6, 5.8 and 5.9 individually, use the loop below to configure every profile in one execution. Replace the profile list with the profiles in your org.
List<String> listProfiles = new List<String>{
    'Profile Name 1',
    'Profile Name 2',
    'Profile Name 3'
};

for(String profile : listProfiles){
    cm_datatransfer.AdminUtilityServices.saveBotDocP2Credentials(
        profile,
        <apikey>,
        <email>,
        'https://api.botdoc.io/',
        'https://apiframe.botdoc.io/chat'
    );
    cm_datatransfer.AdminUtilityServices.updateCallbackURL(
        profile,
        'https://<your-site-domain>/services/apexrest/cm_datatransfer/processP2ContainerStatus'
    );
    cm_datatransfer.AdminUtilityServices.updateEmailTemplateSlug(
        profile,
        'default-template'
    );
}
Disable Chat and iFrame (Optional)
-
Go to Setup → Custom Settings → Functionality Settings.
-
Check the following options as required:
-
DisableChat_P2iFrame
-
Disable_P2ConsumerChat
-
Configure the Batch Where Clause
This setting is used in the WHERE clause of the batch that checks the status of a P2 request and moves it from Sending to Sent.
-
Go to Setup → Custom Settings → DataTransfer Settings.
-
Click Manage → New.
-
Enter:
|
Field |
Value |
|---|---|
|
Name |
|
|
Value |
|
Set the Frequency of the P2 Container Status Batch
-
Go to Setup → Custom Settings → DataTransfer Settings → New.
-
Enter:
|
Field |
Value |
|---|---|
|
Name |
|
|
Value |
|
-
Click Save.
Schedule the Batches
Batch to update the status of the P2 Container
cm_datatransfer.BatchGetP2ContainerStatus oBatch = new cm_datatransfer.BatchGetP2ContainerStatus();
Database.executeBatch(oBatch, 1);
Batch to send Reminder Emails (As Required)
BatchP2ReminderEmail oBatch = new BatchP2ReminderEmail();
Database.executeBatch(oBatch, 1);
Create P2 Secure File Templates
Follow the steps in How to create P2 Secure File Templates.
Create P2 Request button
-
Go to Setup → Object Manager → Select the Source Object
-
Click on → Buttons, Links, and Actins → New Action.
Enter the below details and Save
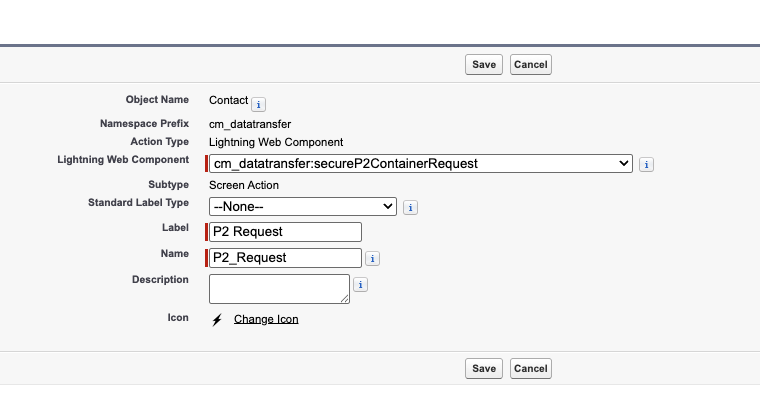
Add button to the Page Layout
-
Go to Setup → Object Manager → Select the Source Object
-
Click on Page Layouts → Select the Desired Page Layout → Mobile & Lightning Actions
-
Drag and Drop the ‘P2 Request’ button on the Page Layout
Note: You can avoid this step if the component needs to be added on the record page rather than as a button.
Add P2 Inbox on the Lightning Page
-
Go to Setup → Object Manager → Select the Source Object
-
Click on Lightning Pages → Select the Desired Page → Edit
-
Below components could be added as required:
-
displayMediaList (display All Medial Files collected)
-
secureP2ContainerRequest (initiate P2 Container Request)
-
secureP2Container (For P2 Inbox)
-
Link Container with the Source Object
-
Create Lookup of Secure P2 Container on the Source Object
-
Add the Related List on the Source Object
-
Go to Setup → Object Manager → Select the Source Object
-
Click on Page Layouts → Select the Desired Page Layout → Related Lists
-
Drag the Secure P2 Container under the Related List Sections. You can add below fields:
-
BotDoc Container ID
-
Status
-
Created date
-
Send Method
-
Recipient’s Status
-
Last Online
-
-
-
Follow the Setup guide to Create a flow to populate the Lookup based on the Parent Record Id on the Secure P2 Container record
6. Support
You have successfully installed and configured the P2 Container feature of the Secure File Transport application.
For further information or troubleshooting, please write to us at support@cloudmaveninc.com.