
Overview
This guide provides an overview of DocGen & eSign, a Salesforce-native solution for generating documents, managing electronic signatures, and securely handling completed documents. It explains the intended users, prerequisites, installation options, and post-installation configuration required to enable licensing, permissions, Salesforce Site access, signing workflows, custom settings, document actions, and workflow status tracking. The guide also links to additional instructions for creating templates, mapping Salesforce fields, configuring signers, and organizing templates into folders.
Introduction
DocGen & eSign is essentially a Salesforce-native document automation and electronic signature solution that lets your Salesforce org generate documents using Salesforce data, send them for electronic signatures, apply digital signatures and document sealing, and securely manage completed documents — all without manually creating, exchanging, or tracking documents outside Salesforce.
Click here to discover the full range of features offered by the DocGen & eSign.
Intended Users
-
Salesforce Admins – Responsible for setup and configuration.
-
End Users – Business users who make create signing links or generate documents.
-
Developers – Those integrating with external systems.
Prerequisites
System Requirements
Salesforce Professional, Enterprise, Unlimited, or Developer Edition
User Roles & Permissions
Admin Access – Required for installation and configuration
Installation
Post-Installation Setup
5.1 Assign the License to the intended users
Every user must be assigned a user license to access the App cmDocs - Document Generation and eSign . A user's license determines the baseline of features that the user can access.
-
Navigate to Setup.
-
Use the Quick Find or Search Setup box to search for and select the specific user requiring the cmDocs - Document Generation and eSign license.
-
Click on the user's name to access their detailed user record.
-
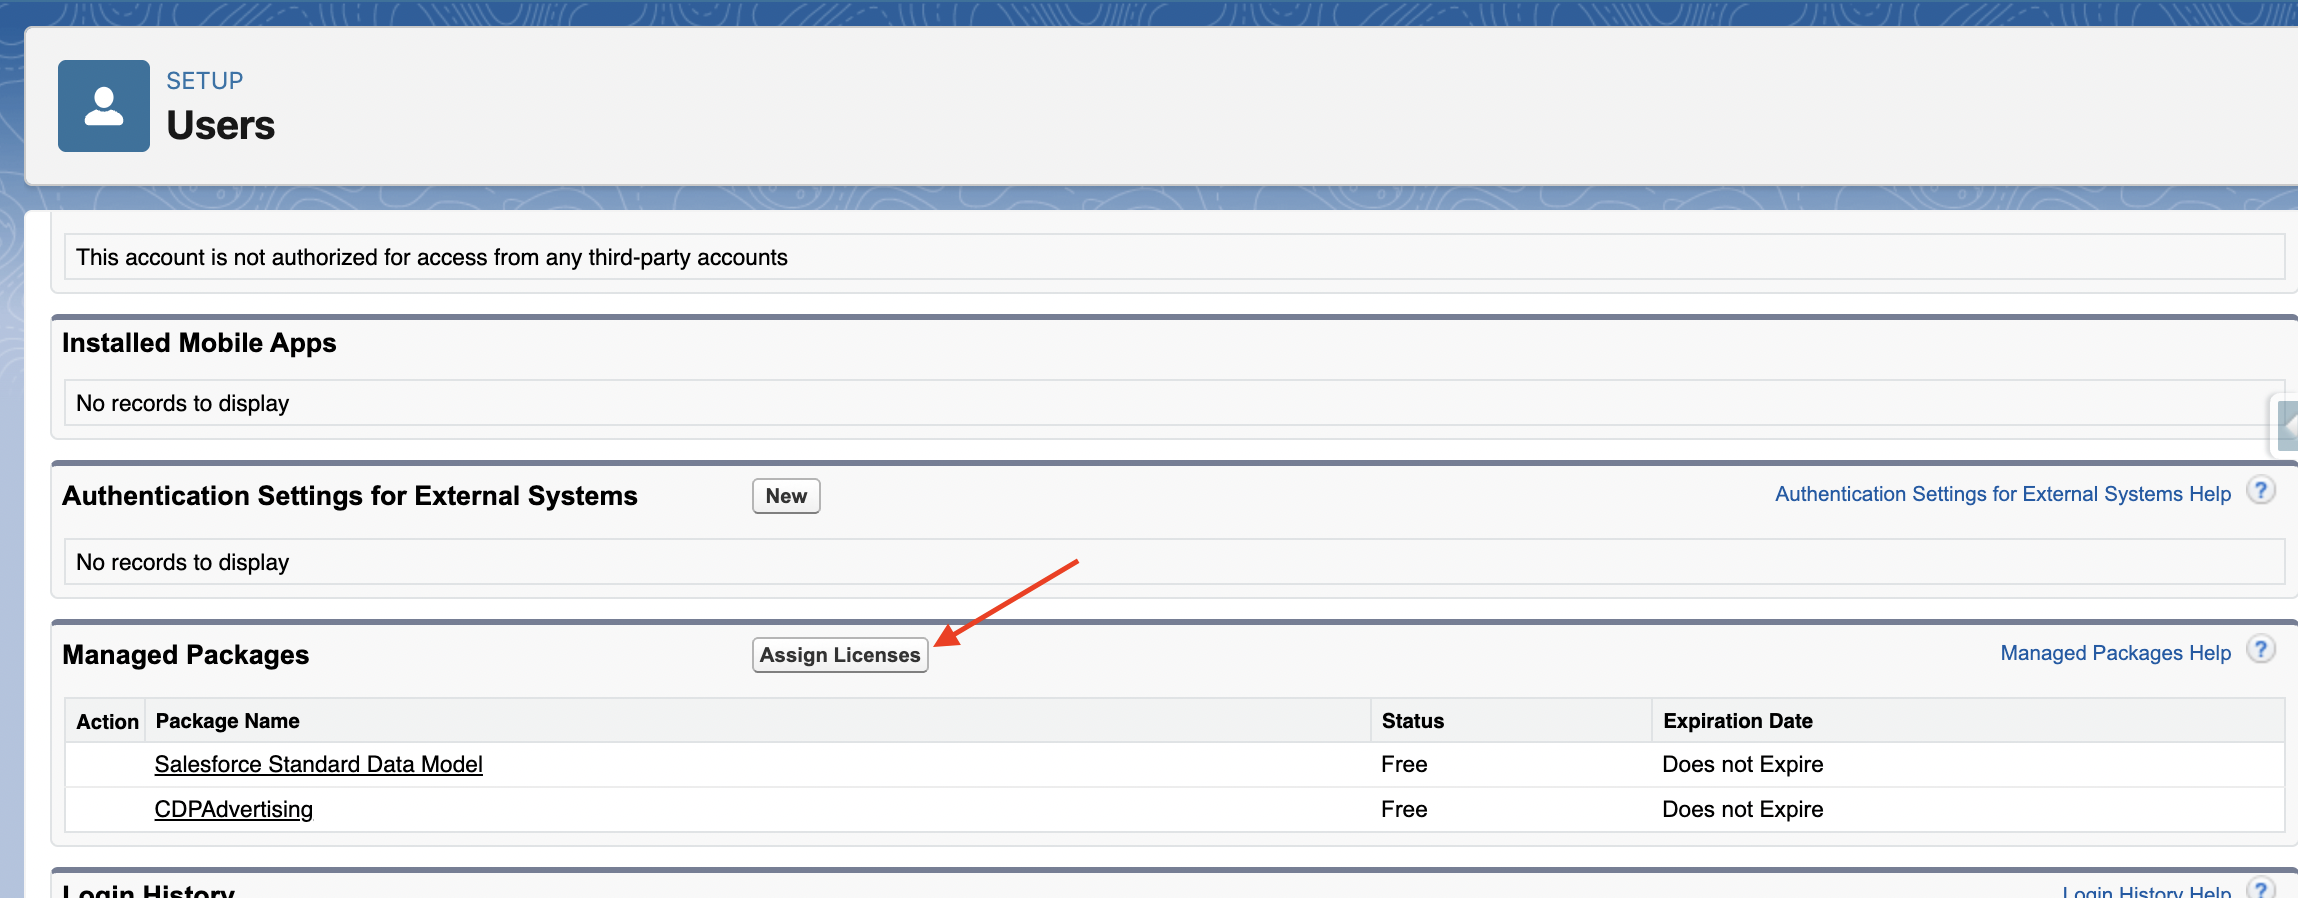
Scroll down the user detail page to locate the "Managed Packages" related list.
-
Click the "Assign Licenses" button associated with the "Managed Packages" section.
-
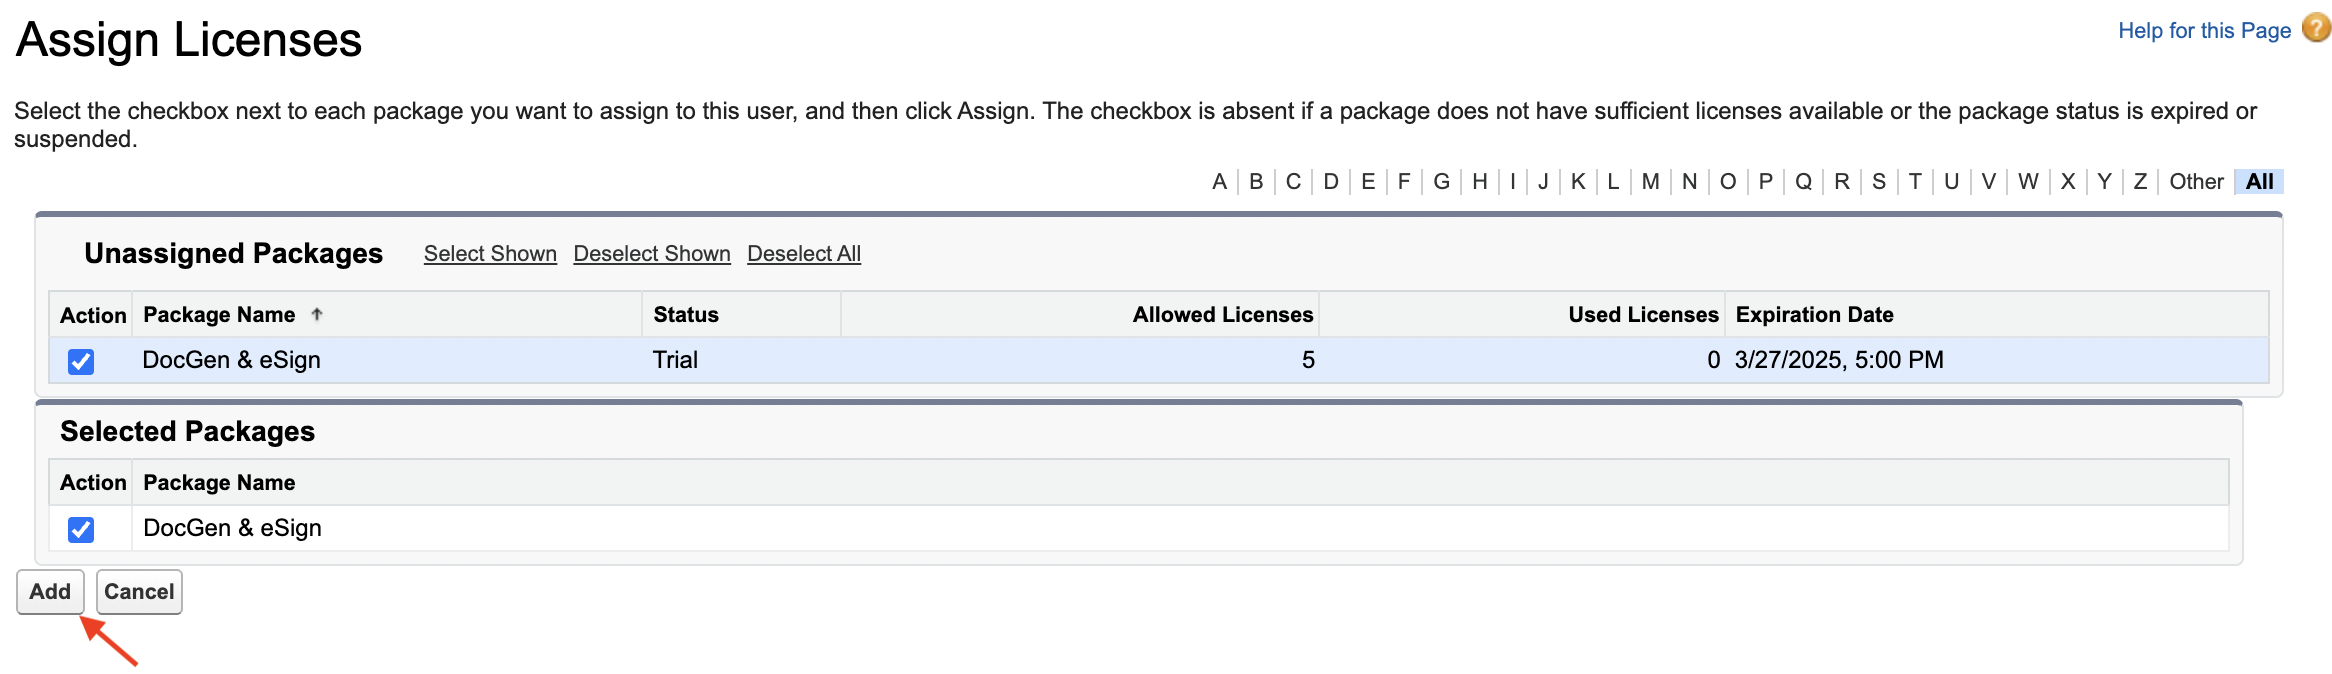
Click the "Add" button to assign the selected "cmDocs - Document Generation and eSign" license to the user.
5.2 Assign the Required Permission Set
Permission Set is assigned to users to grant additional permissions or functionality beyond their existing profile settings.
-
Navigate to Setup.
-
Use the Quick Find box to search for "Permission Set".
-
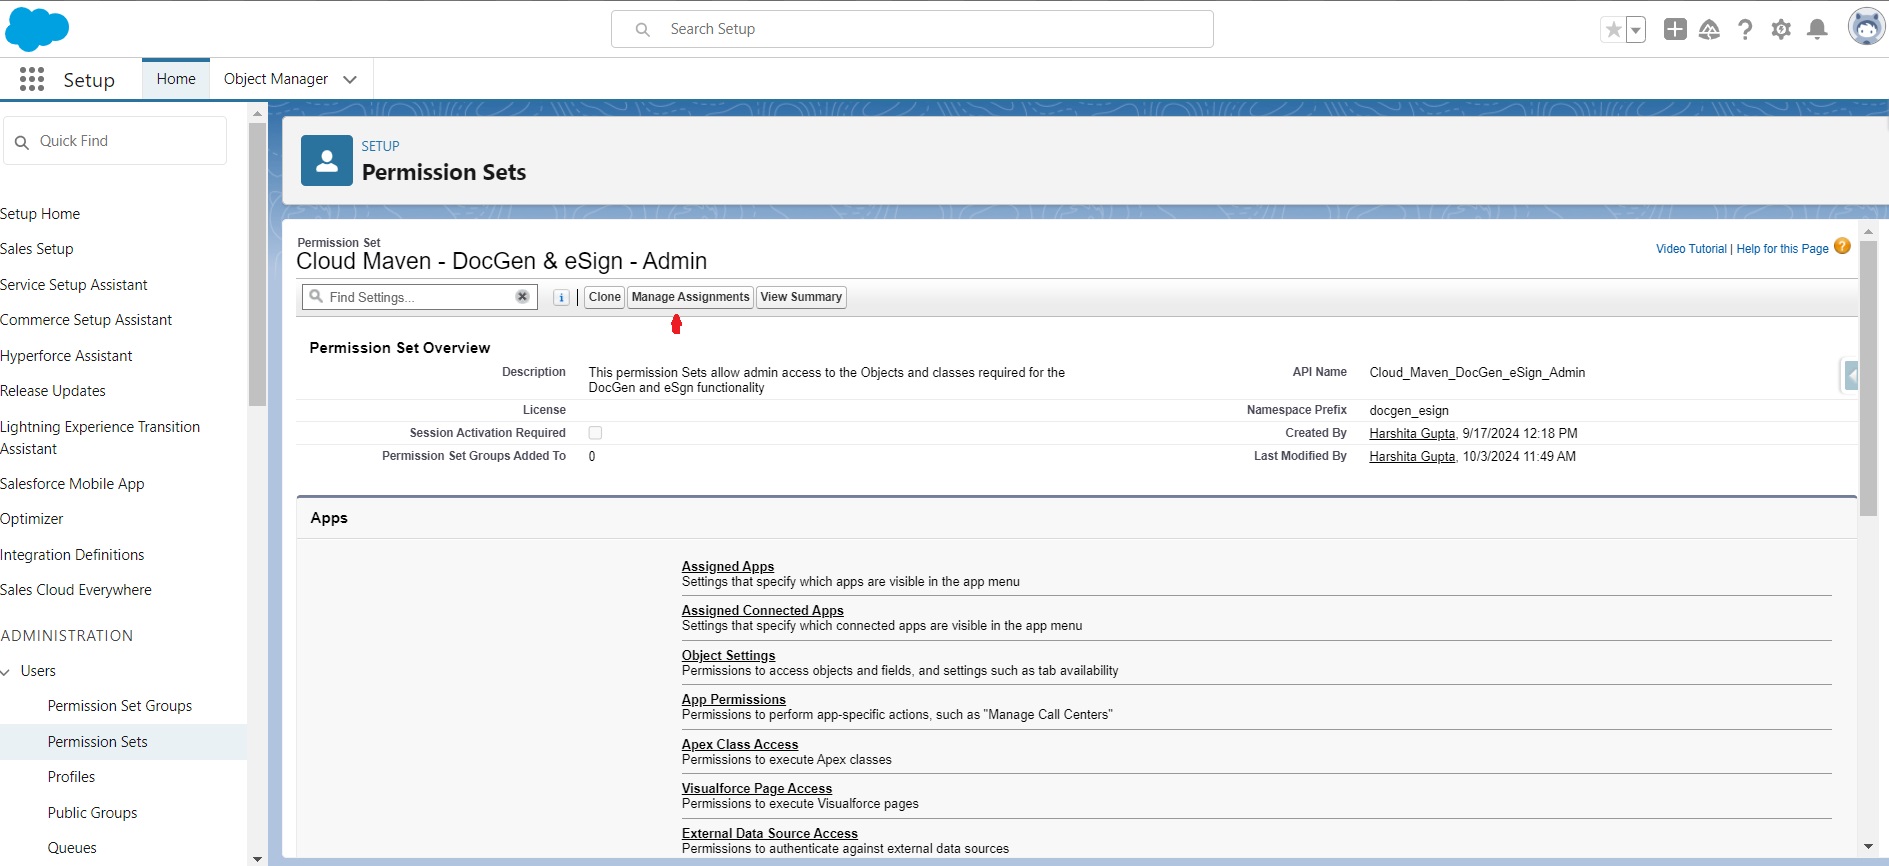
Locate the "Cloud Maven - cmDocs - Document Generation and eSign – Admin" permission set from the list.
-
Click on "Manage Assignments".
-
Assign the permission set to the relevant users.
5.3 Create a Salesforce Site
A Salesforce Site is required to securely expose specific Salesforce data and functionality through a custom web interface. It grants limited access to Site Guest Users, allowing them only to view or edit permitted data and complete actions such as signing documents electronically.
-
Navigate to Setup.
-
Use the Quick Find box to search for "Site".
-
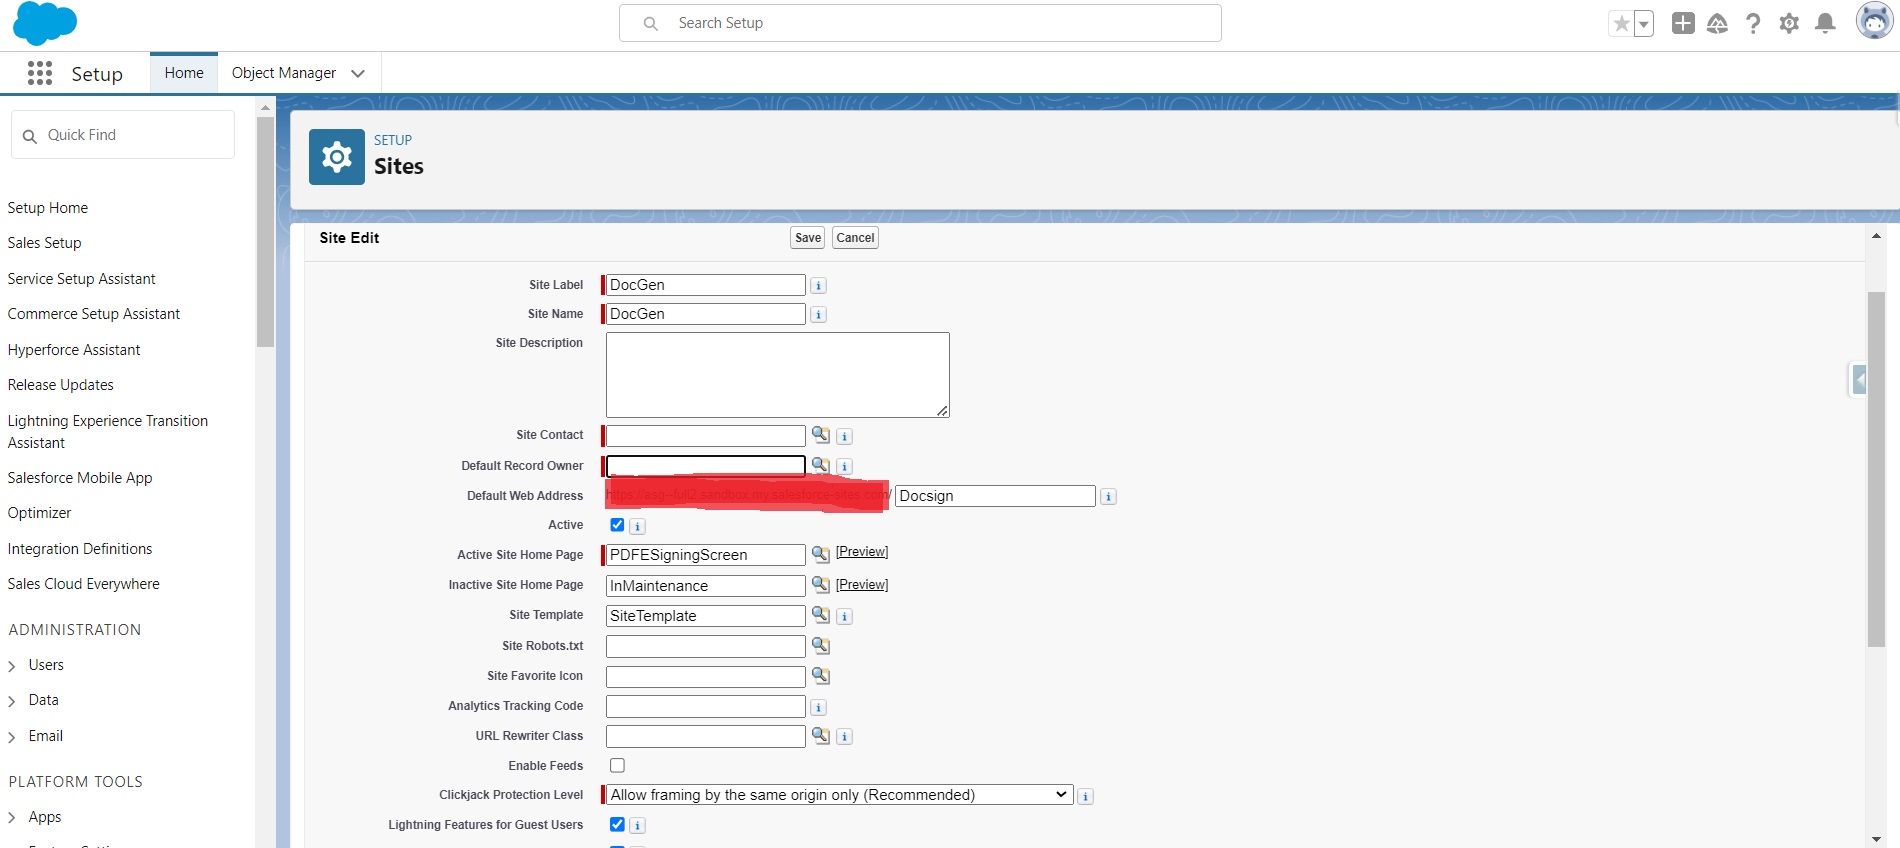
Click "New" to create a Salesforce Site.
-
Enter all required details as depicted in the provided image.
-
Click "Save".
5.4 Grant App License to Site Guest User
-
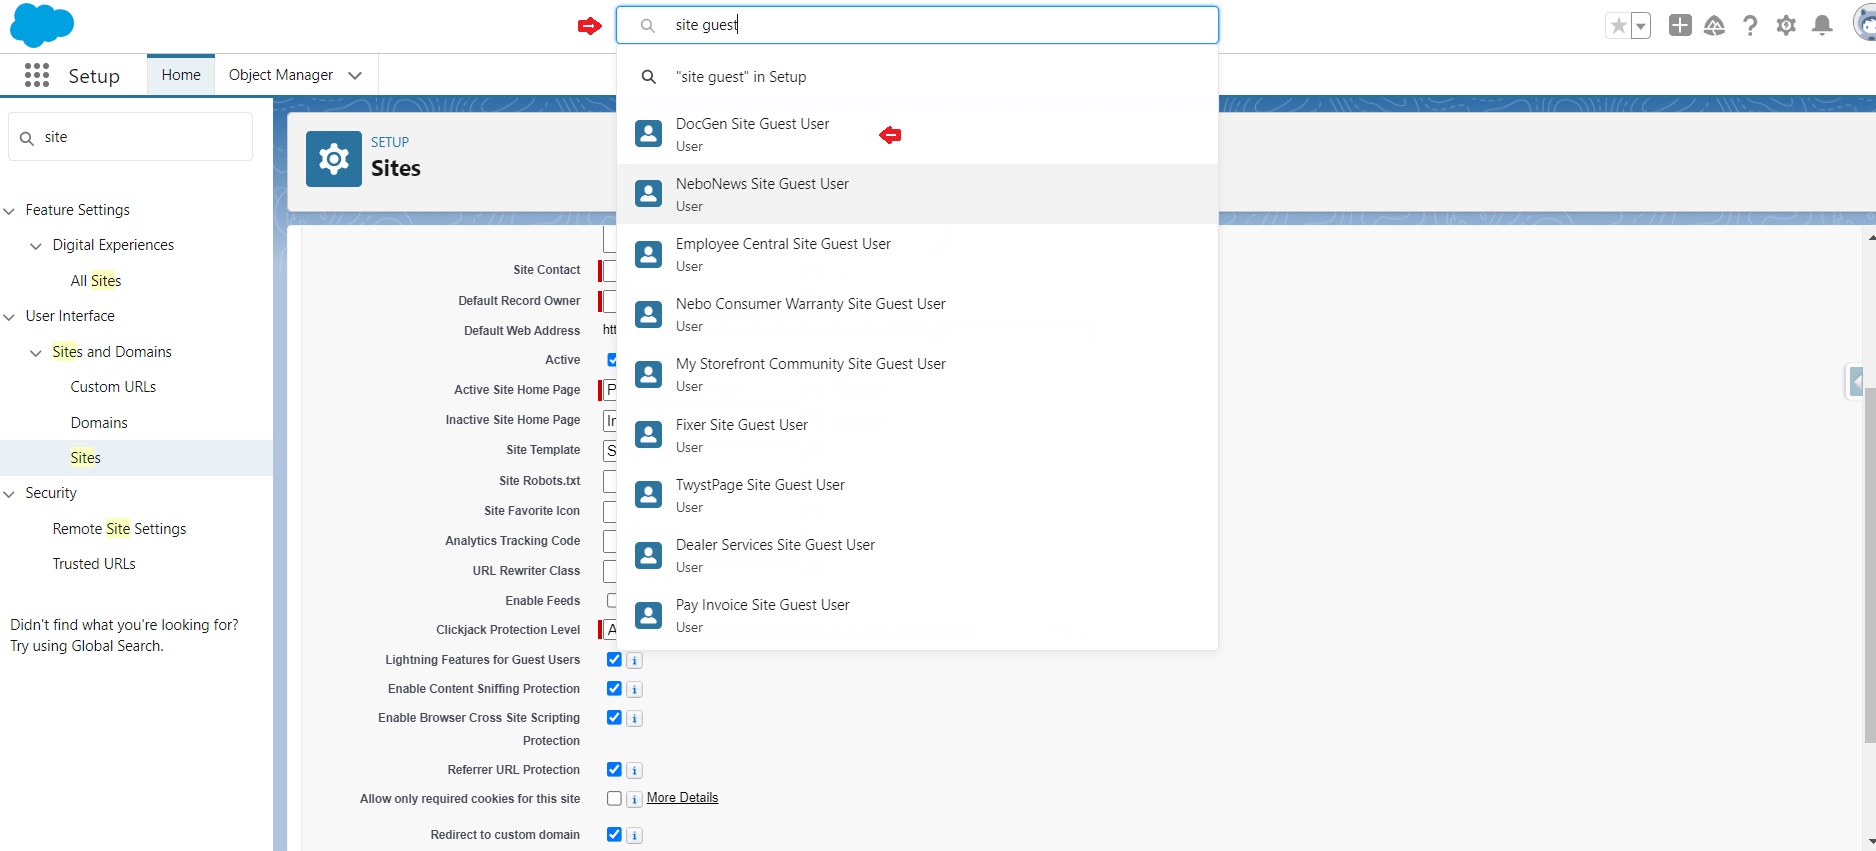
In Setup, use the global search bar to locate "<<Site Name>> Site Guest User". (Replace <<Site Name>> with the name of the site created in step 5.2.)
-
Click on the "<<Site Name>> Site Guest User" from the list.
-
Scroll down the user detail page to locate the "Managed Packages" related list.
-
Click the "Assign Licenses" button associated with the "Managed Packages" section.
-
Click the "Add" button to assign the selected "cmDocs - Document Generation and eSign" license to the user.
5.5 Grant Required Access to the Site Guest User
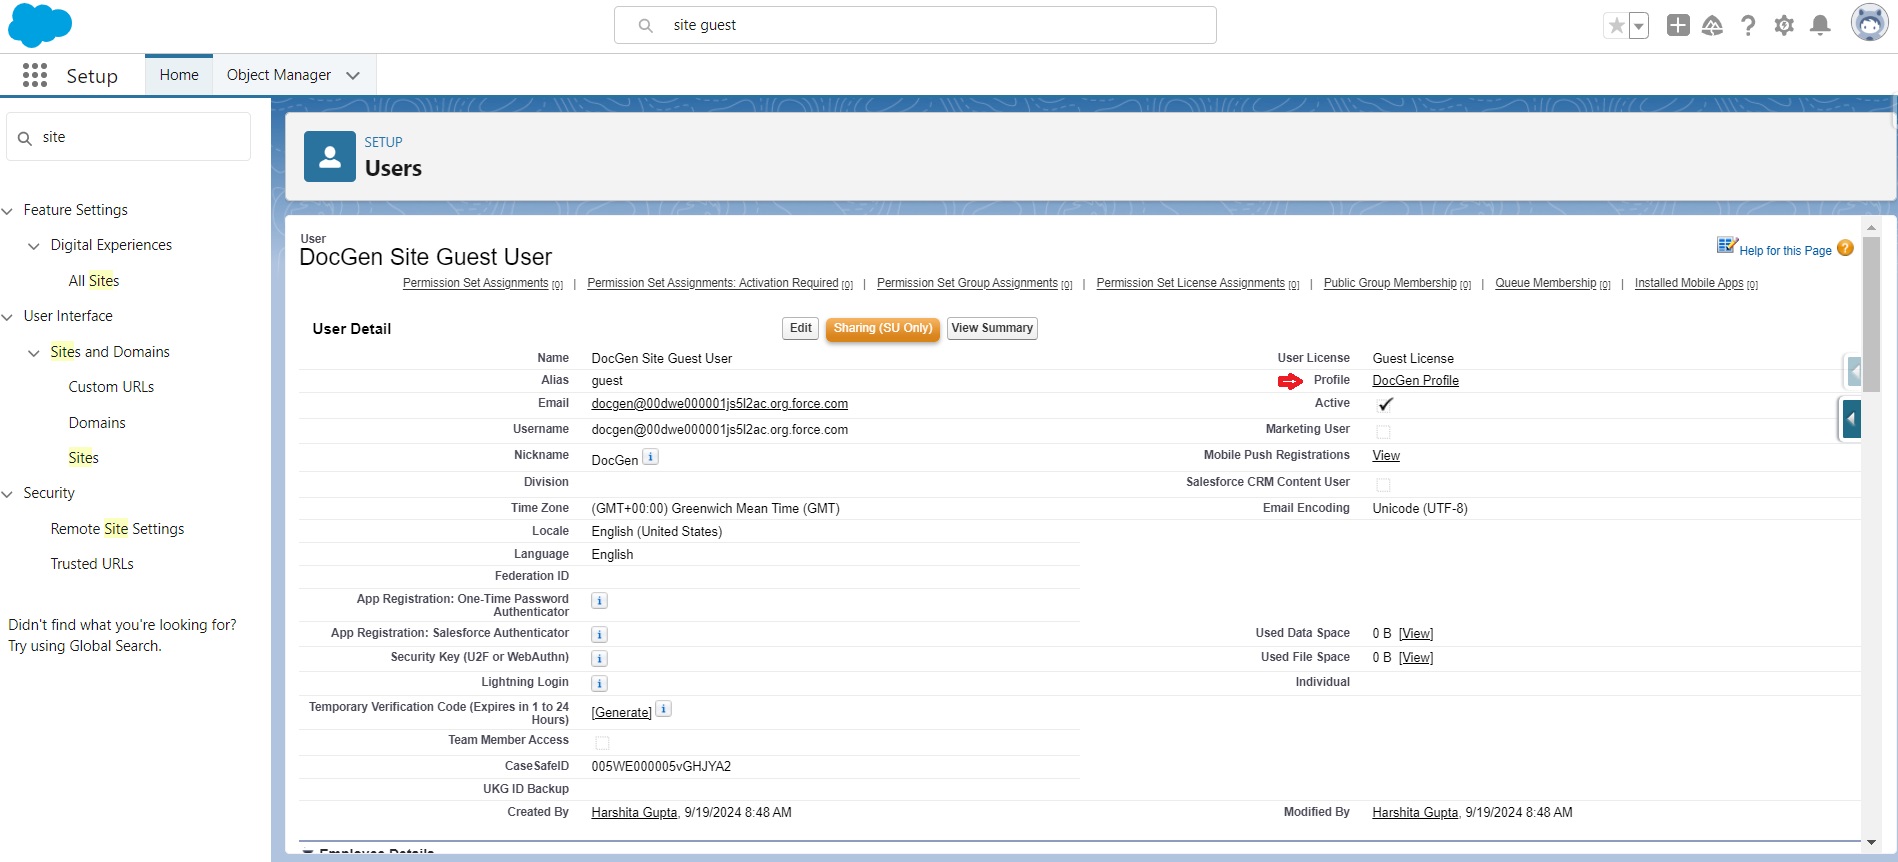
Navigate to Site Guest User Profile.
5.6 Provide access to the following Apex Classes
-
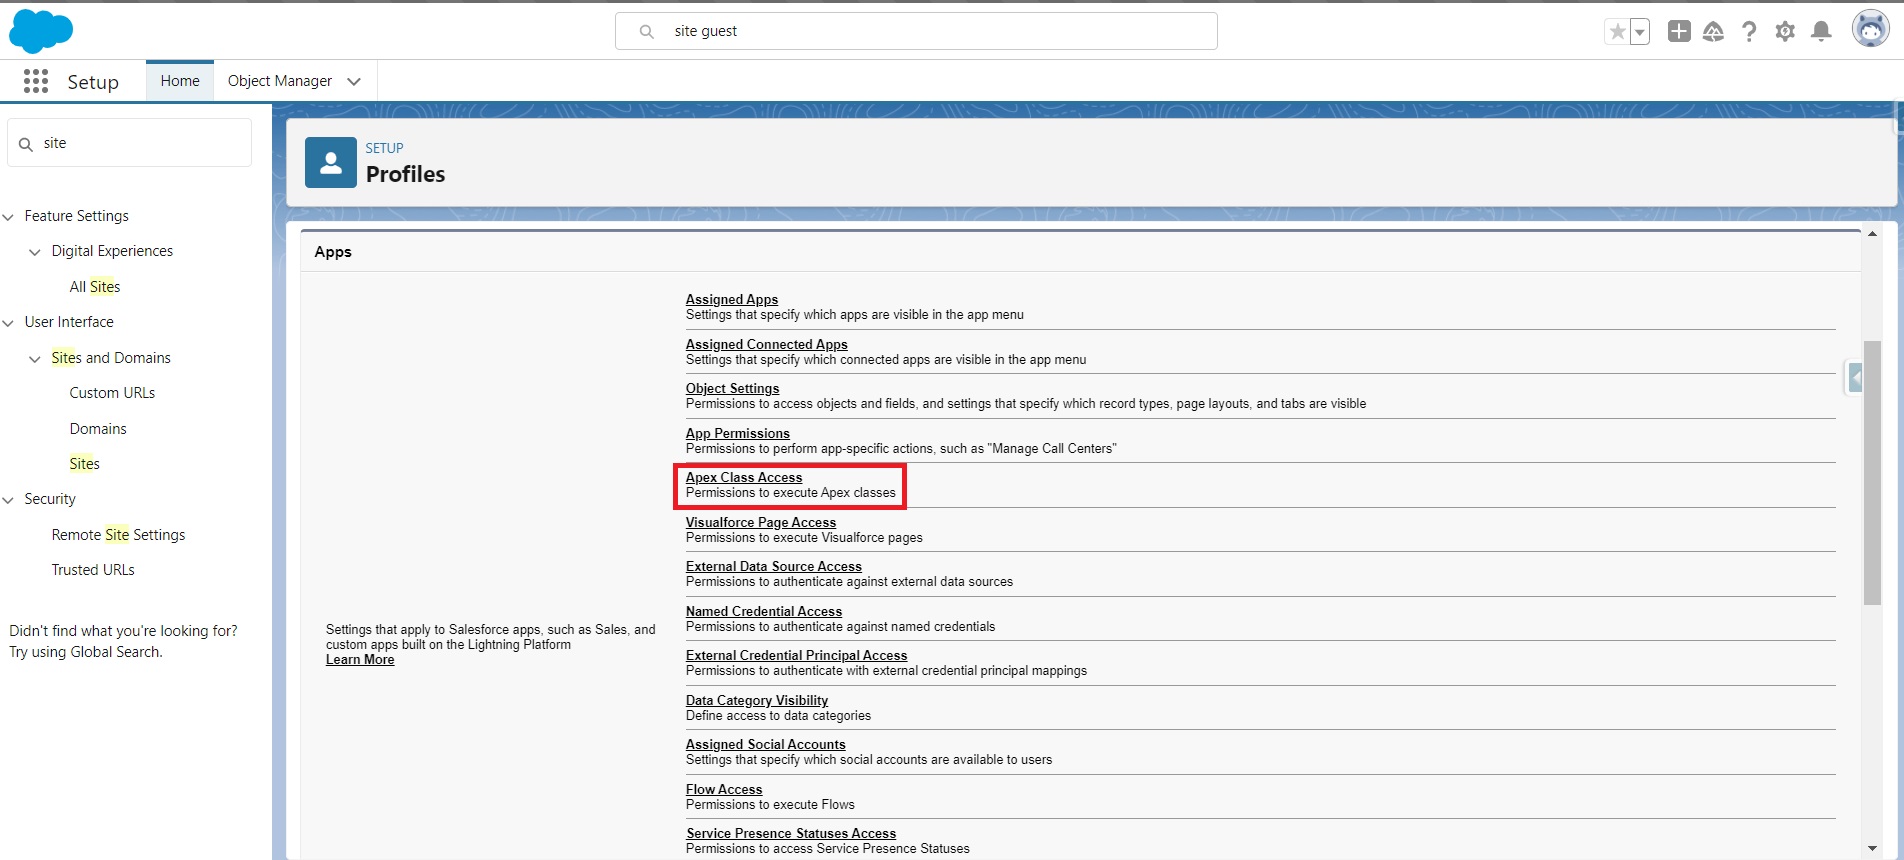
Open the Profile of the Site Guest User.
-
Assign access to the following Apex Classes:
-
docgen_esign.AutoPopulatedSigningScreenController -
docgen_esign.SigningScreenController -
docgen_esign.UtilityClass
-
5.7 Grant Access to Required Visualforce Pages
-
Stay in the Site Guest User Profile.
-
Provide access to the following Visualforce pages:
-
docgen_esign.AutoPopulatedSigningScreen -
docgen_esign.PDFESigningScreen -
docgen_esign.PDFSigningScreen
-
5.8 Configure Custom Settings
-
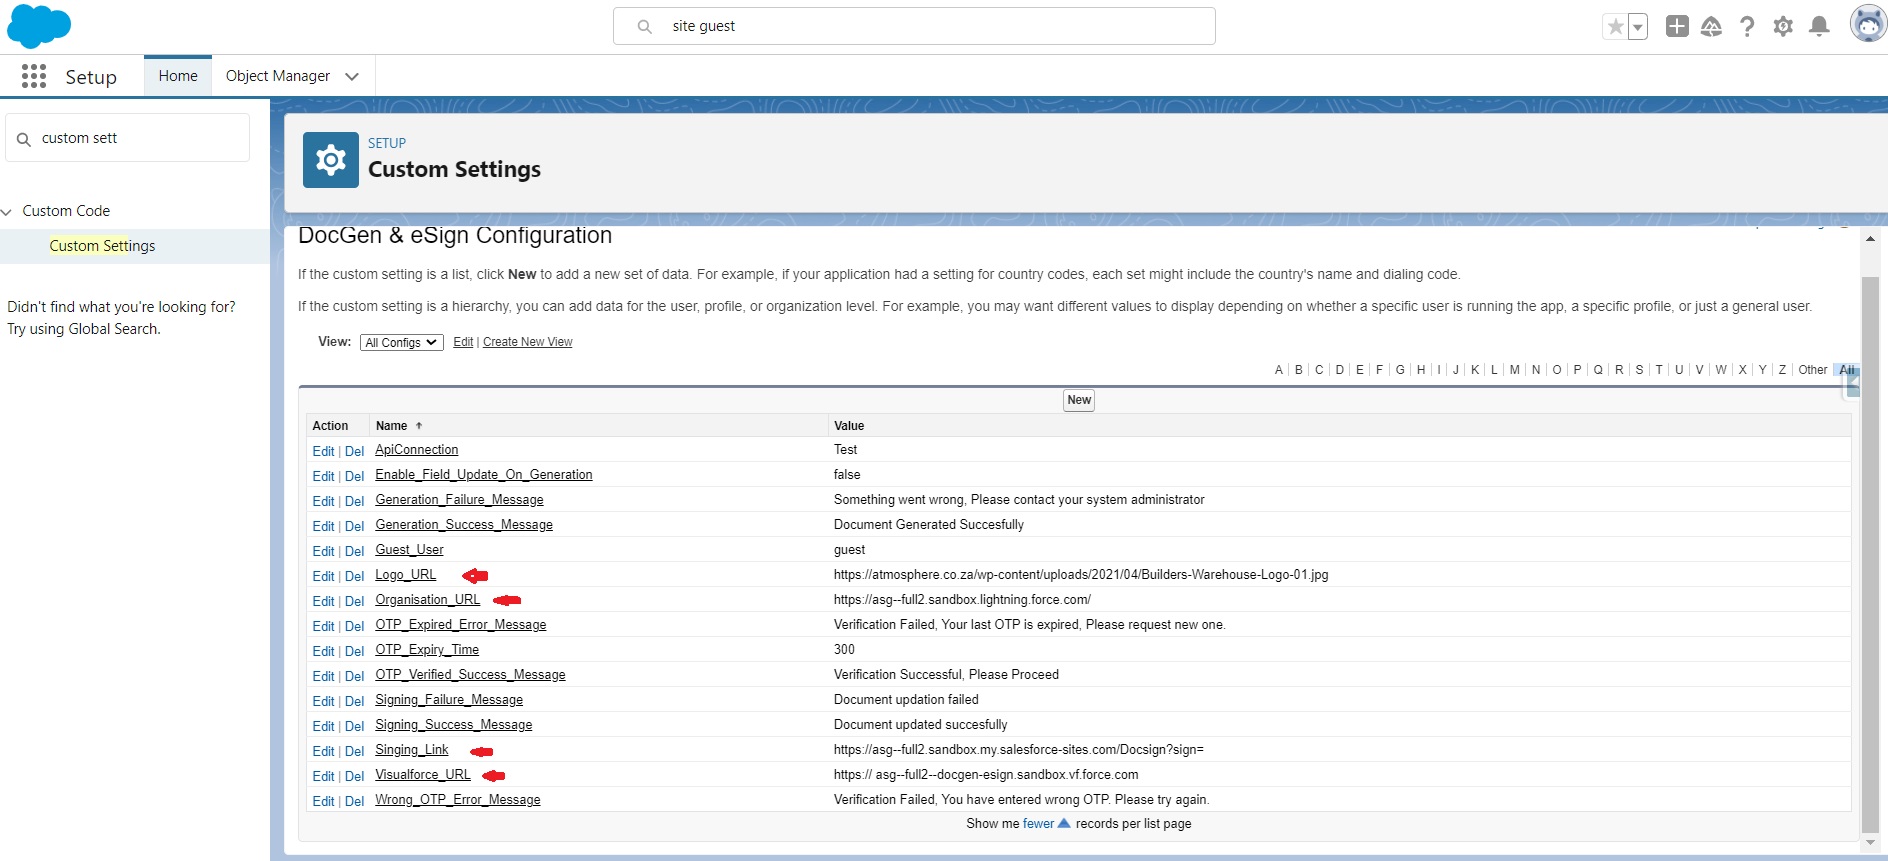
Navigate to Setup → Use Quick Find to search for "Custom Settings".
-
Click on "Manage", then select "cmDocs - Document Generation and eSign Configuration".
-
Edit the following fields:
-
Logo URL: Add the desired logo URL.
-
Organization URL: Enter the organization’s domain (Lightning Domain ).
-
Signing Link: Add the newly created Site URL followed by
?sign=. -
Visualforce URL: Contact the Cloud Maven team at setup@cloudmaveninc.com for this value.
-
Legal_Email_Address: Add a legal email address (or any preferred address) that will be displayed in the Electronic Record and Signature Disclosure.
-
5.9 Add the ‘Generate Document’ Action
The administrator must add the action button, enabling users to easily generate documents and send them for signature with a single click.
-
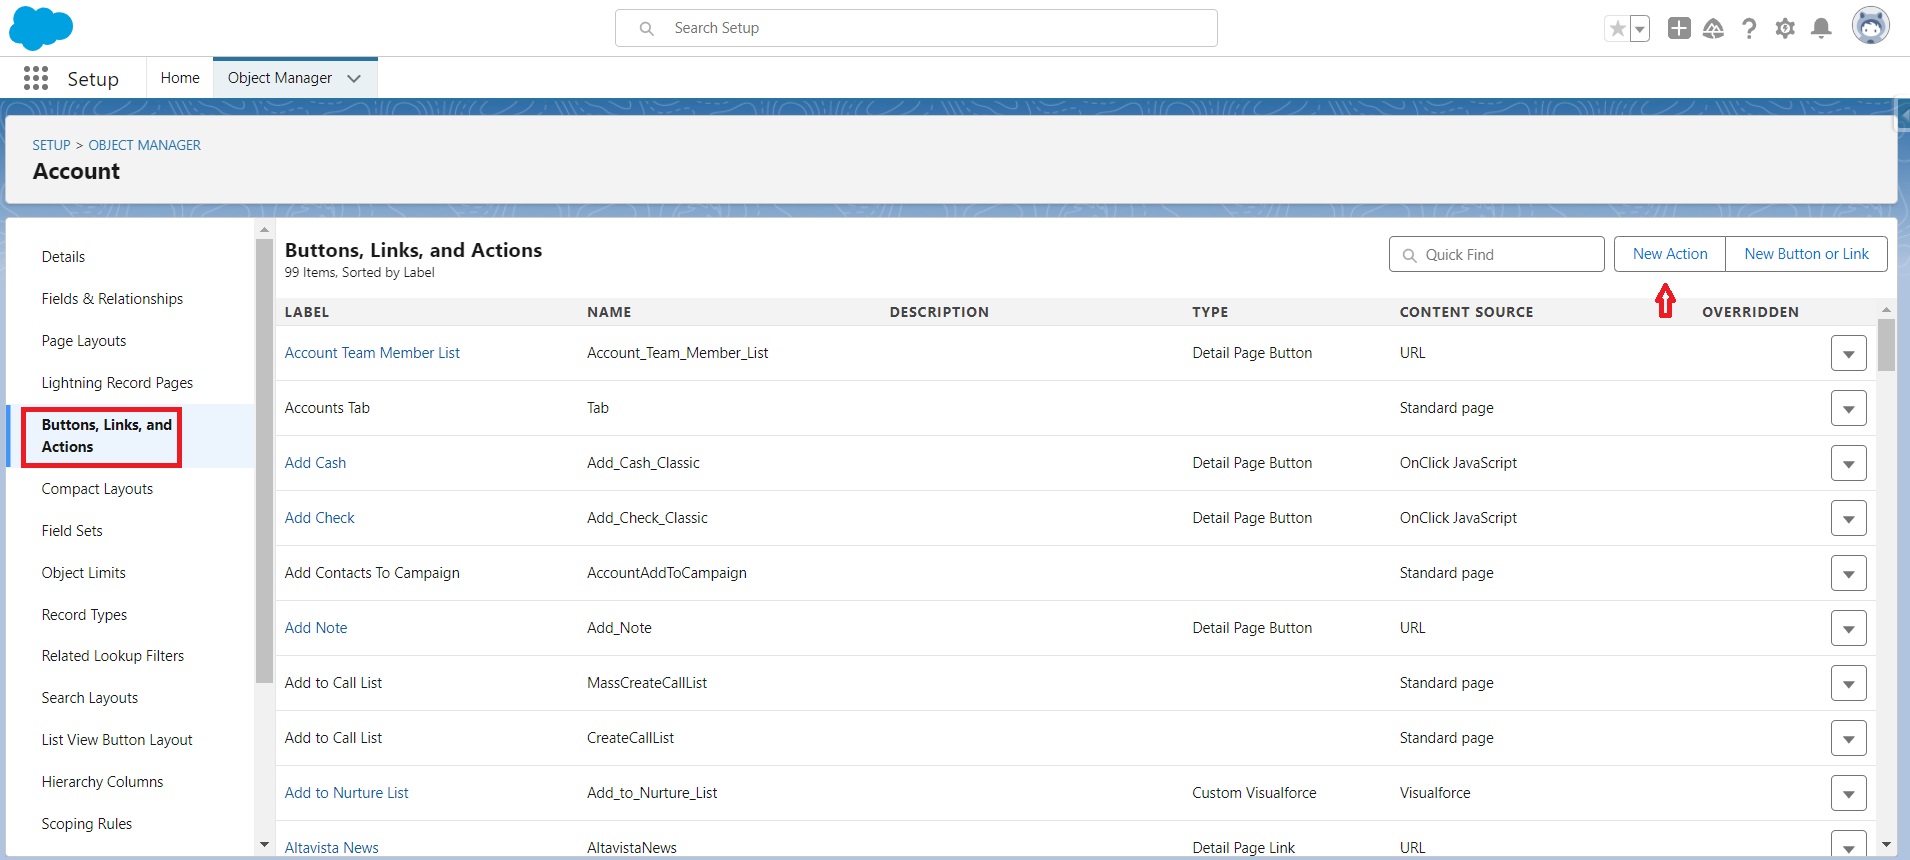
Navigate to Object Manager → Select the Source Object.
-
Click on "Buttons, Links, and Actions".
-
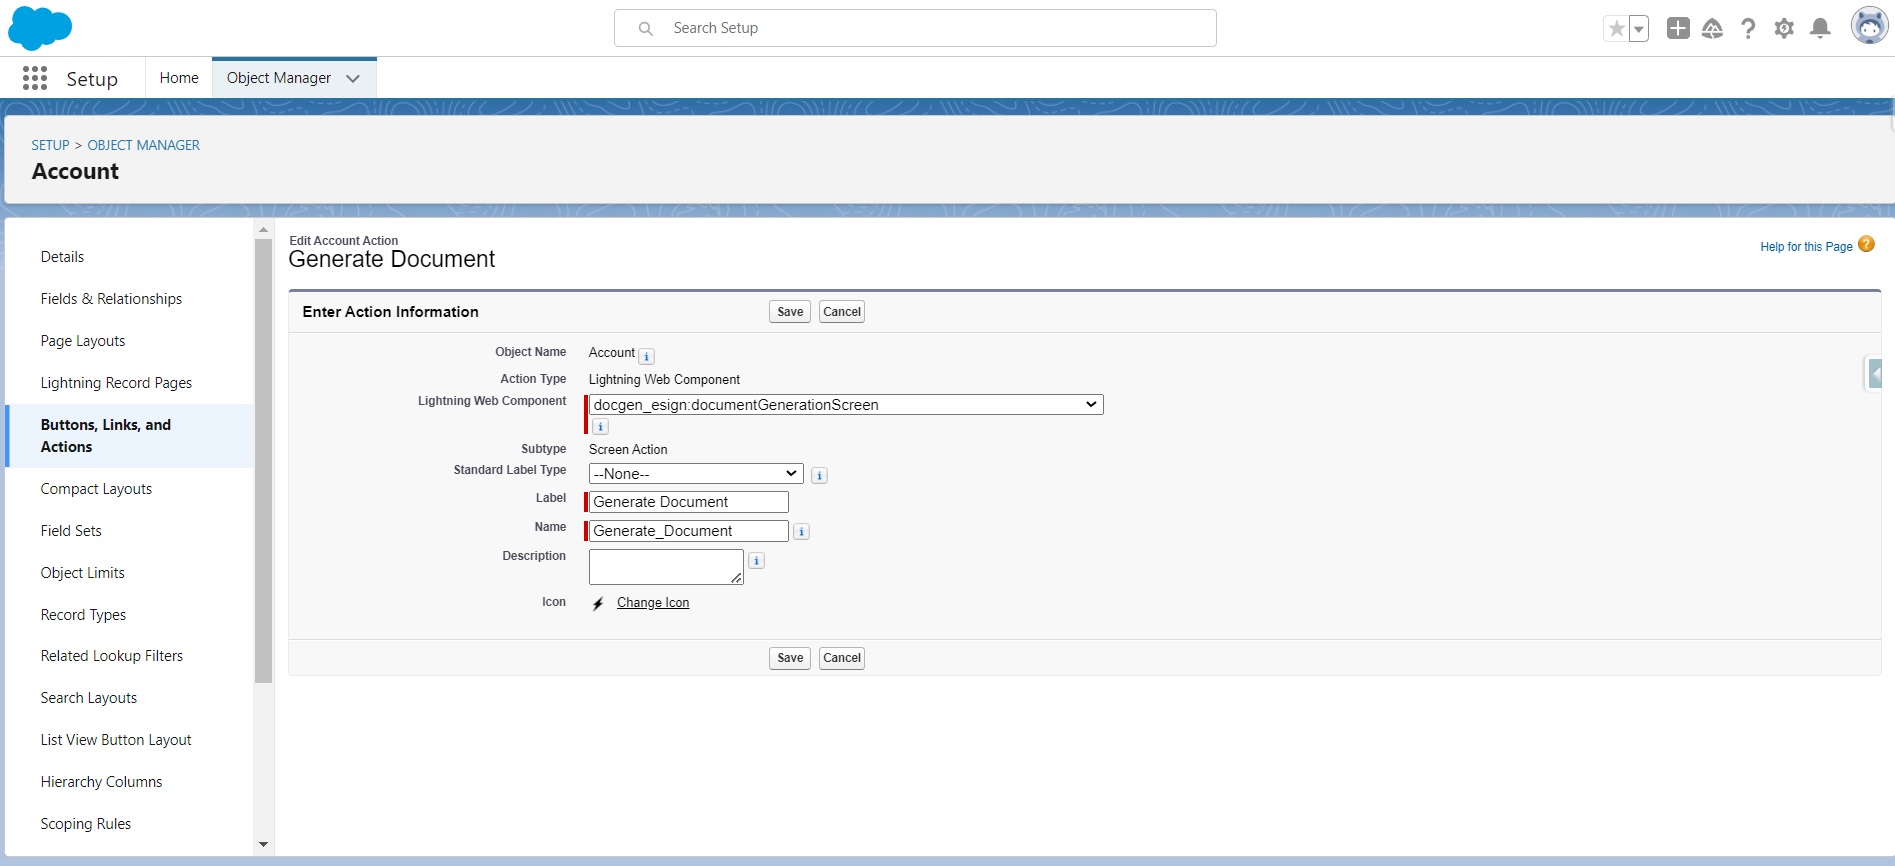
Click "New Action", then enter the required details.
-
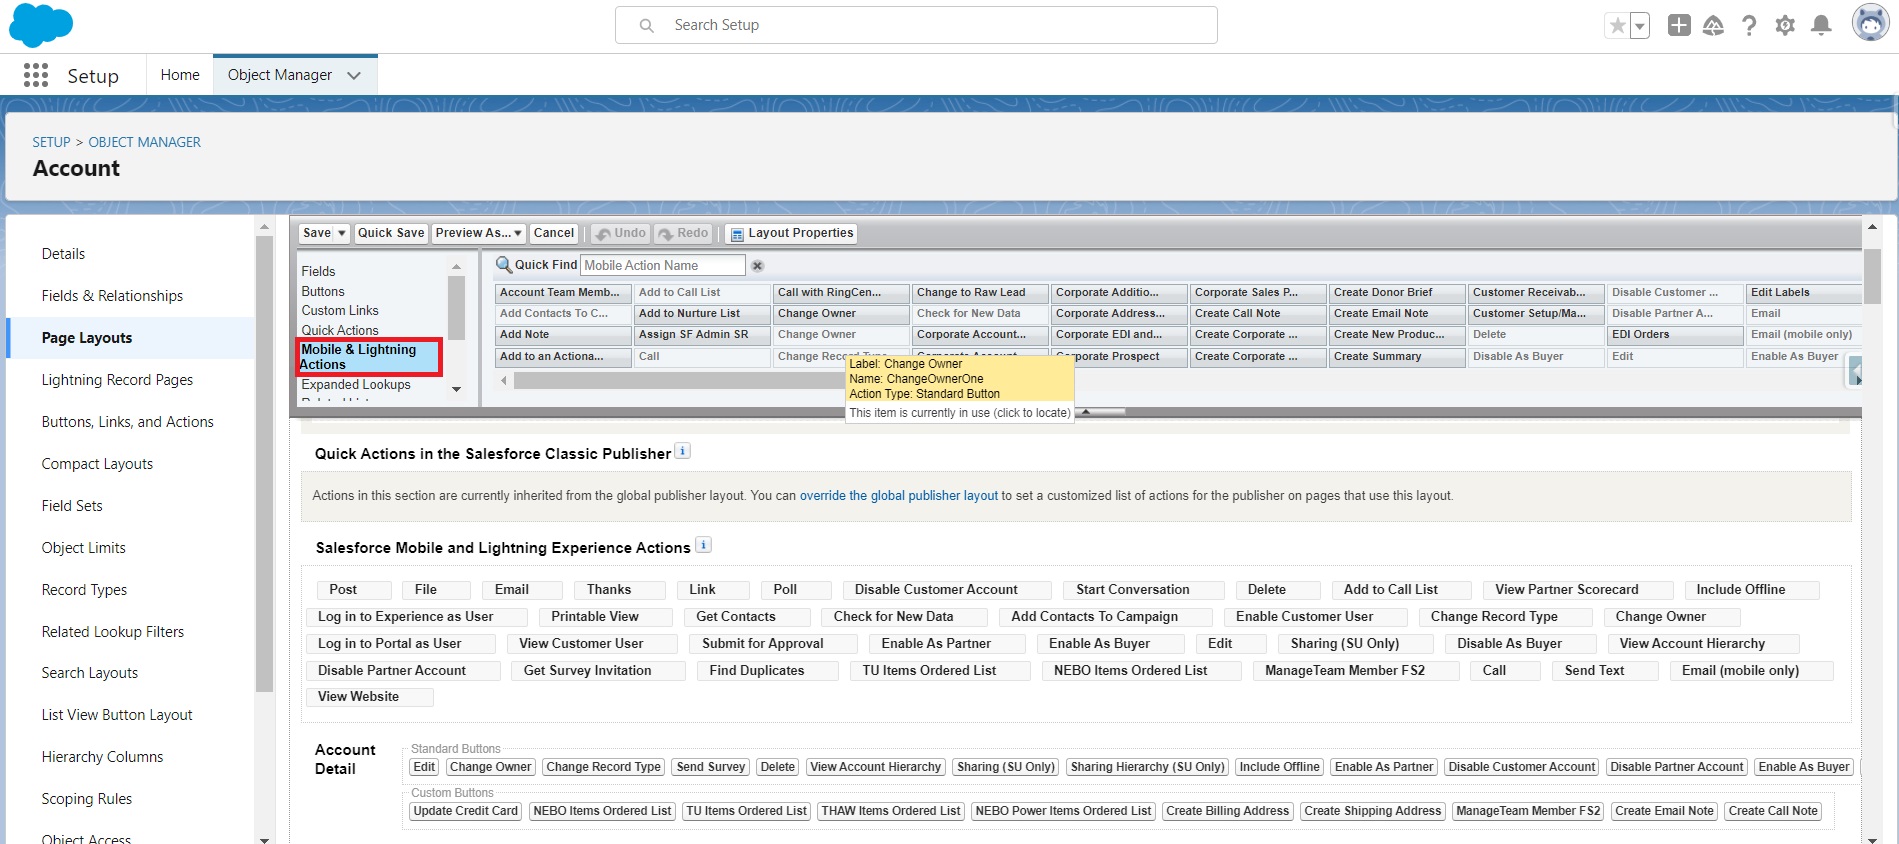
Add the "Generate Document" button to the "Mobile & Lightning Actions" section of the Page Layout. Enter the details as shown in the screenshot below. Users can specify an alternate name for the action according to their requirements.
-
Add the button to the desired page layout or assign it an appropriate Lightning action name.
5.10 Add the Document Workflow Status LWC on the Record Page
-
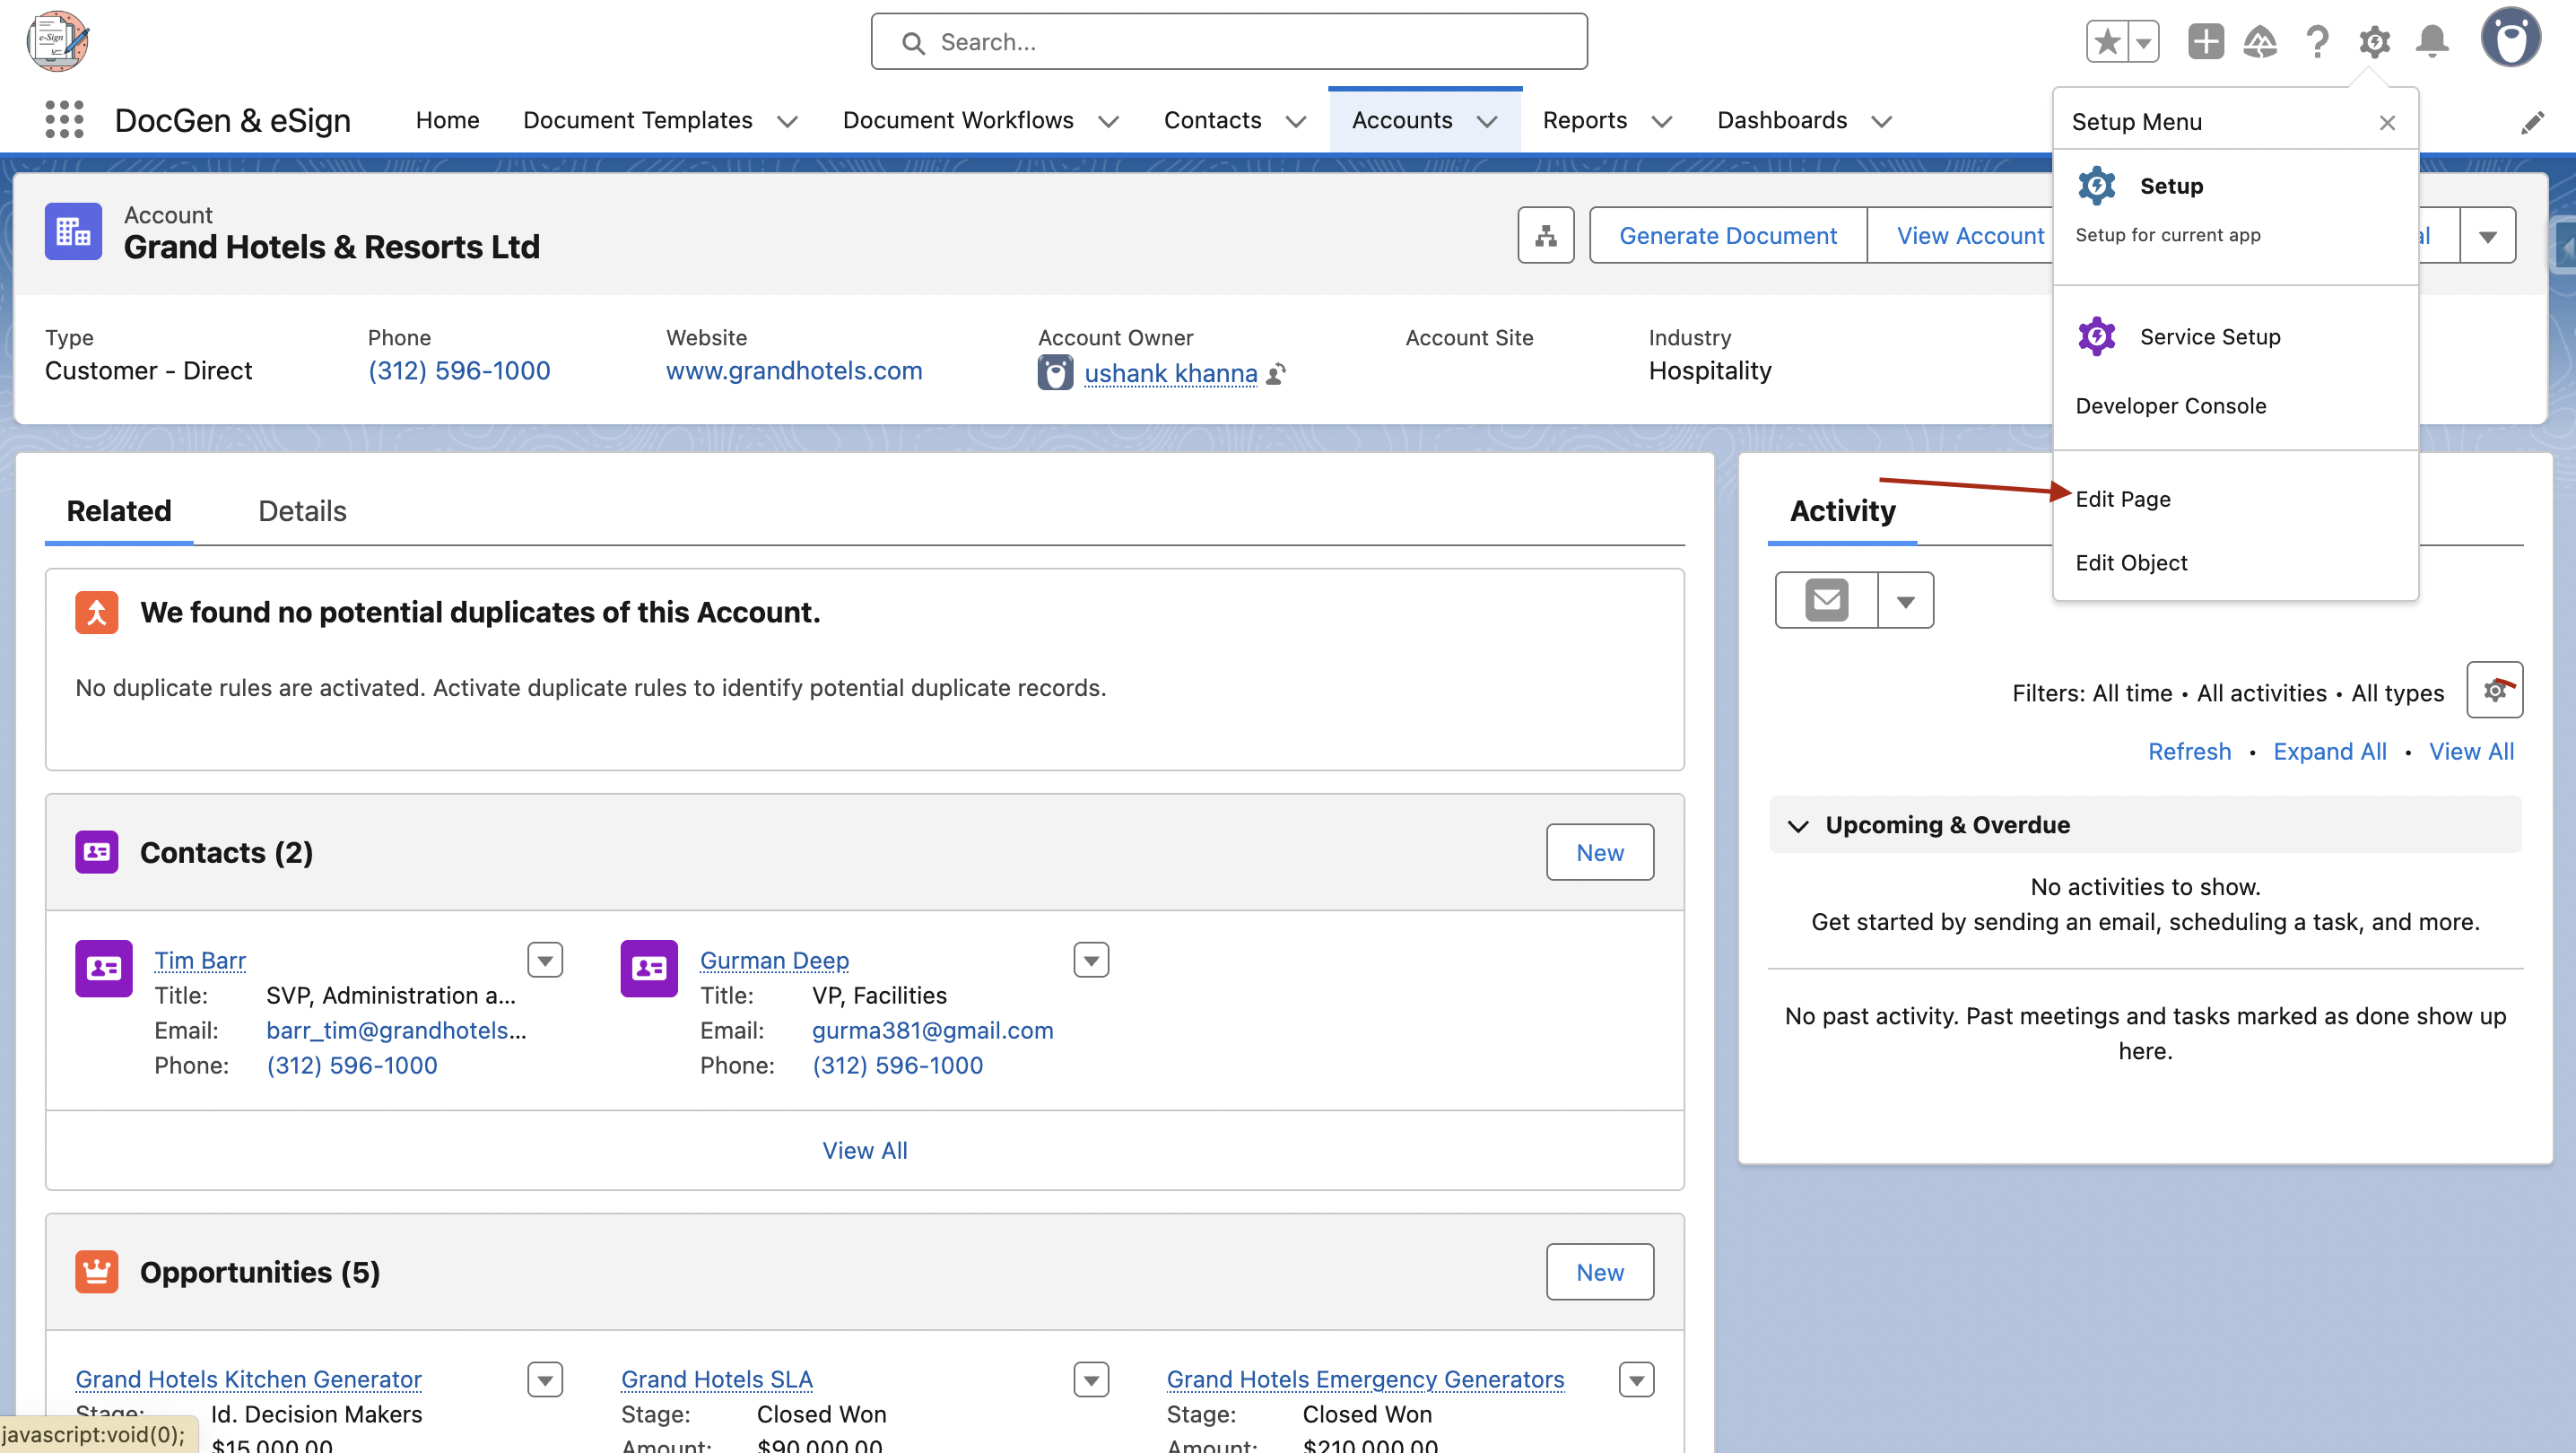
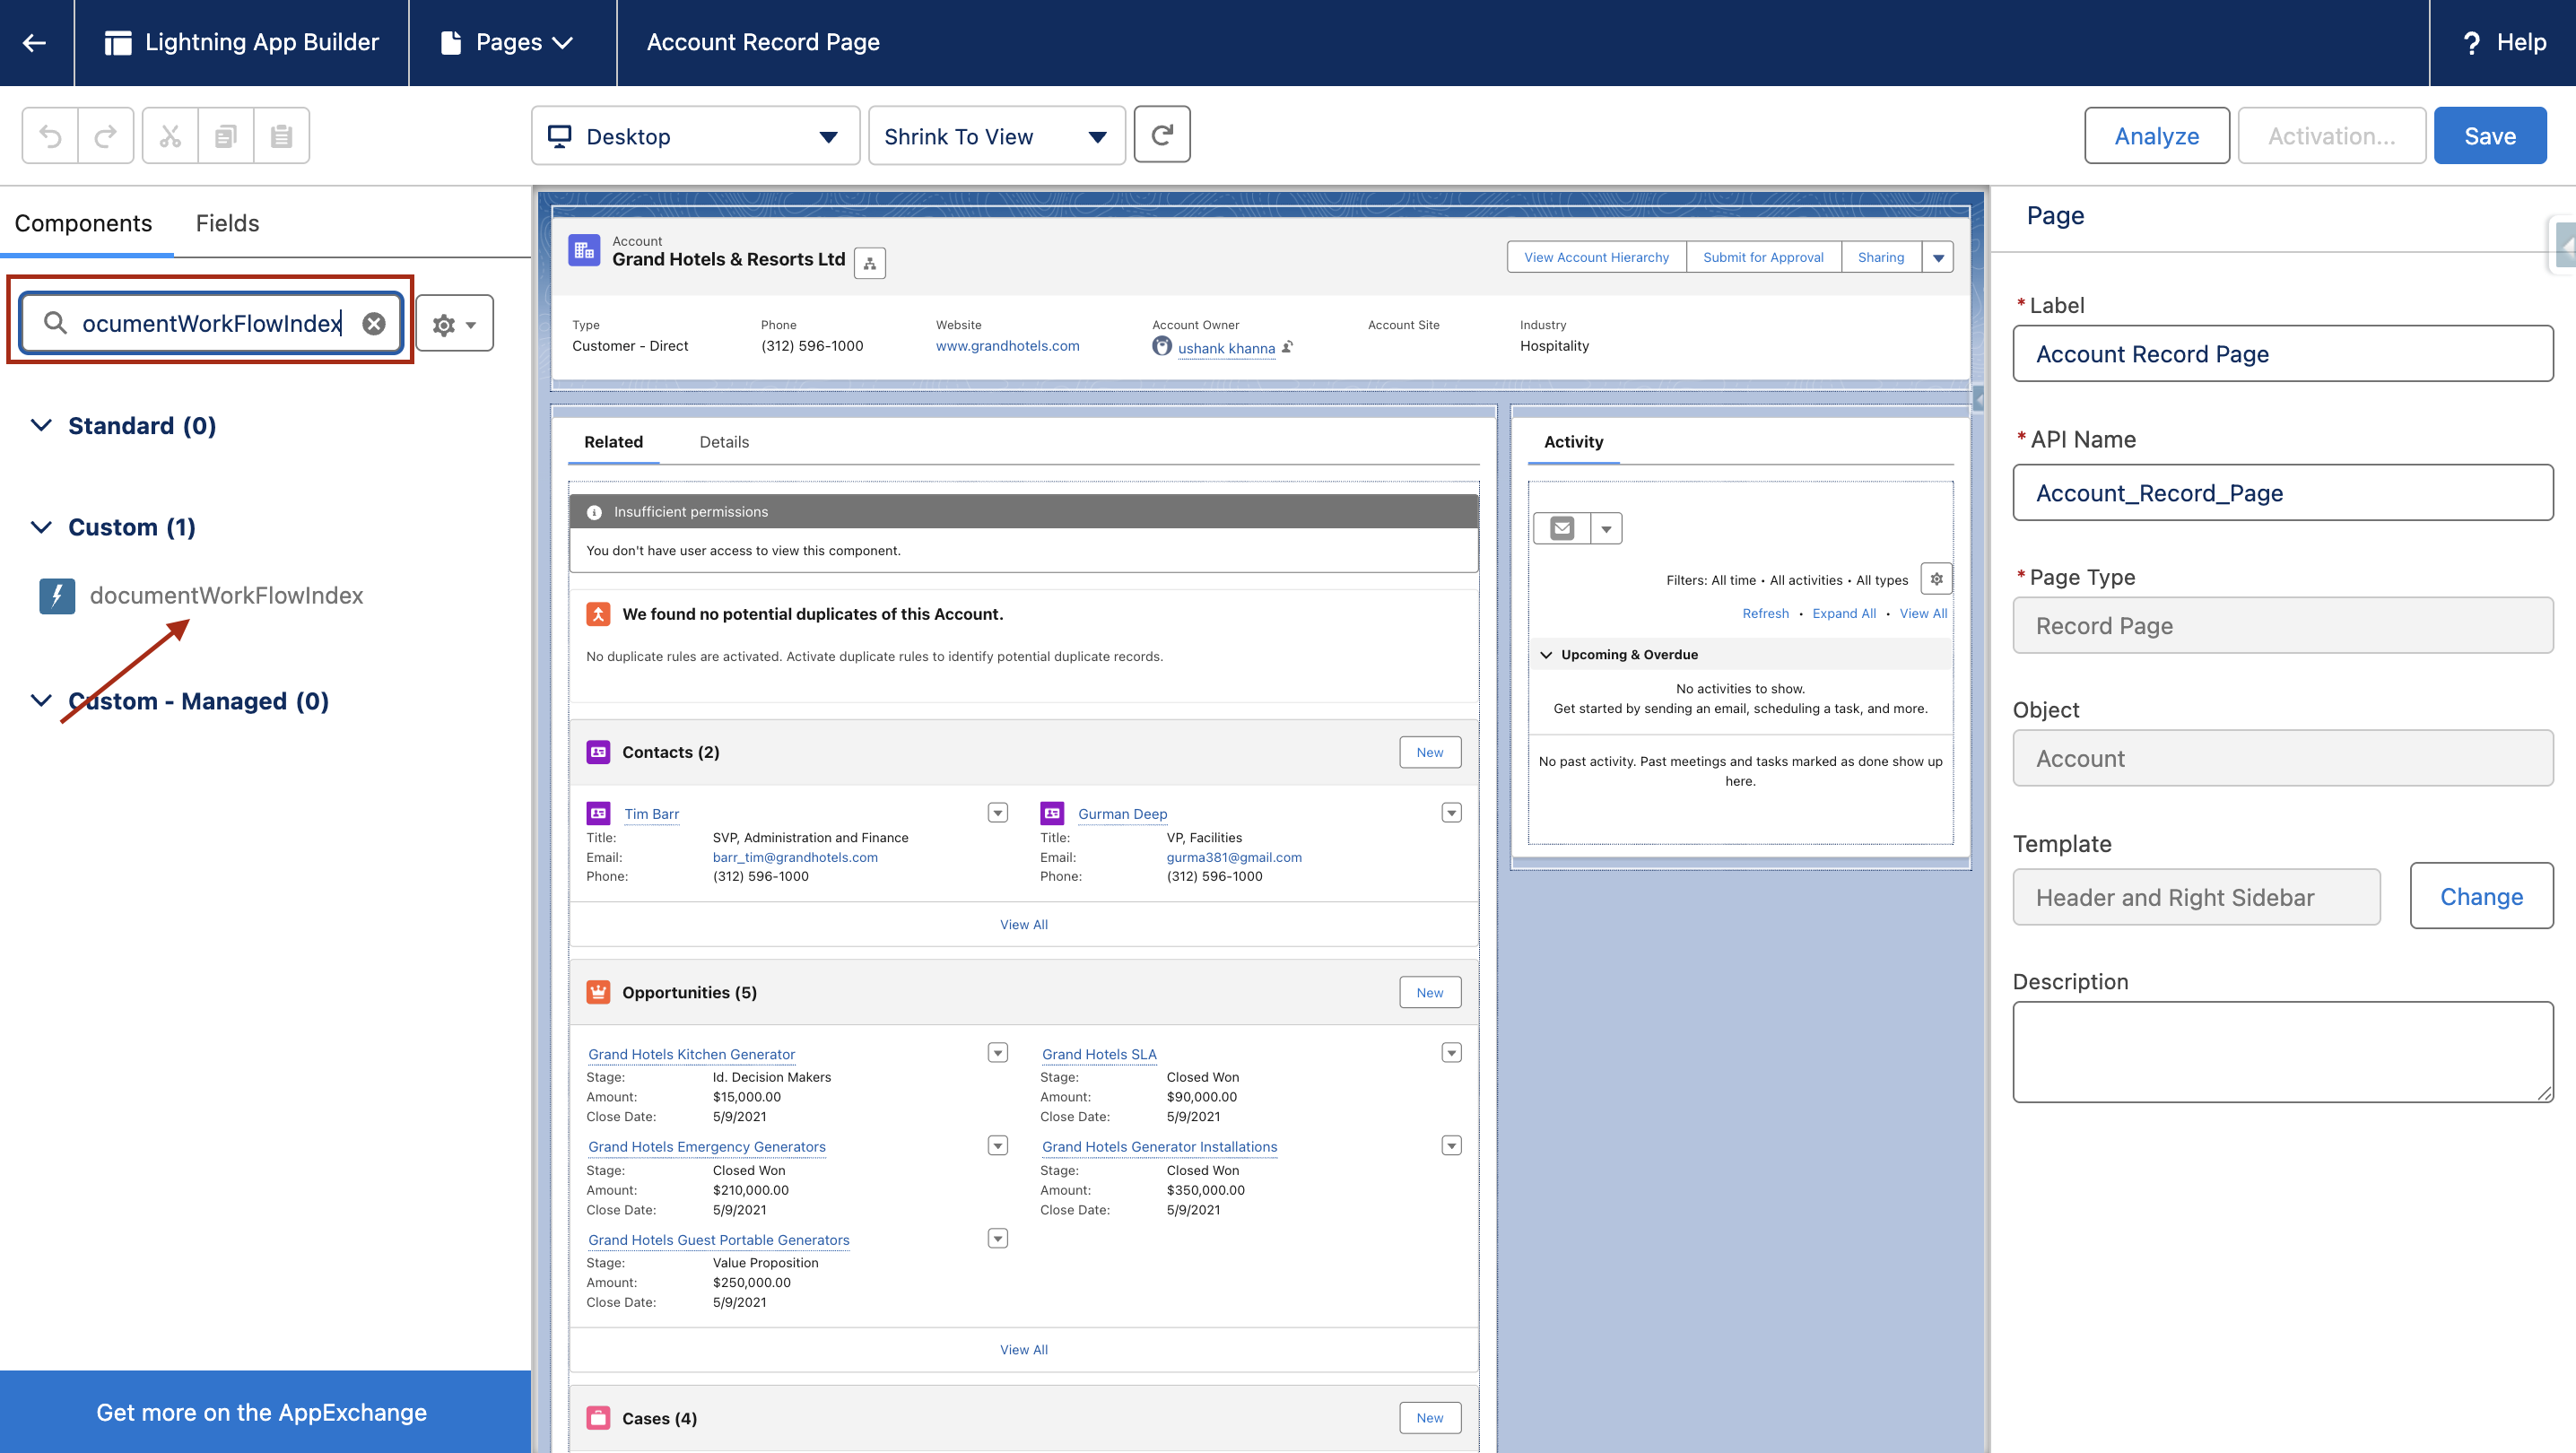
Navigate to the record page → Click the ⚙️ Gear icon → Select Edit Page.
-
In the Component Search box, search for
documentWorkFlowIndex.
-
Then, drag and drop the
documentWorkFlowIndexLightning Web Component (LWC) to your desired location on the page layout.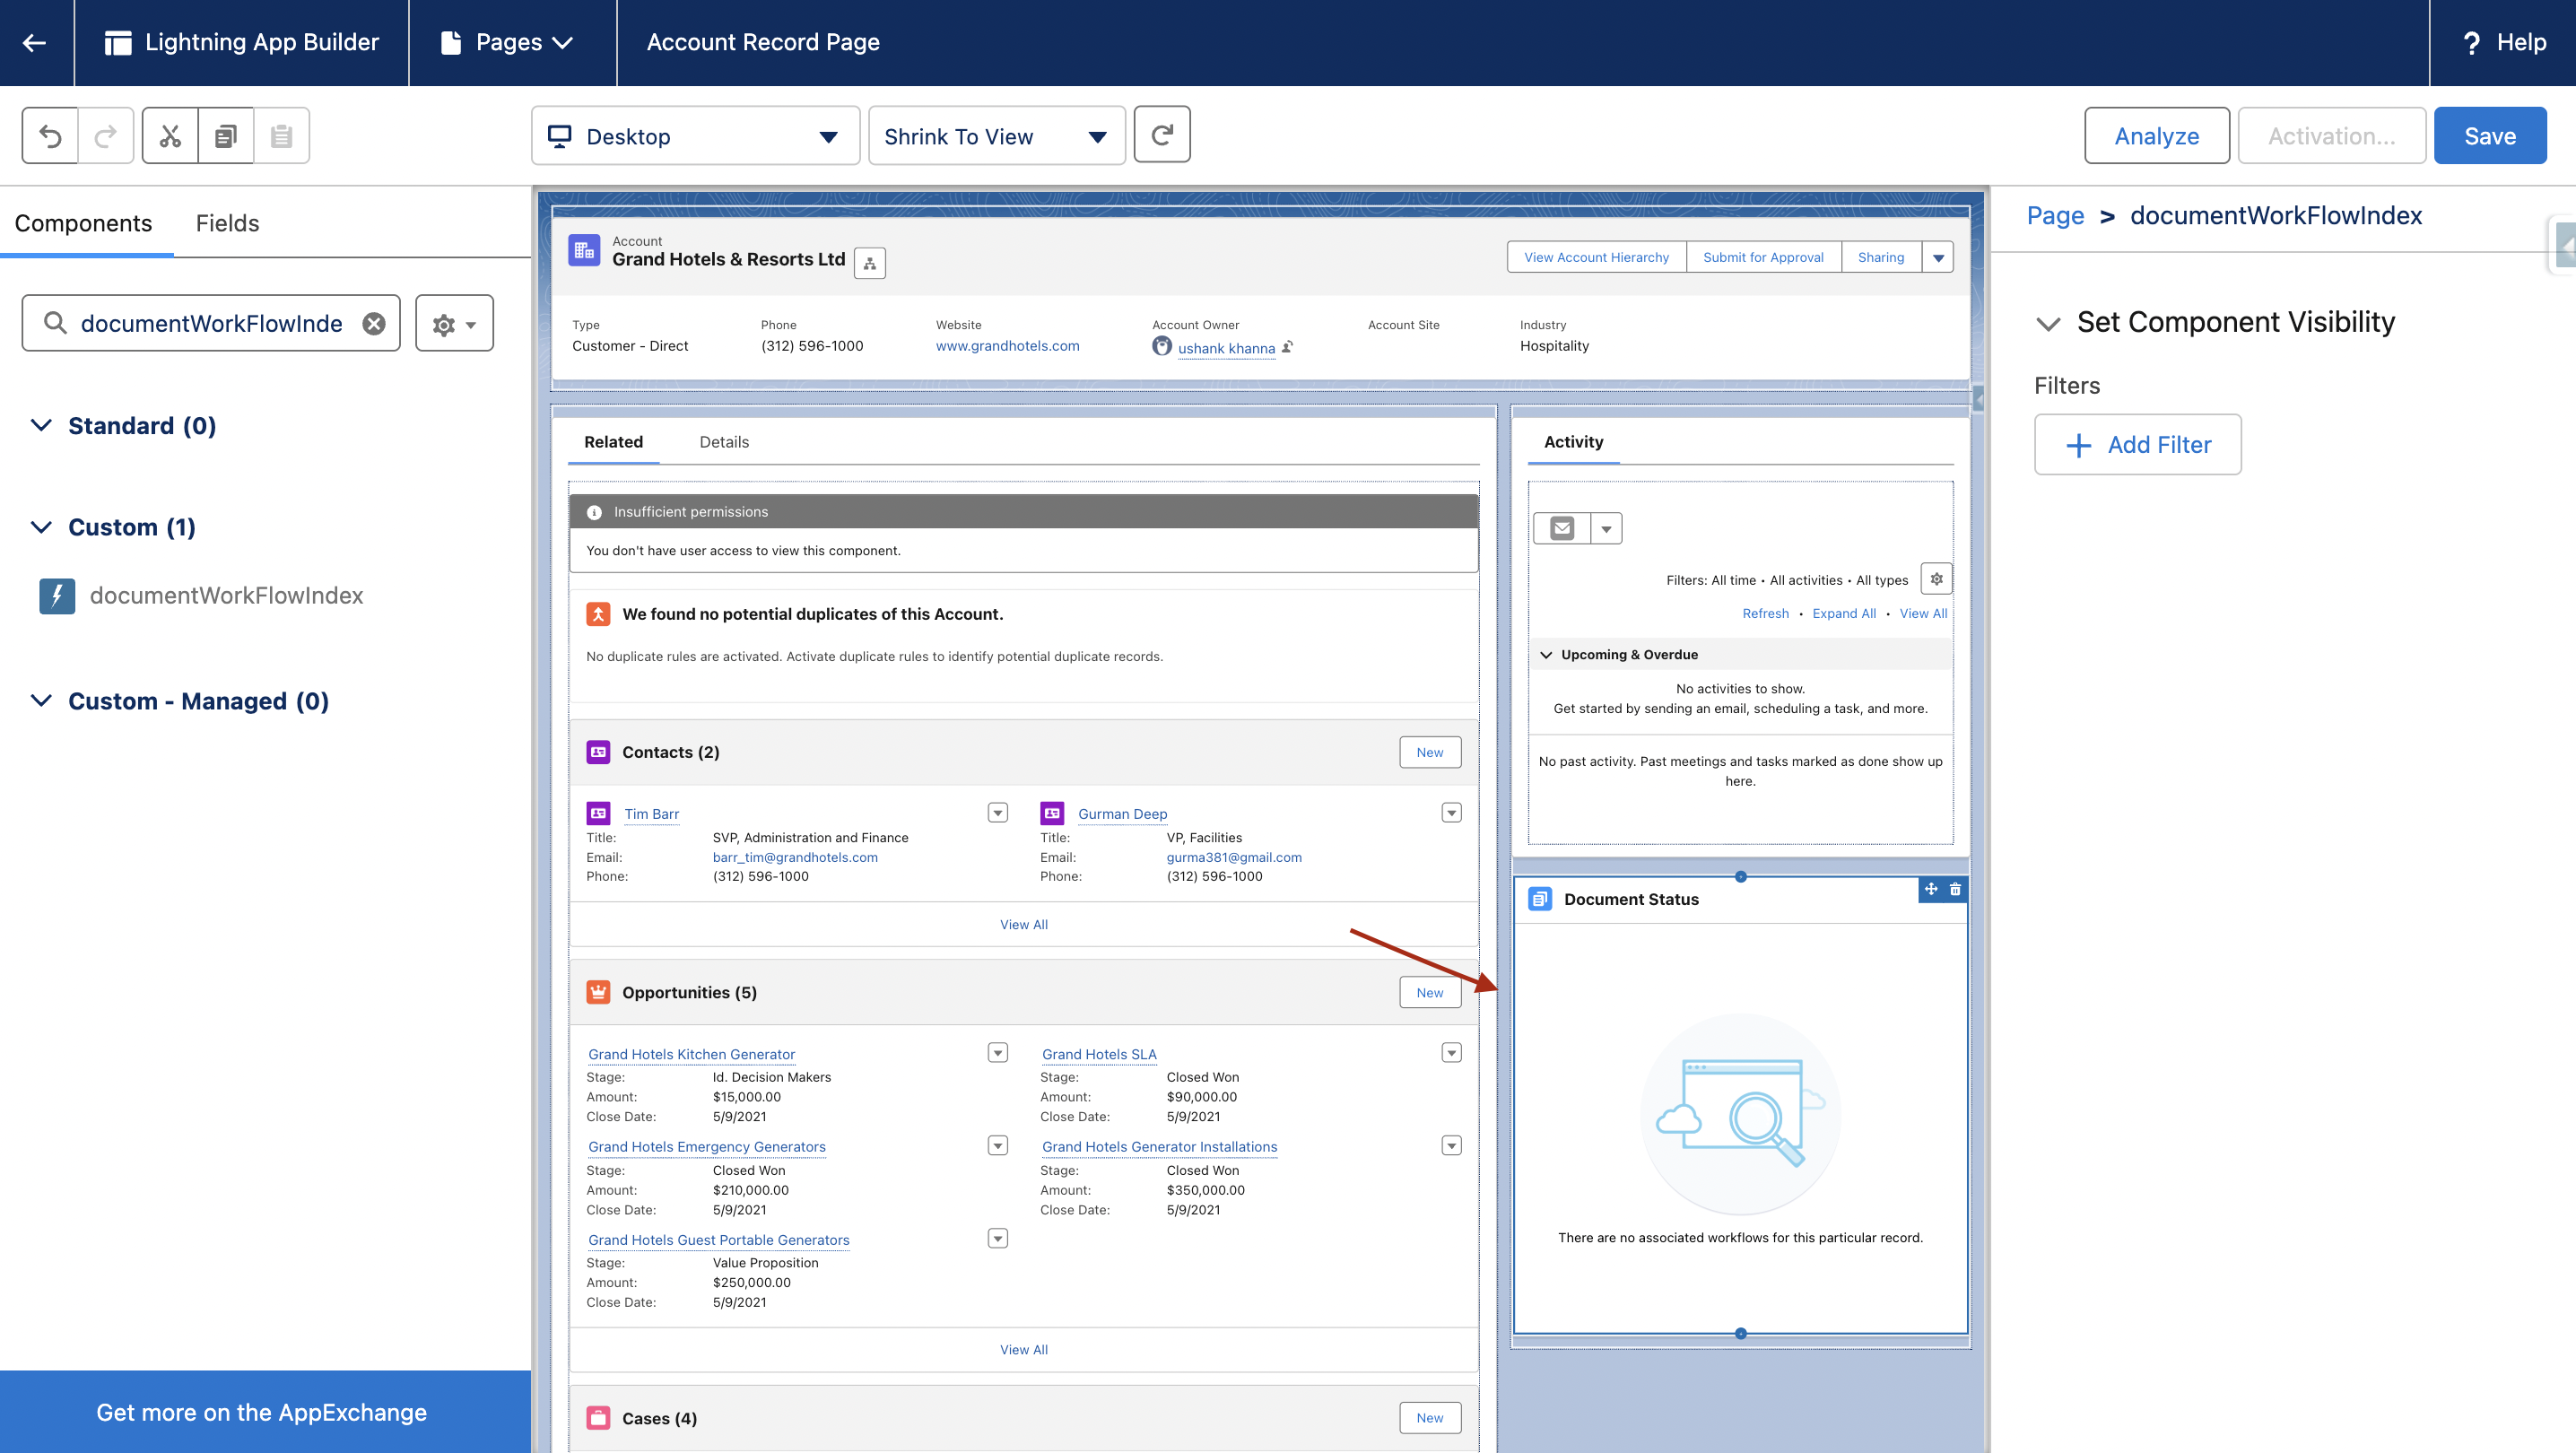
-
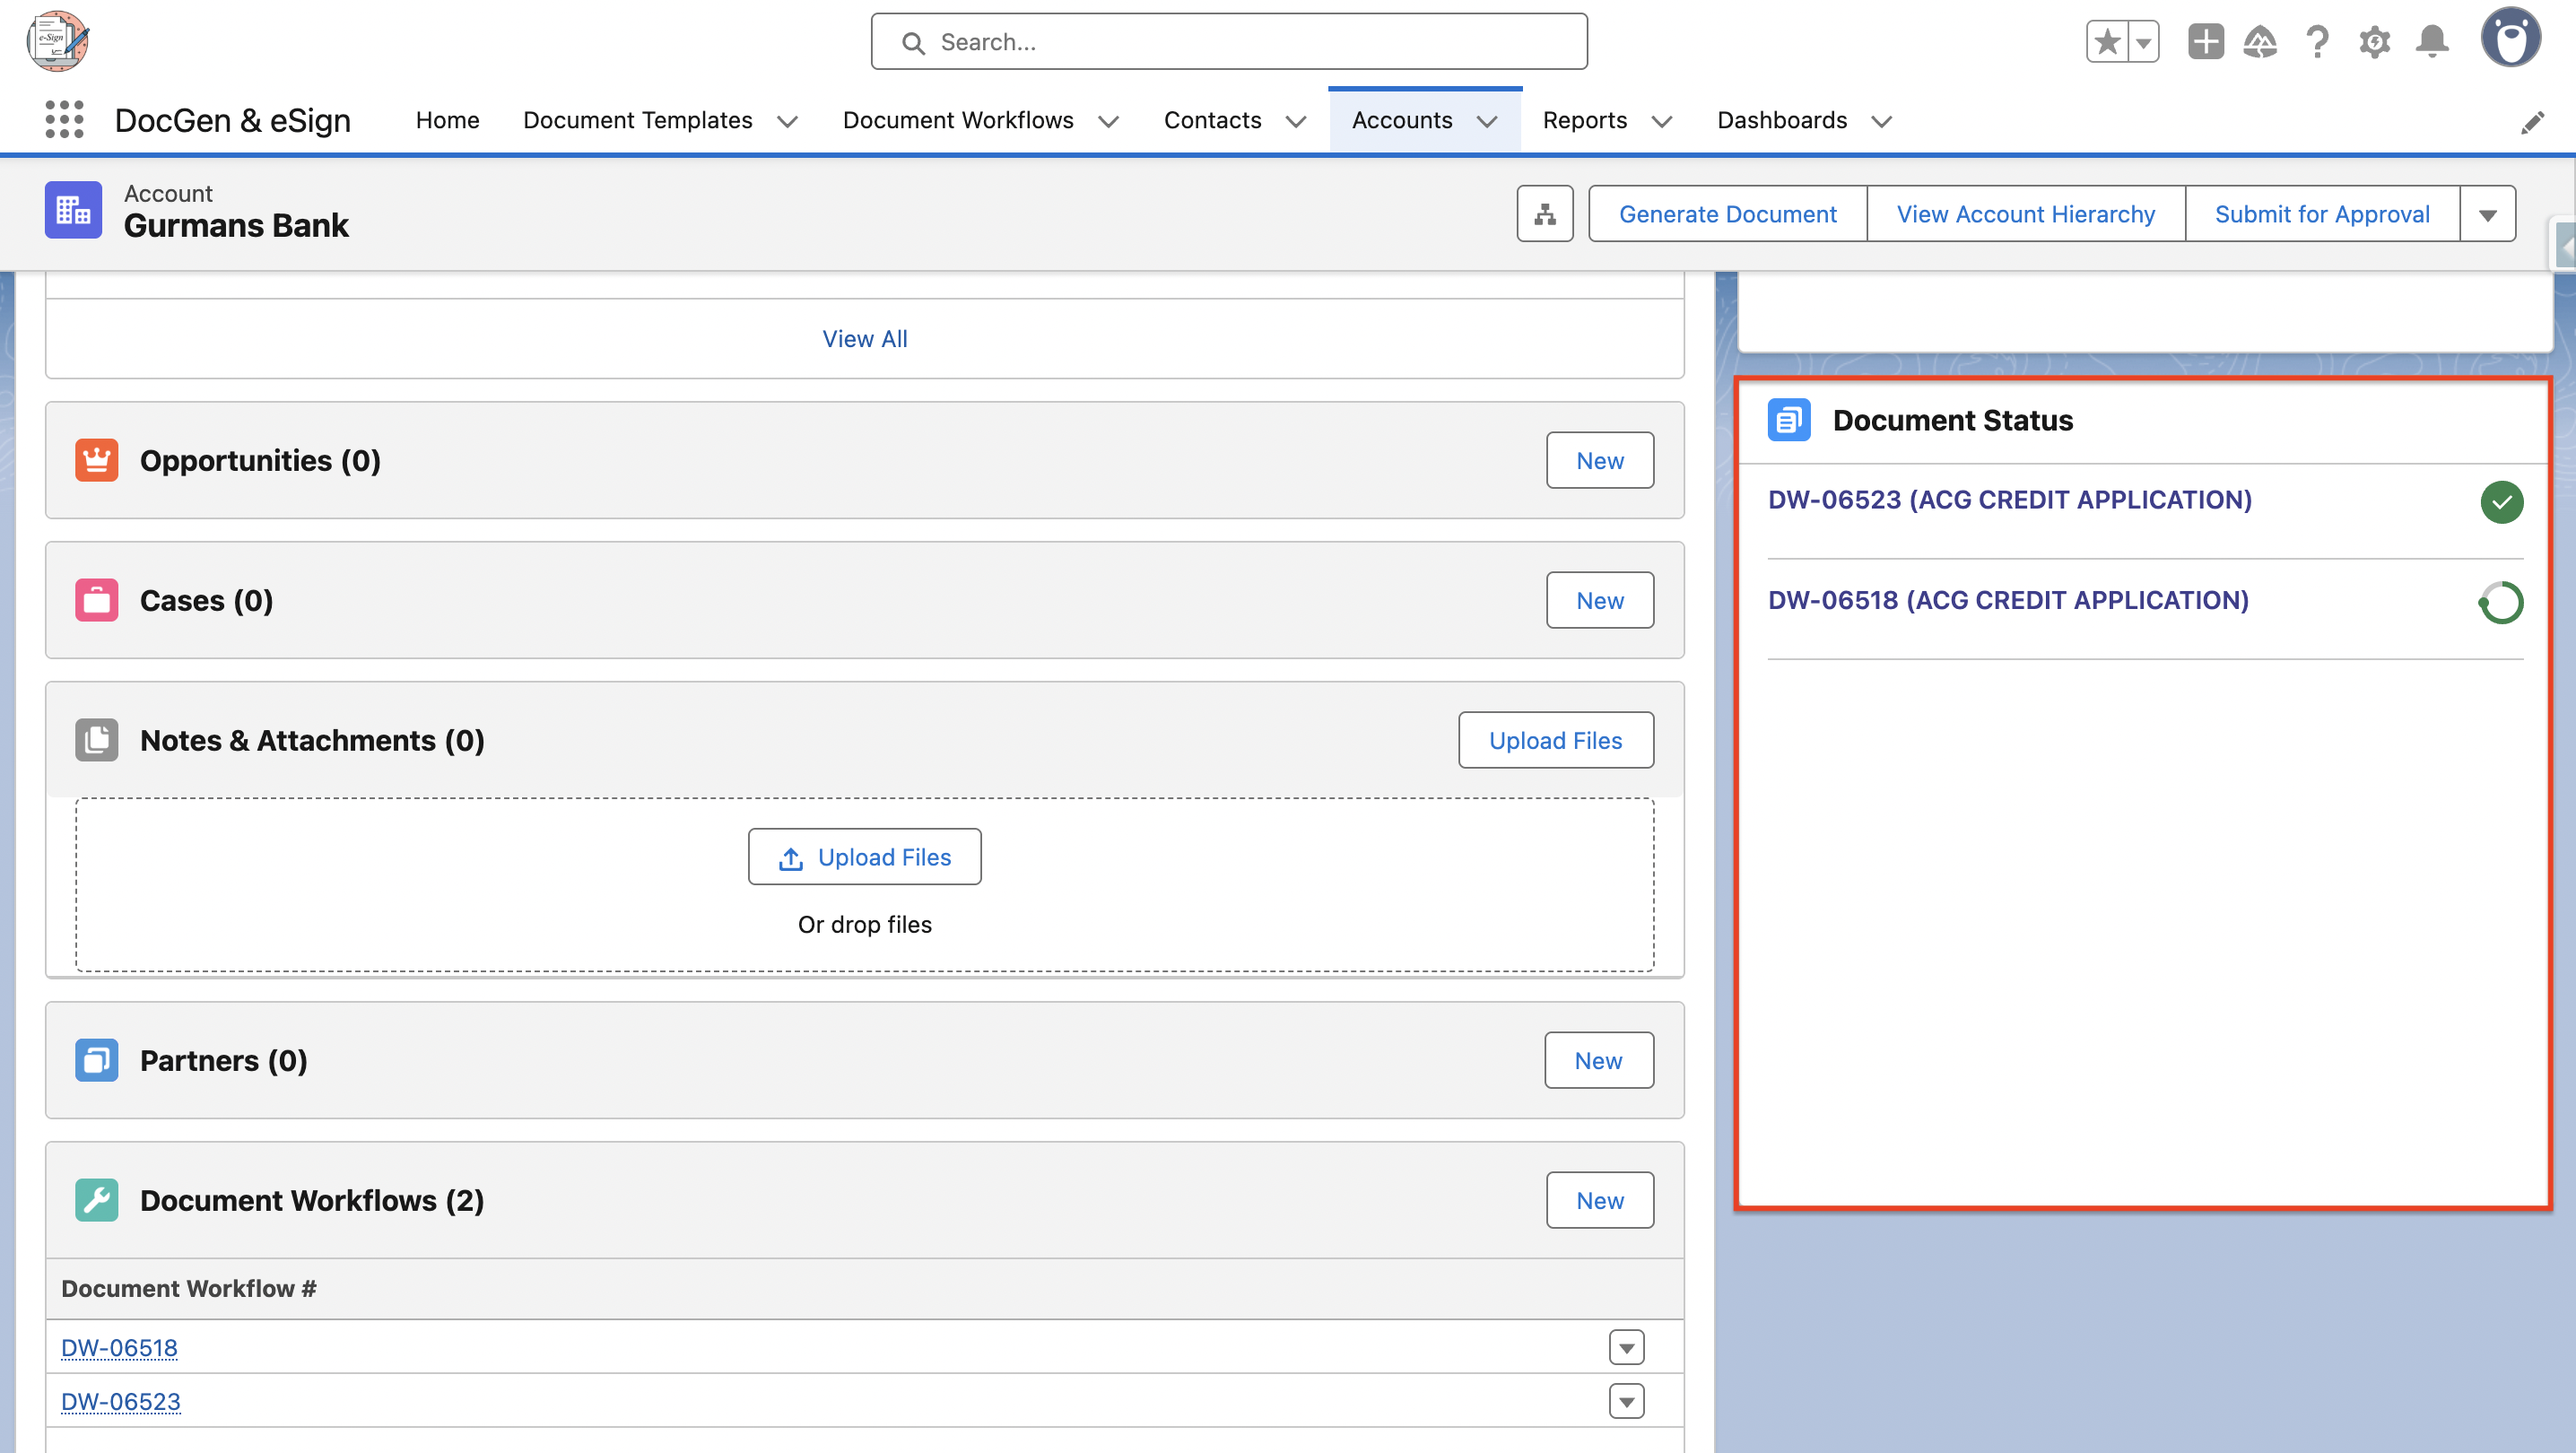
Click Save in the top right corner.If this is a new layout or not yet activated, click Activate.
5.11 Enter License and Key Information
You can skip this step in trial ORGs
Execute the below code in the developer console anonymous window.
String sEnvironment = '<<< YOUR Environment >>>';
String siteLicenseKey = '<<< YOUR Site License Key >>>';
String vfPageKey = '<<< YOUR Vf Page License Key >>>';
String privateKey = '<<< YOUR  Private Key >>>';
docgen_esign.AdminServices.saveDocGenCredentials(sEnvironment, privateKey, siteLicenseKey, vfPageKey);
Please contact the setup@cloudmaveninc.com team to get your license key information.
How to create Document Templates
Learn how to create and manage document templates for efficient e-signature workflows.
How to Map Salesforce Object Fields to Document Templates
Learn how to map Salesforce object fields to document templates for accurate, data-driven document generation.
How to Map Salesforce Object Fields to Document Templates
Configuring Document Signers
Learn how to configure and assign document signers using Salesforce and related records.
How to Configure Dynamic Signers on Document Templates
Schedule Automated Reminder Email for Signers
Learn how to configure and schedule a batch process to automatically send reminder emails for documents with pending signatures.
How to Schedule Automated Reminder Emails Batch
Enable Template Grouping into Folders
Organize document templates into folders for easier management and access.