
Overview.
This guide explains how to map PDF fields to Salesforce fields, configure field behavior, use related records, and assign signature fields to predefined signers before document generation and signing.
Open the Document Template.
-
Navigate to Document Templates in Salesforce.
-
Open the required document template.
-
Click the Document Field Mapping tab.
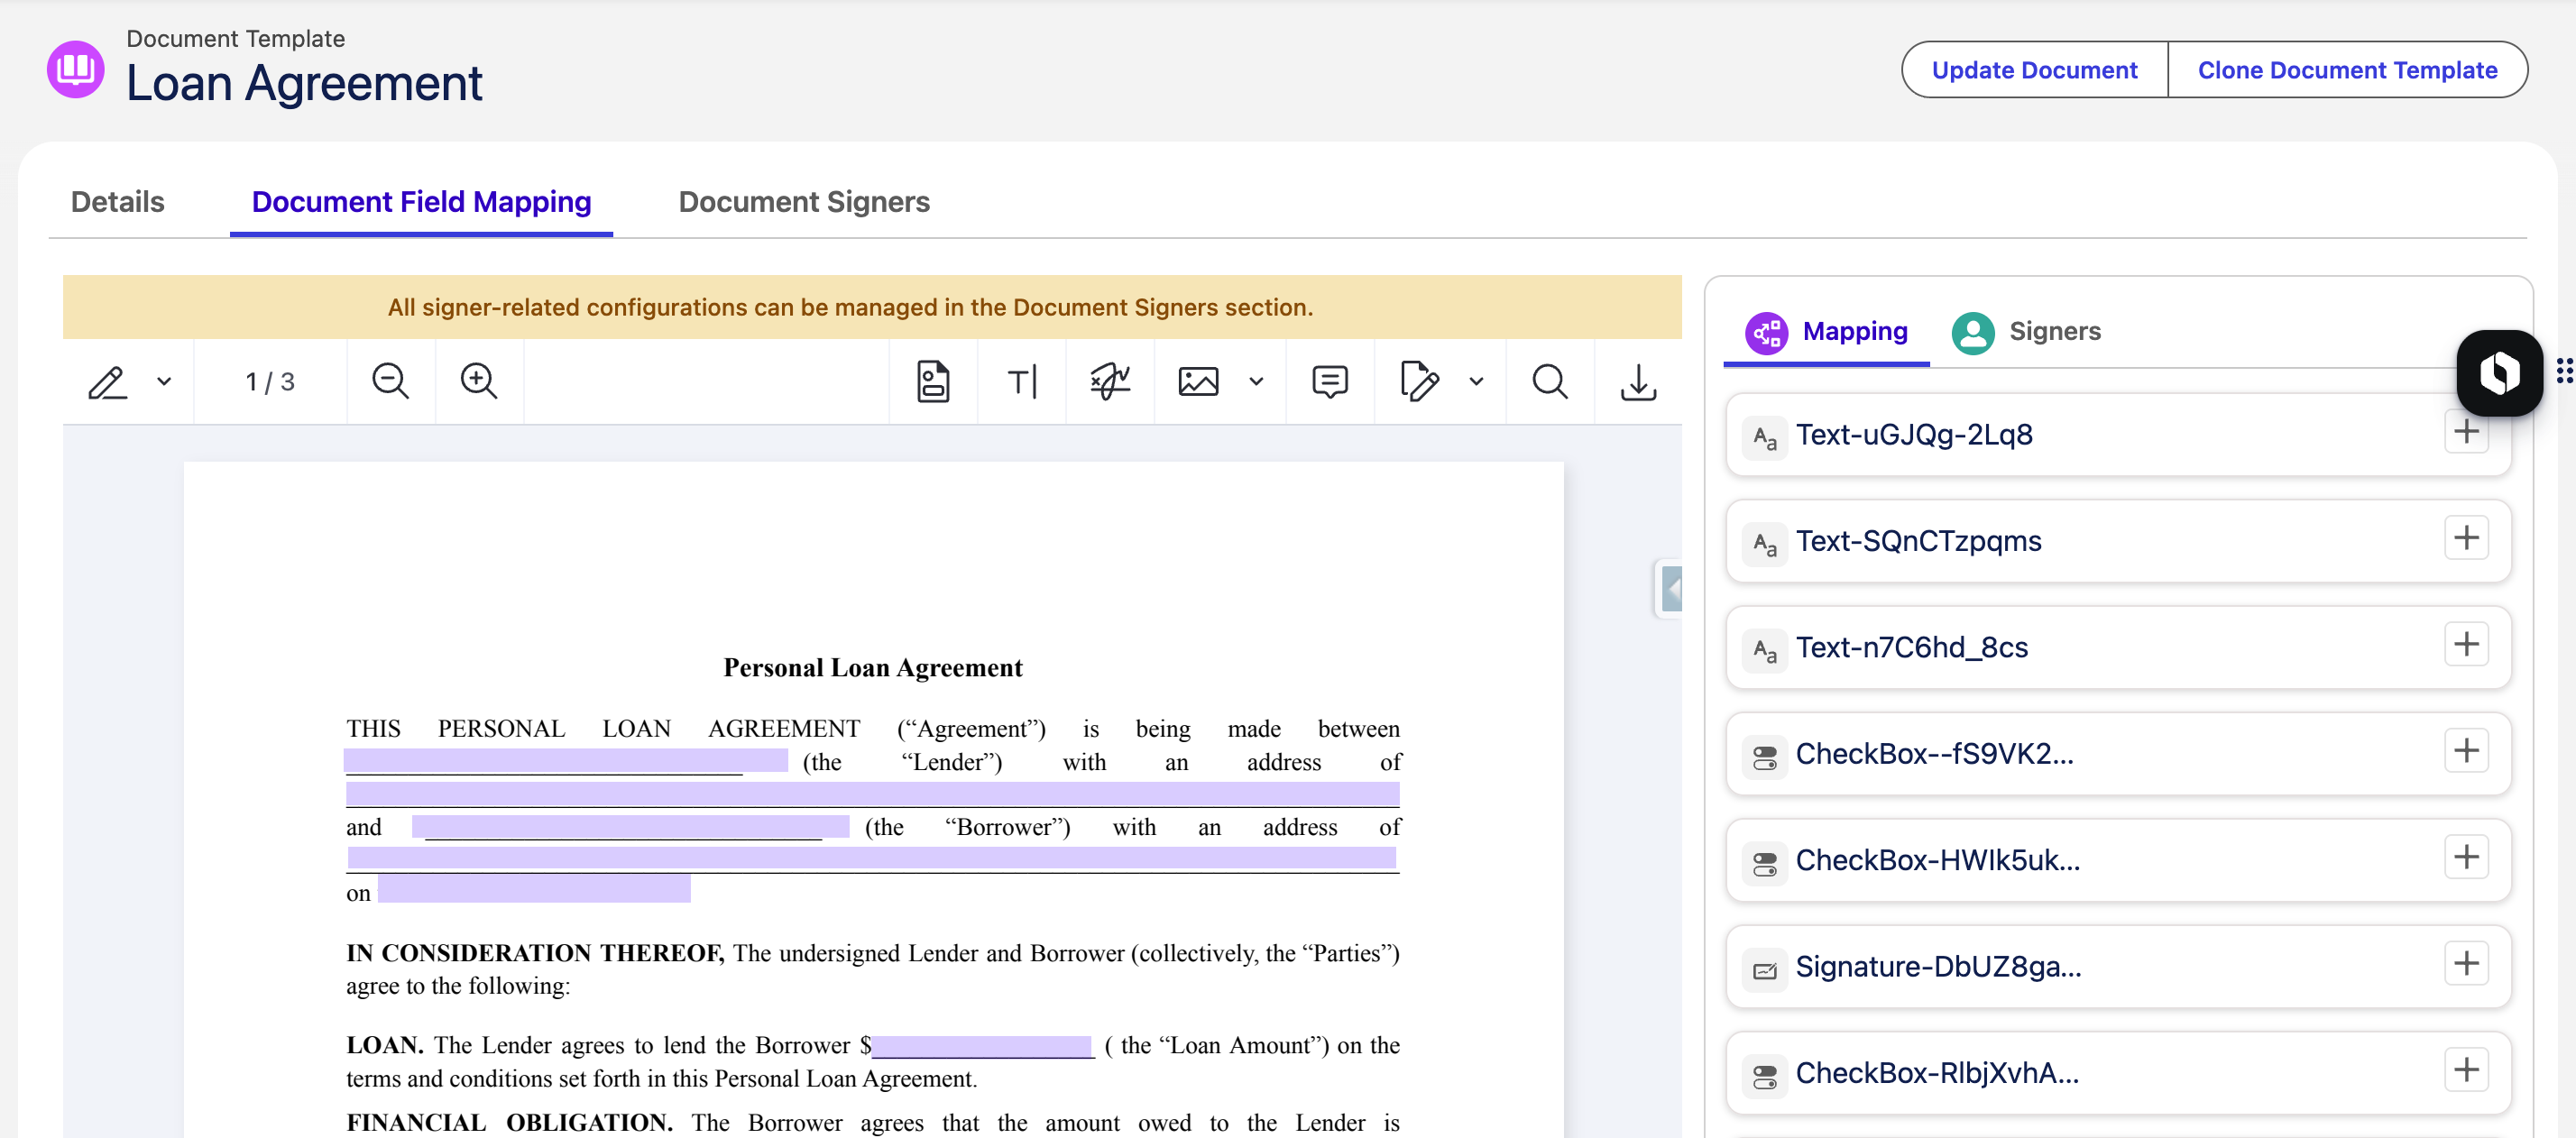
The Document Field Mapping screen displays:
-
The uploaded PDF document.
-
The fields detected in the PDF.
-
Available Salesforce fields that can be mapped to each document field.
-
Configuration options that control how each mapped field behaves during document generation and signing.
Identify the PDF Fields.
The PDF document is displayed on the left side of the screen, while the detected document fields are displayed in the panel on the right.
Each field is identified by its field name, such as:
-
Text-oDd8CAZXca -
CheckBox-oJmi6BA... -
Text-8H0kt5vHBi -
Signature-sVh7wUh...
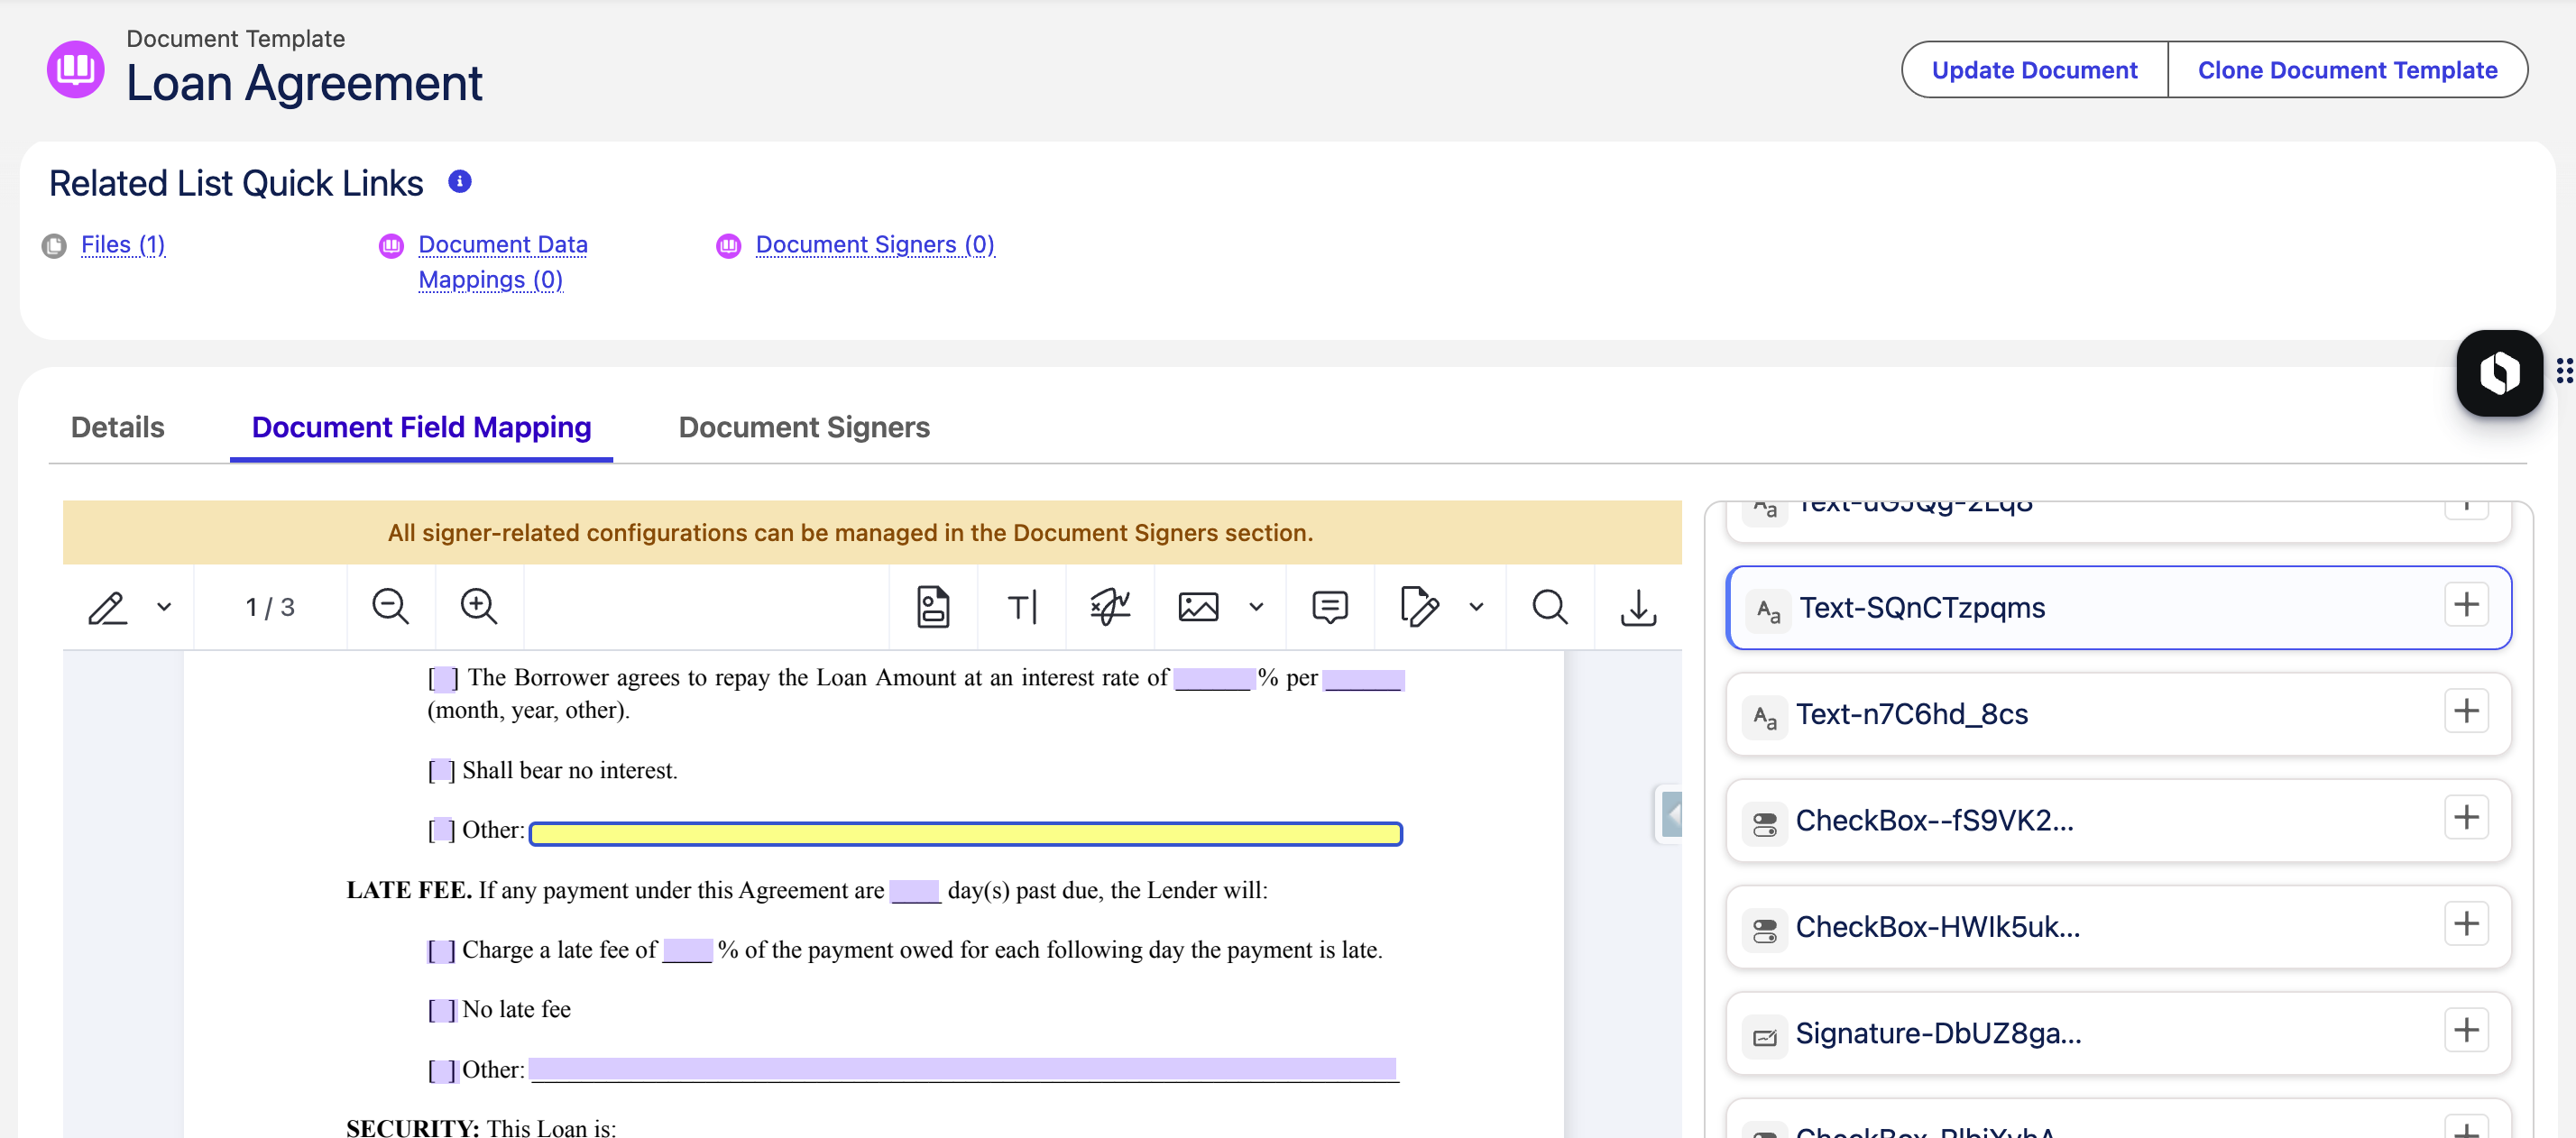
Click the field you want to map in the document. The selected field will be highlighted in the right-hand panel, making it easy to identify and configure its mapping.
Create a Field Mapping.
To map a PDF field to a Salesforce field:
-
Locate the PDF field you want to map in the right-hand panel.
-
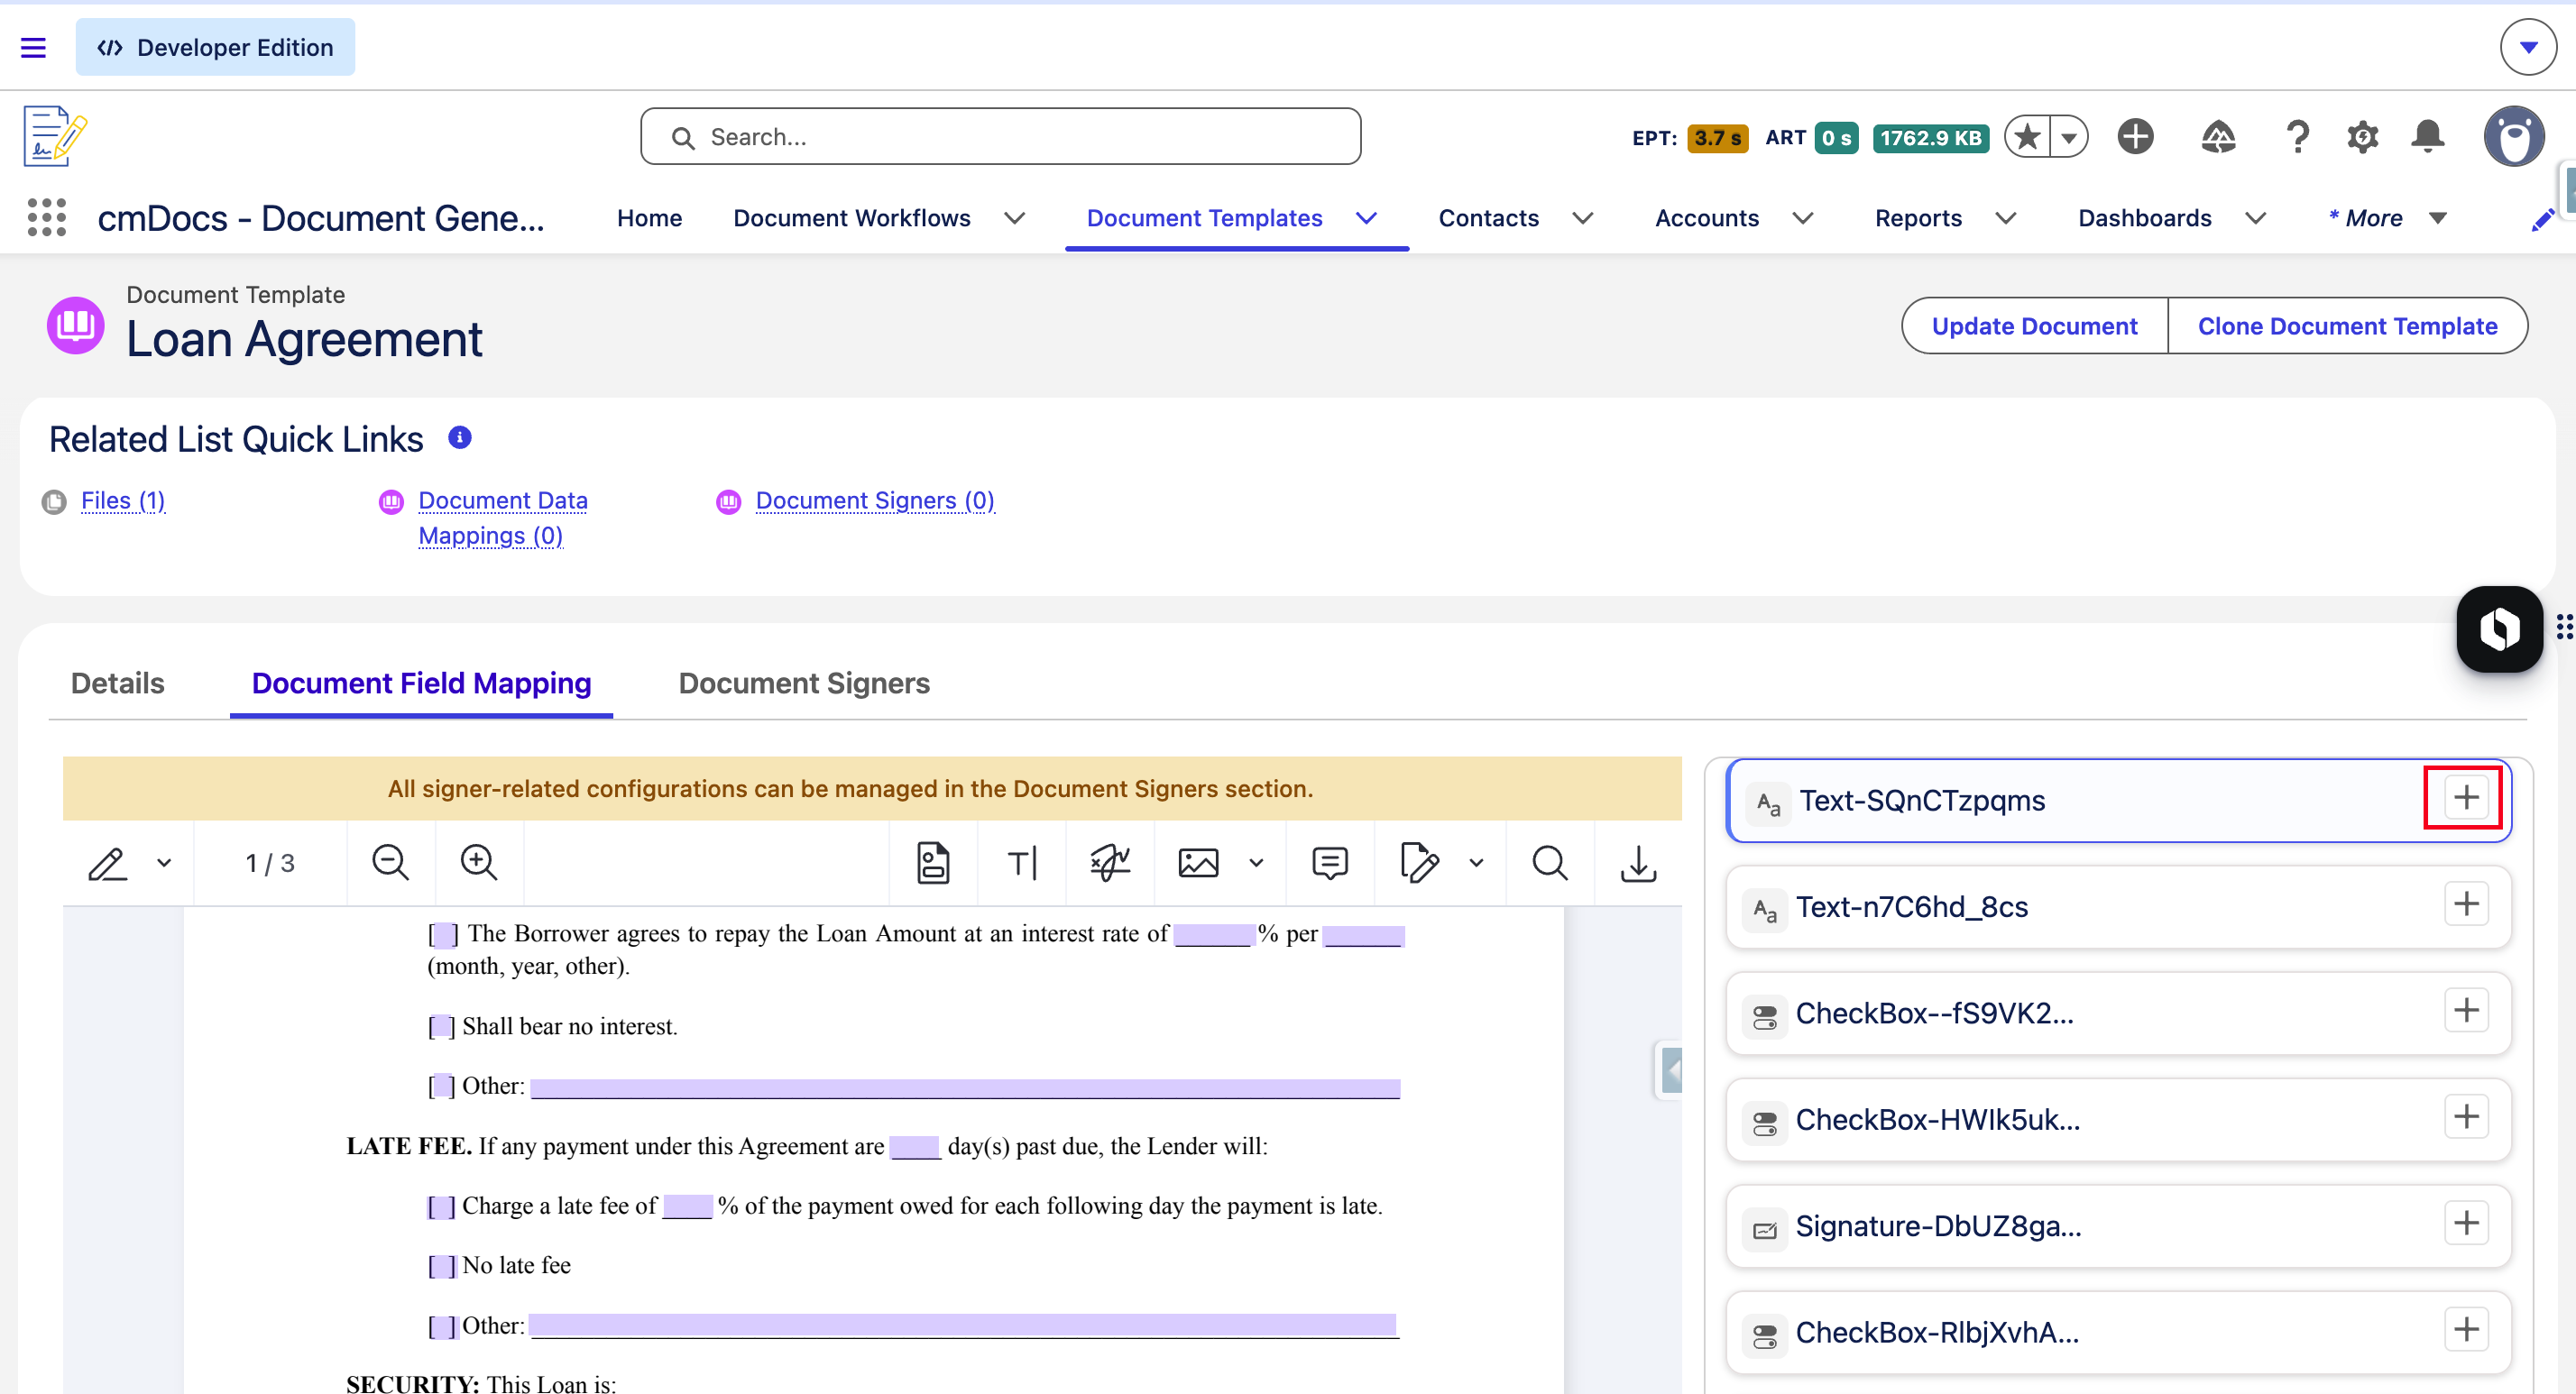
Click the + (Add) icon next to the field.
-
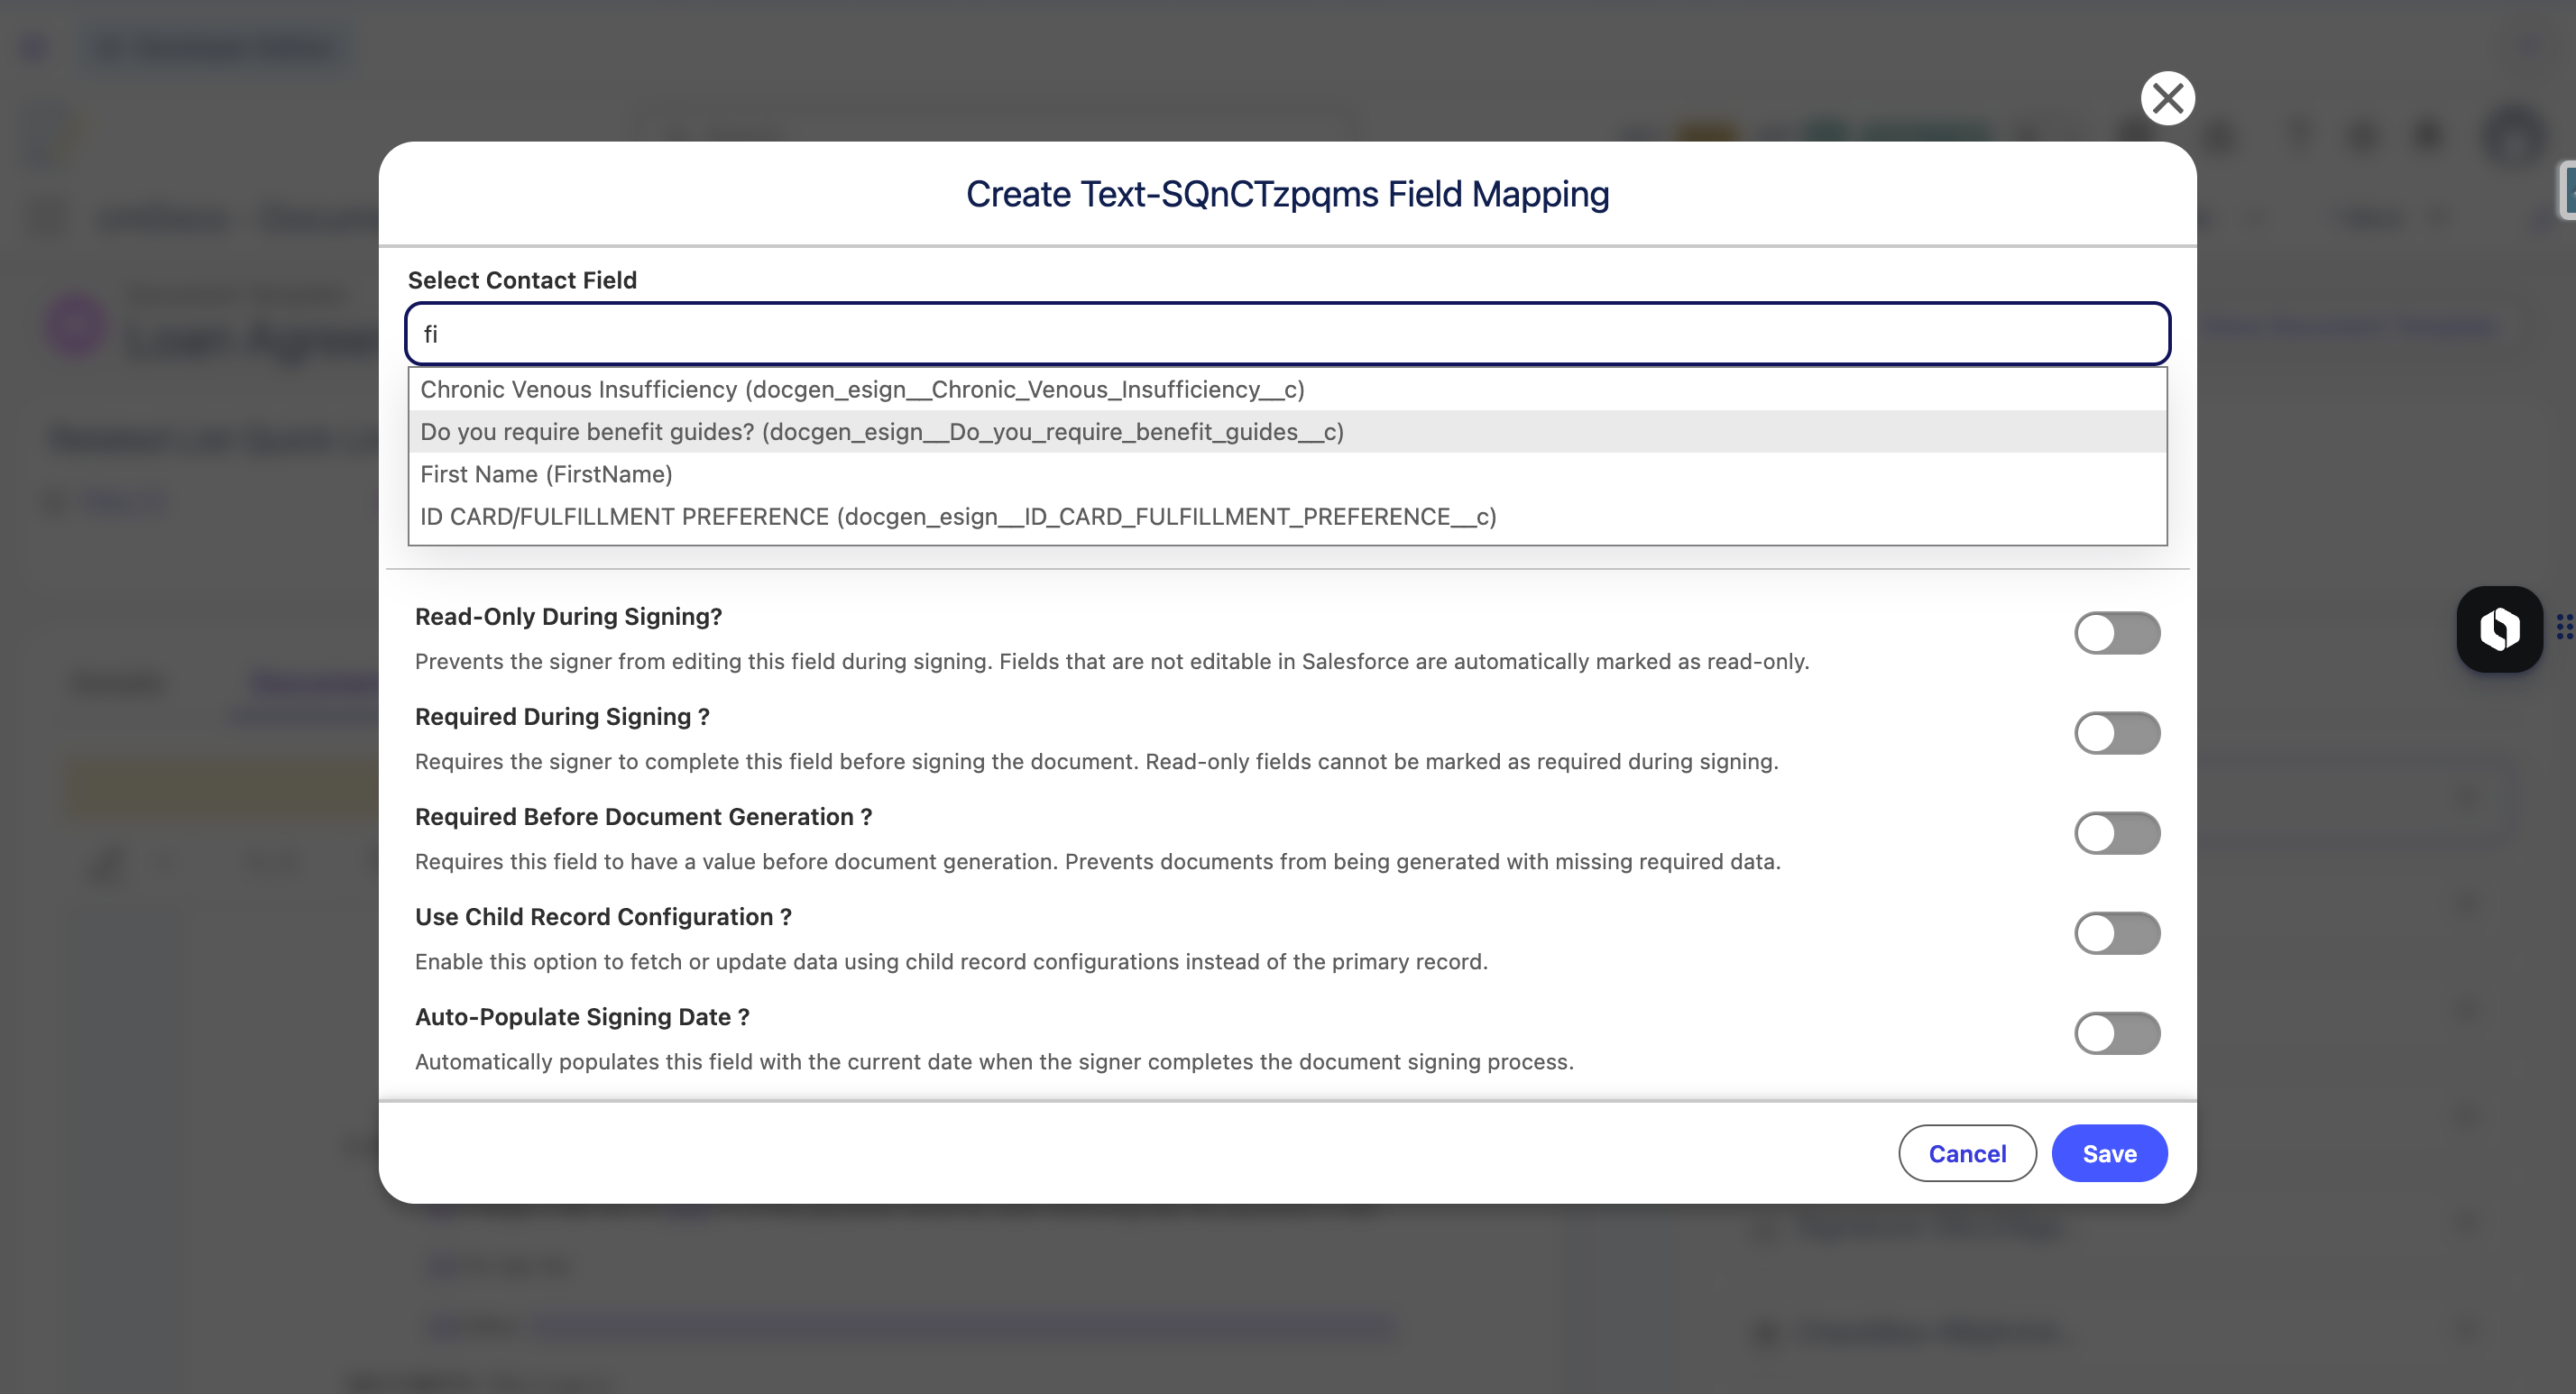
The Create Field Mapping window opens.
The mapping window allows you to select the Salesforce field that should be associated with the selected PDF field.
For example, if the PDF contains a field for Borrower Name, you can map that field to a Salesforce field such as Contact Name.
Select the Salesforce Field.
The mapping window displays the Salesforce fields available for the selected document template.
Select Contact Field
Use Select Contact Field to select the Salesforce field that should populate the PDF field.
You can search for a field by typing its name in the search box.
Once mapped, the Contact Name value can be automatically populated into the corresponding PDF field when the document is generated.
Map Fields from a Related Salesforce Object.
In addition to fields from the primary Salesforce record, you can also map fields from a related Salesforce object through a lookup relationship.
For example, a Contact has a lookup relationship to an Account through the Account ID field.
When configuring a Contact field mapping, you may therefore be able to select fields from the related Account, such as:
-
Account Name
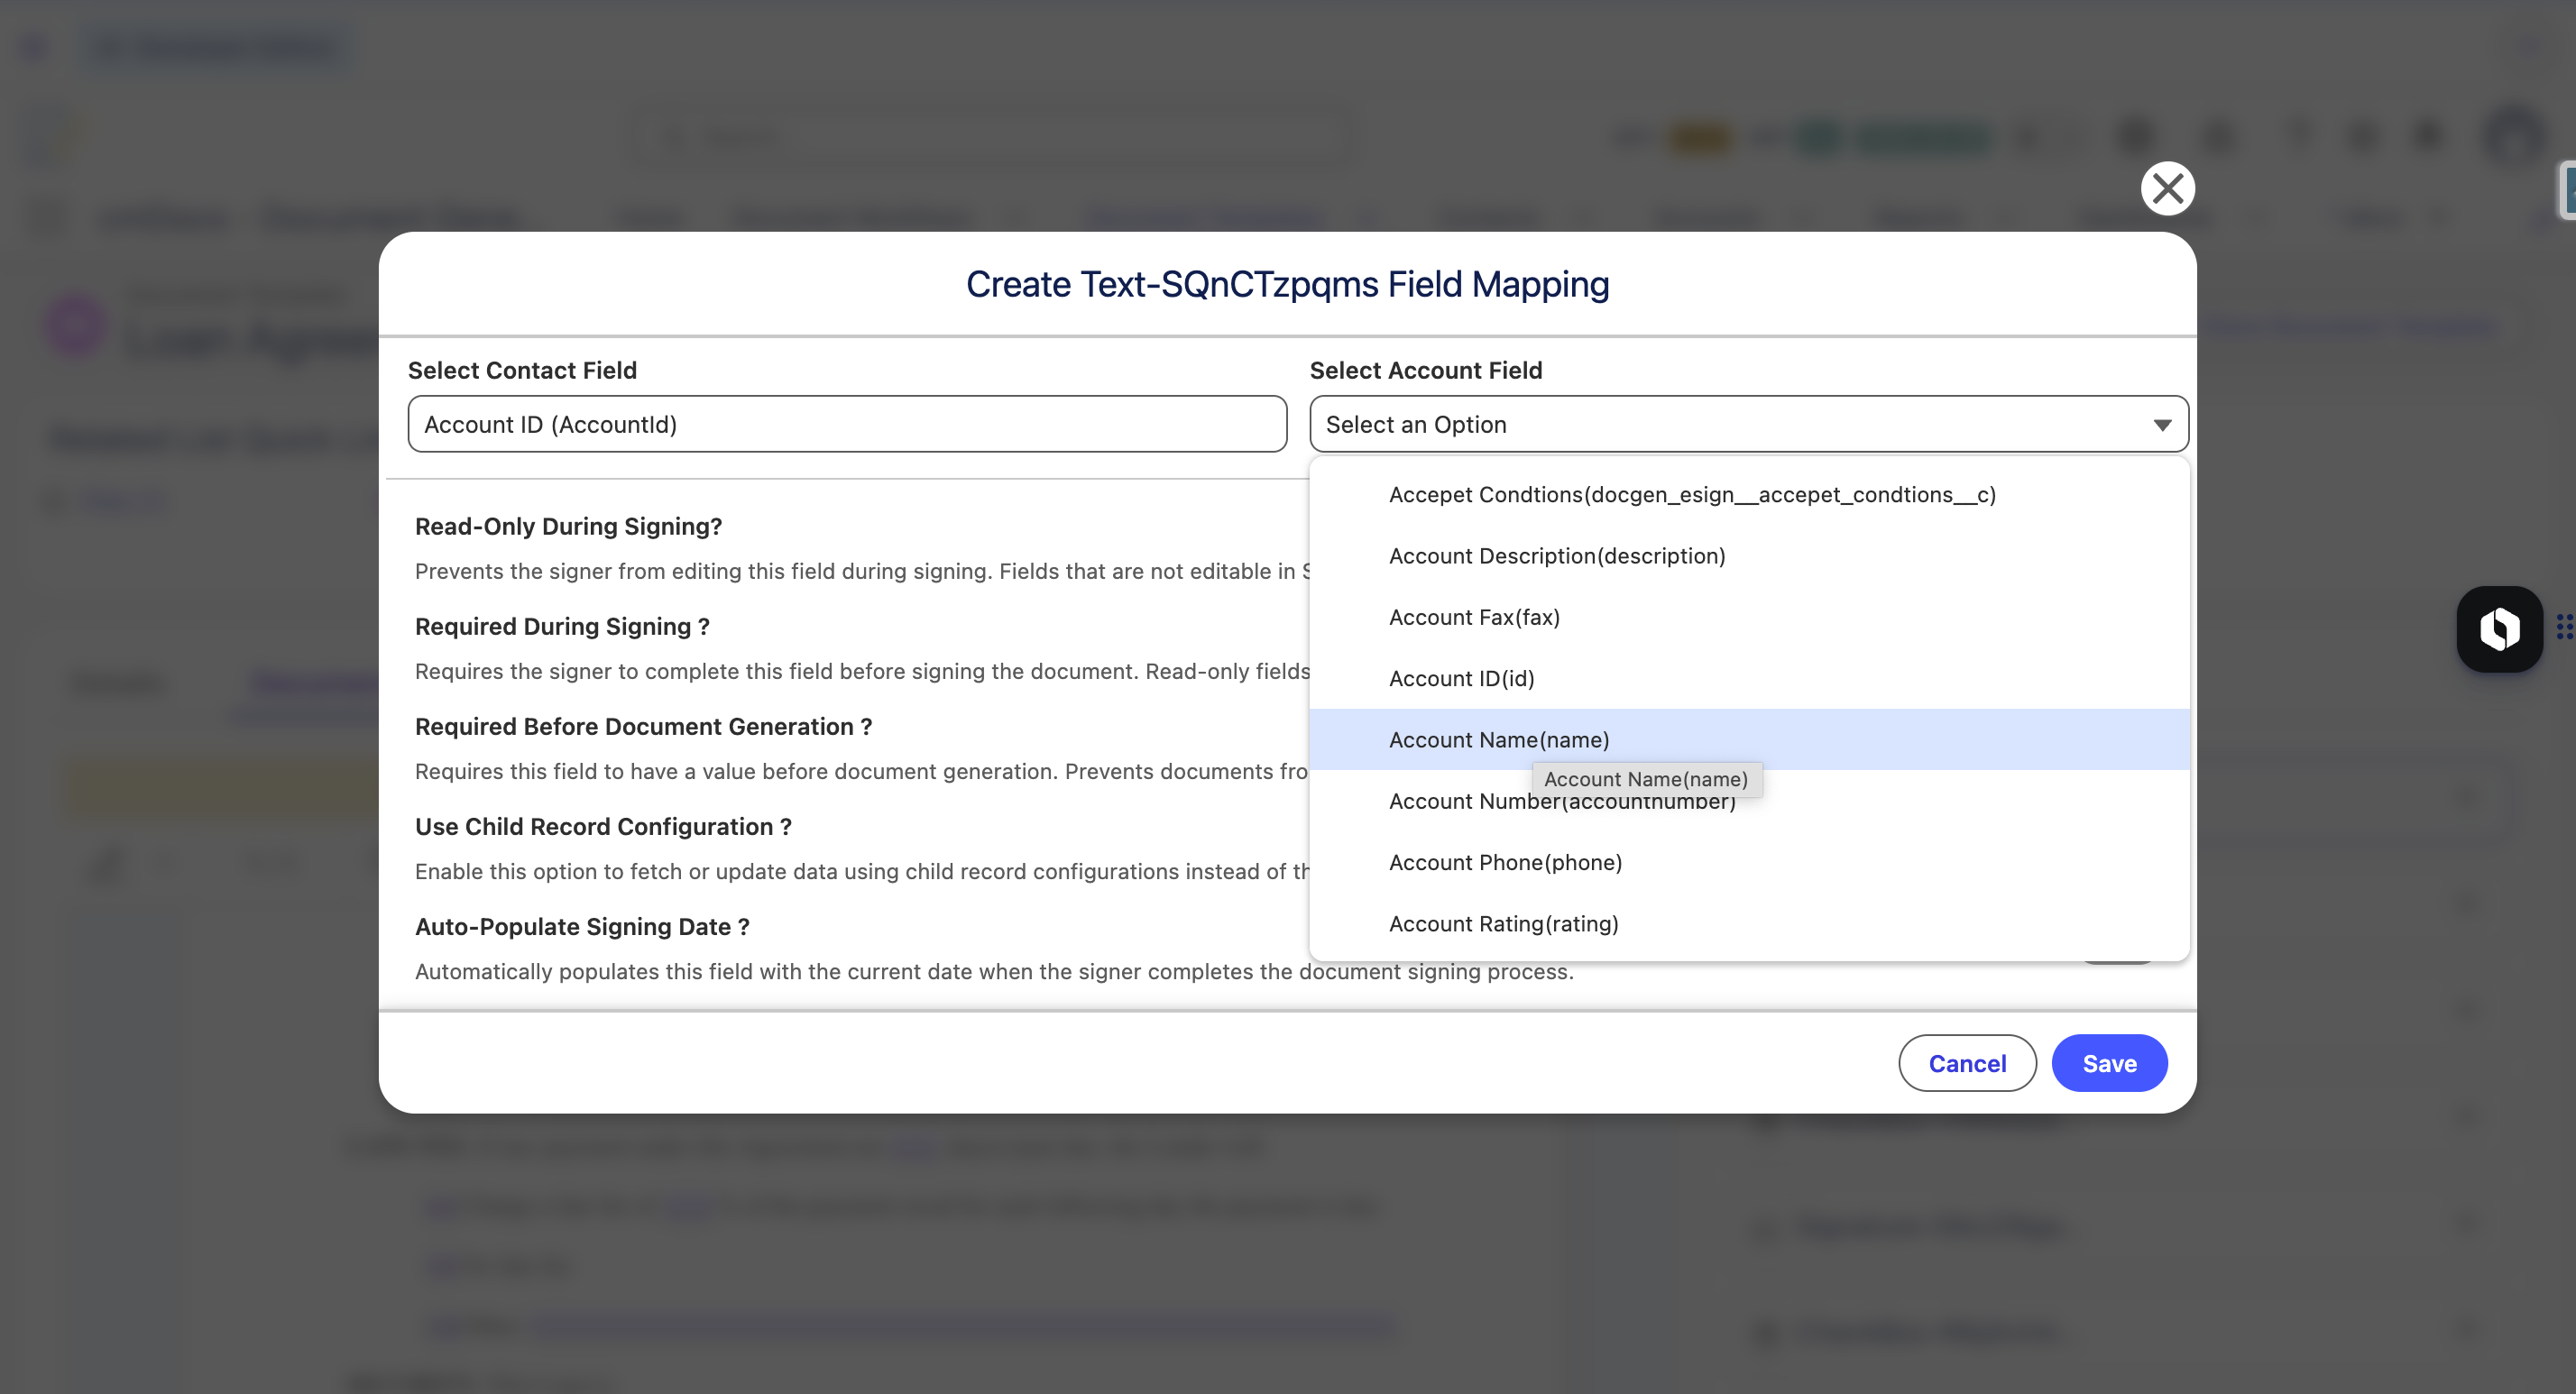
This is useful when the information required in the document belongs to a related record rather than the primary Salesforce record.
Configure Field Behavior.
After selecting the Salesforce field, you can configure how the field should behave during document generation and signing.
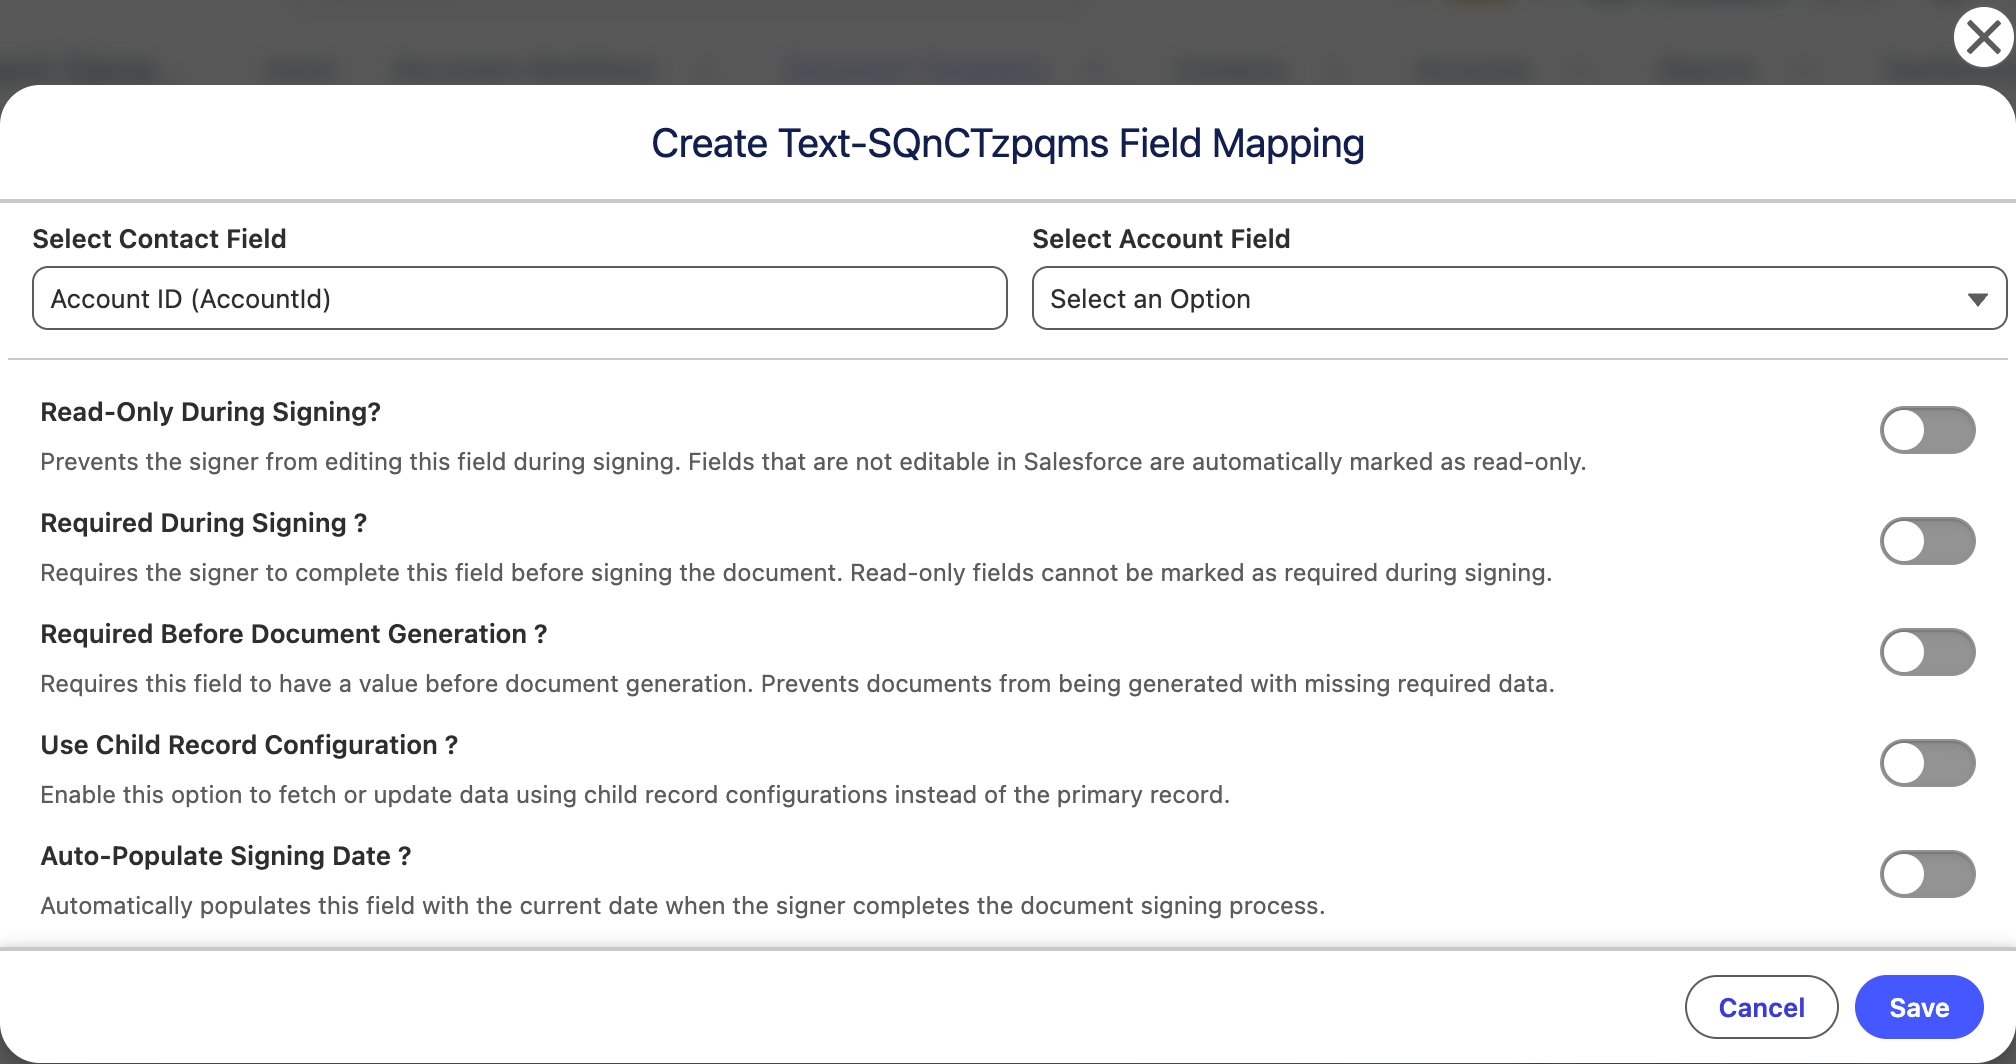
The mapping window provides the following options.
Read-Only During Signing
Enable Read-Only During Signing if the signer should be able to view the value but should not be able to modify it while signing.
For example, if the PDF contains the borrower's name populated from Salesforce, you may want the signer to see the name but prevent them from changing it.
Fields that are not editable in Salesforce are automatically treated as read-only.
Example:
Contact Name → PDF Borrower Name
If the field is read-only during signing, the signer can view the populated name but cannot change it.
Required During Signing
Enable Required During Signing if the signer must complete the field before they can finish signing the document.
This is useful for information that must be provided or confirmed by the signer.
For example:
-
Confirmation checkbox
-
Additional information
-
Required signer input
If the field is left blank, the signer will not be able to complete the signing process.
Note: A field configured as Read-Only During Signing cannot be marked as required during signing because the signer cannot edit the field.
Required Before Document Generation
Enable Required Before Document Generation when the Salesforce field must contain a value before the document can be generated.
This helps prevent documents from being generated with missing information.
Example
If the PDF contains:
Loan Amount: $________
and the corresponding Salesforce field is required before document generation, the document cannot be generated until the Loan Amount contains a value.
This option is particularly useful for important information that must always be populated in the generated document.
Use Child Record Configuration.
Enable Use Child Record Configuration when the field should retrieve or update information using a configured child record instead of the primary Salesforce record.
This option is useful when the information required for the document is stored in a related child record.
For example, if a document is generated from an Account but certain information is stored in related records, the child record configuration can be used to retrieve the appropriate data.
Enable Use Child Record Configuration when the field needs to retrieve or update data from a related child record instead of the primary Salesforce record.
Learn More: For instructions on creating and configuring child record configurations for PDF document templates, refer to Create Child Record Configuration for PDF Template Mappings.
Auto-Populate Signing Date.
Enable Auto-Populate Signing Date when you want Salesforce to automatically populate the mapped field with the date on which the signer completes the signing process.
This is useful for documents that require a signing or execution date.
Example
PDF Field:
Date Signed
Salesforce Field:
Signing Date
When the signer completes the document, the system automatically populates the field with the current signing date.
This eliminates the need for the signer or Salesforce user to manually enter the signing date.
Mapping Signature Fields.
To map signature fields:
-
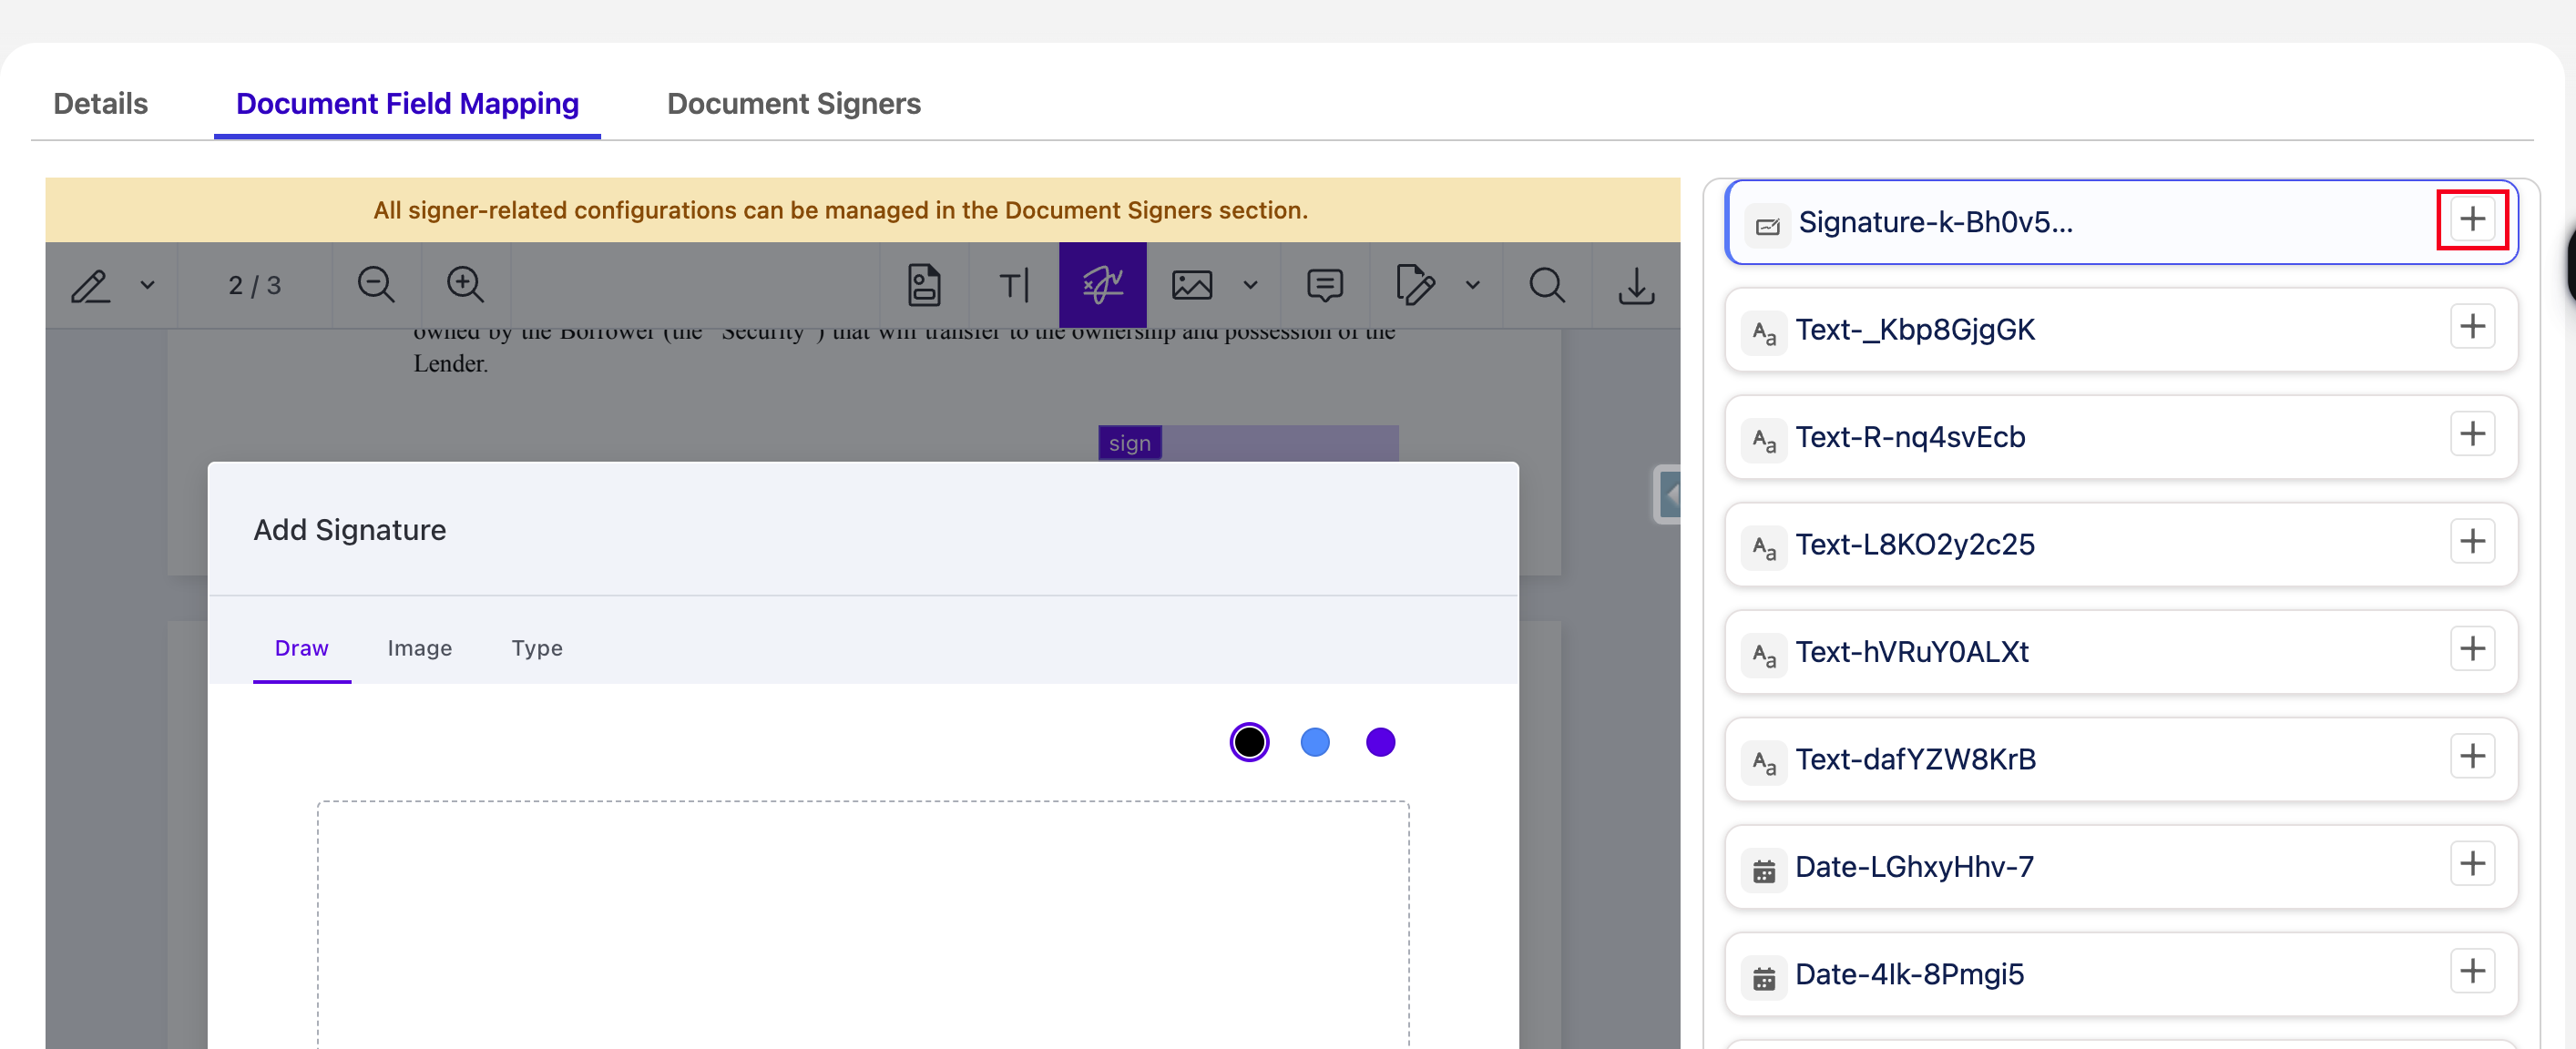
Select the Signature Field
Click the signature field in the PDF that you want to configure. The selected field will be highlighted in the right-hand panel.
Select a Predefined Signer
Select the appropriate signer from the list of Predefined Signers configured for the document.
For instructions on creating and configuring signers for a document, refer to Create Signers for a Document.
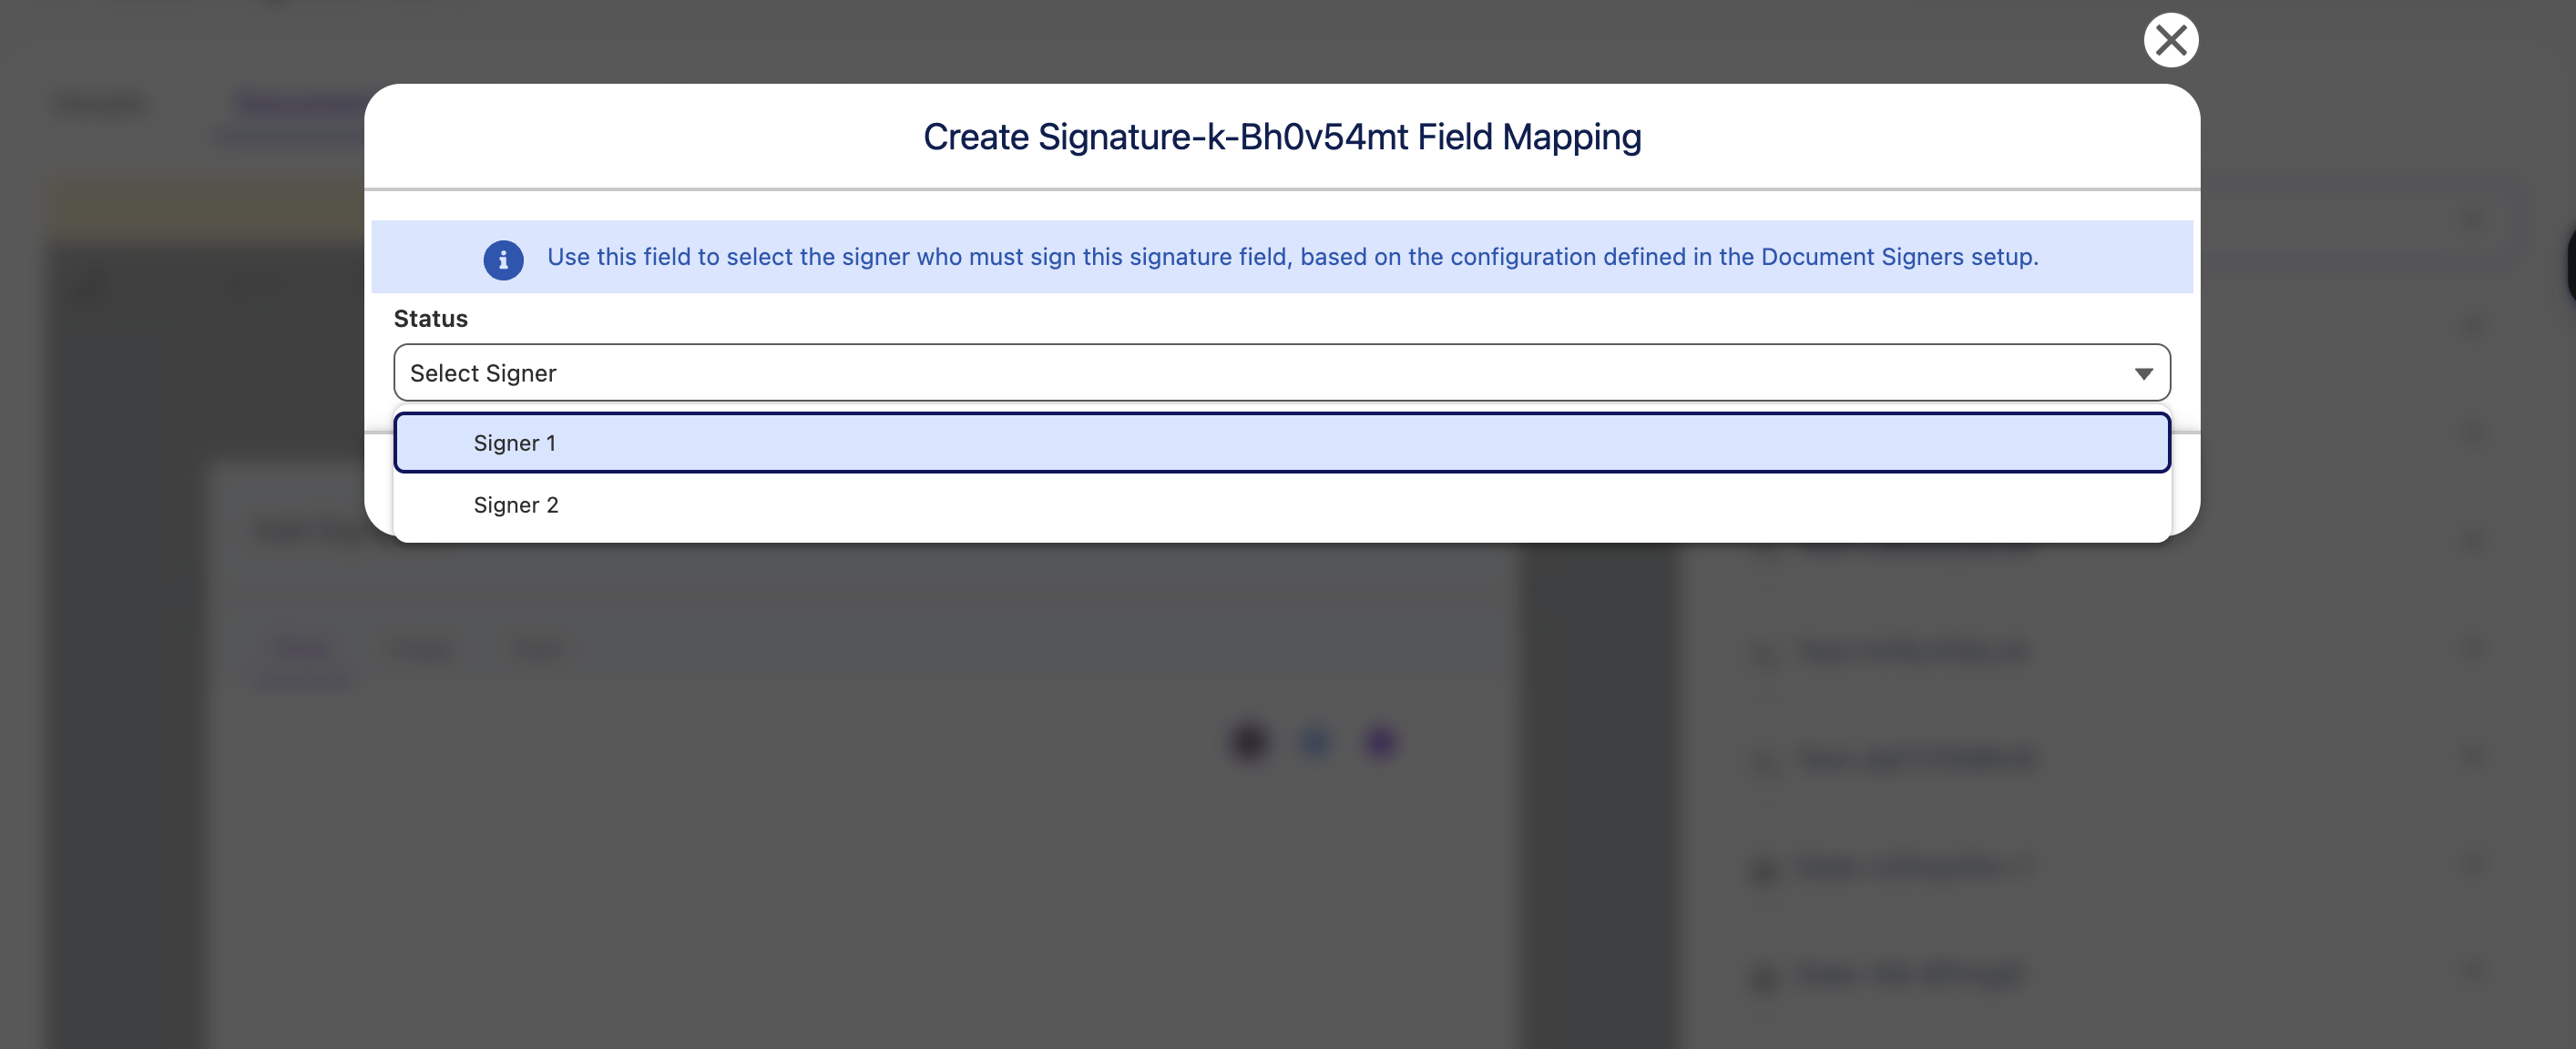
Save the Mapping
After selecting the appropriate signer, click Save to save the signature field mapping.
Repeat these steps for each signature field in the document.
Important: Make sure all signature fields in the PDF are mapped to the appropriate predefined signer. An unmapped signature field may not be assigned to the correct signer during the e-signature process.