
Overview
This guide explains how administrators can enable the Send Document for eSignature functionality on a Salesforce record page. Once enabled, users can access the action directly from the selected record and send any document for eSignature or Digital Signature without using a predefined Document Template.
Activate the Send Document for eSignature Page
Before adding the action to a record page, make sure the Send Document for eSignature Lightning page is activated.
Steps
-
Go to Setup in Salesforce.
-
In Quick Find, search for Lightning App Builder.
-
Locate Send Document for eSignature.
-
Click View.
-
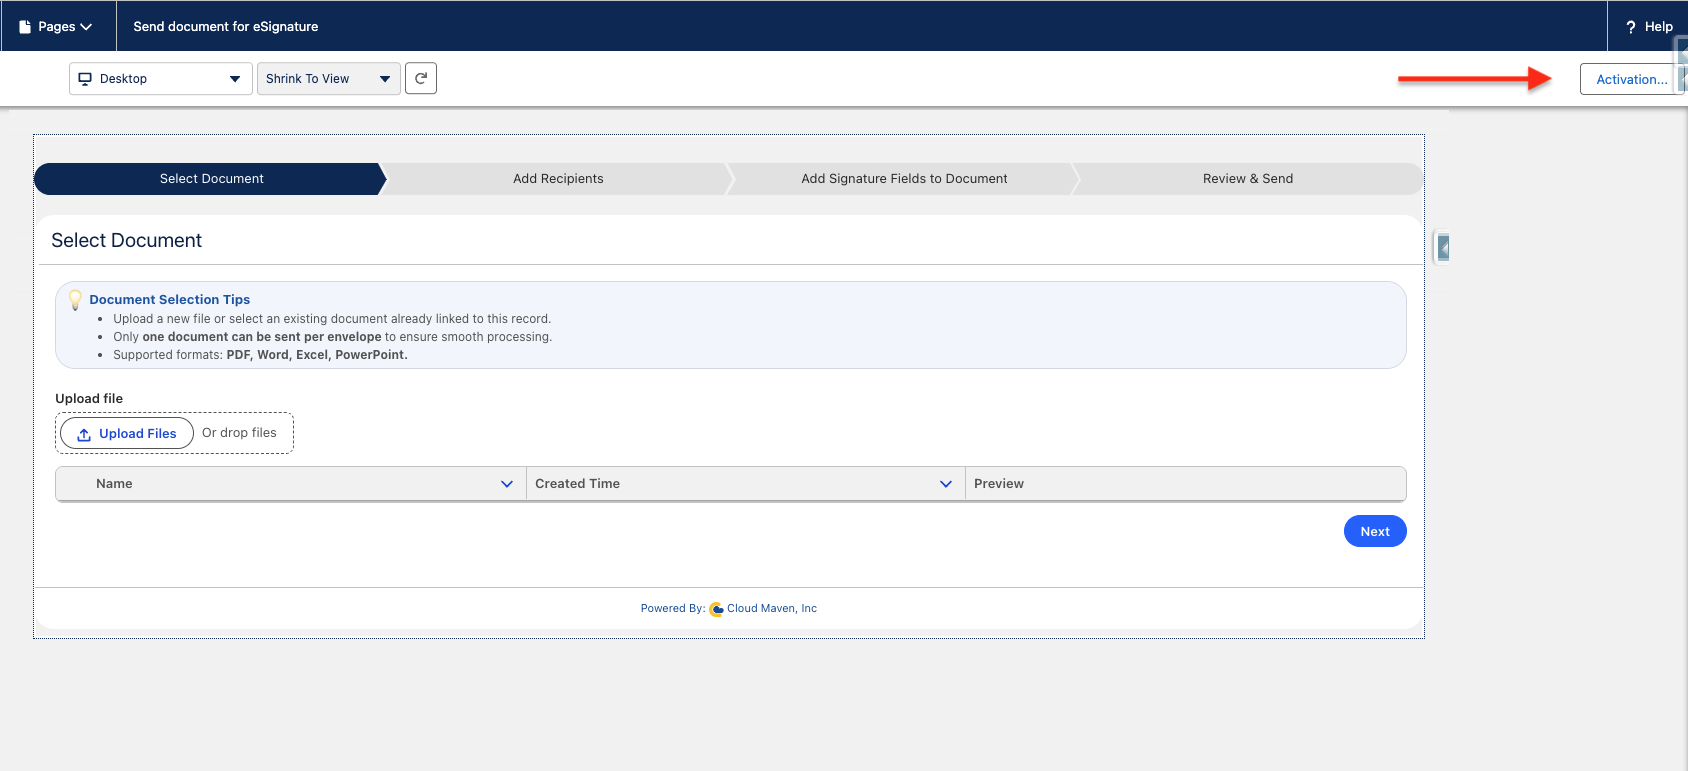
Click Activation.
-
Activate the page for the required:
-
Lightning App
-
Profile
-
Record type, where applicable
-
-
Save the activation settings.
Create the Send Document for eSignature Action
After activating the Lightning page, create a custom action on the object where you want users to send documents for signing.
Steps
-
Go to Setup → Object Manager.
-
Select the object where you want to enable the functionality.
Example:
Account -
Navigate to Buttons, Links, and Actions.
-
Click New Action.
-
Configure the action with the following details:
|
Field |
Value |
|---|---|
|
Action Type |
Custom Visualforce |
|
Label |
Send Document for eSignature |
|
Name |
Send_Document_for_eSignature |
Configure the remaining fields according to your organization's Salesforce configuration.
Configure the Action URL
The action must pass the current Salesforce record ID to the Send Document for eSignature page.
Use the following URL structure:
/lightning/n/Send_document_for_eSignature?c__recordId={!Account.Id}
Replace Account.Id with the appropriate merge field for the object where the action is being created.
Examples
For an Account:
/lightning/n/Send_document_for_eSignature?c__recordId={!Account.Id}
For an Opportunity:
/lightning/n/Send_document_for_eSignature?c__recordId={!Opportunity.Id}
For another object, use that object's record ID merge field.
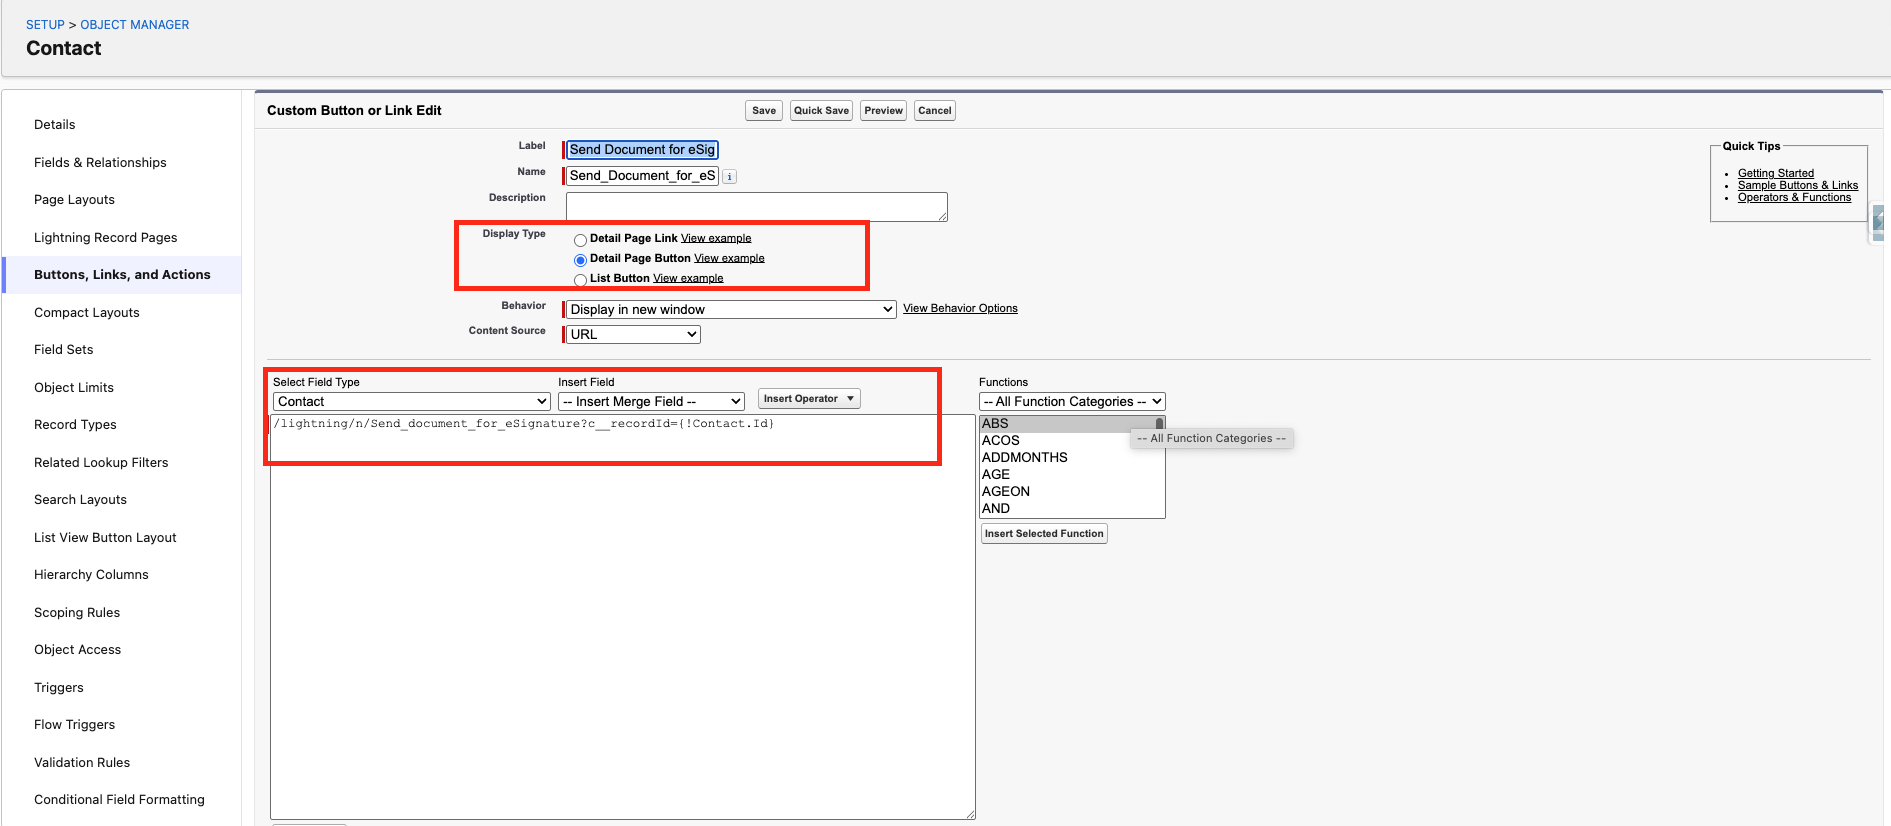
Important: The record ID parameter allows DocGen & eSign to identify the Salesforce record from which the document-sending process was initiated.
Add the Action to the Record Page
Once the action has been created, add it to the appropriate record page so users can access it.
Option 1: Add to the Page Layout
-
Go to Setup → Object Manager.
-
Select the required object.
-
Open Page Layouts.
-
Select the appropriate page layout.
-
Locate Salesforce Mobile and Lightning Experience Actions.
-
Drag Send Document for eSignature into the actions section.
-
Click Save.
The action will now be available from the record page for users assigned to that page layout.
Option 2: Add to a Lightning Record Page
You can also add the action directly to a Lightning Record Page.
-
Open Setup → Object Manager.
-
Select the required object.
-
Open Lightning Record Pages.
-
Select the record page you want to modify.
-
Click Edit.
-
Select the Highlights Panel.
-
Configure the available actions.
-
Add Send Document for eSignature.
-
Click Save.
-
If required, click Activate to make the updated page available to users.
Configure Signer Selection Options
1. Access the Signer Configuration
-
Go to Setup in Salesforce.
-
Search for Custom Metadata Types.
-
Locate DocGen Signer Selection Config.
-
Click Manage Records.
-
Locate Signer Configuration.
-
Click Edit.
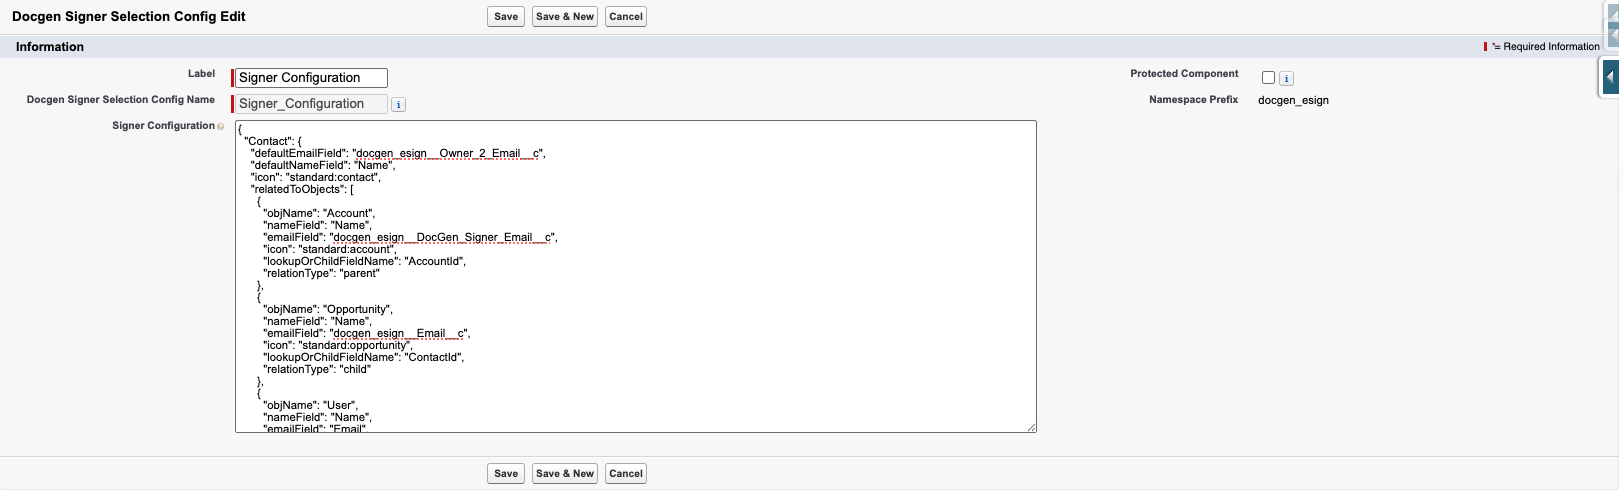
The Signer Configuration record contains the JSON configuration used to populate the signer-selection options.
2. Understand the Configuration Structure
The configuration uses JSON to define the available signer objects and their corresponding fields.
Example:
{
  "Contact": {
    "defaultEmailField": "docgen_esign__Owner_2_Email__c",
    "defaultNameField": "Name",
    "icon": "standard:contact",
    "relatedToObjects": [
      {
        "objName": "Account",
        "nameField": "Name",
        "emailField": "docgen_esign__DocGen_Signer_Email__c",
        "icon": "standard:account",
        "lookupOrChildFieldName": "AccountId",
        "relationType": "parent"
      },
      {
        "objName": "Opportunity",
        "nameField": "Name",
        "emailField": "docgen_esign__Email__c",
        "icon": "standard:opportunity",
        "lookupOrChildFieldName": "ContactId",
        "relationType": "child"
      },
      {
        "objName": "User",
        "nameField": "Name",
        "emailField": "Email",
        "icon": "standard:user"
      }
    ]
  }
}
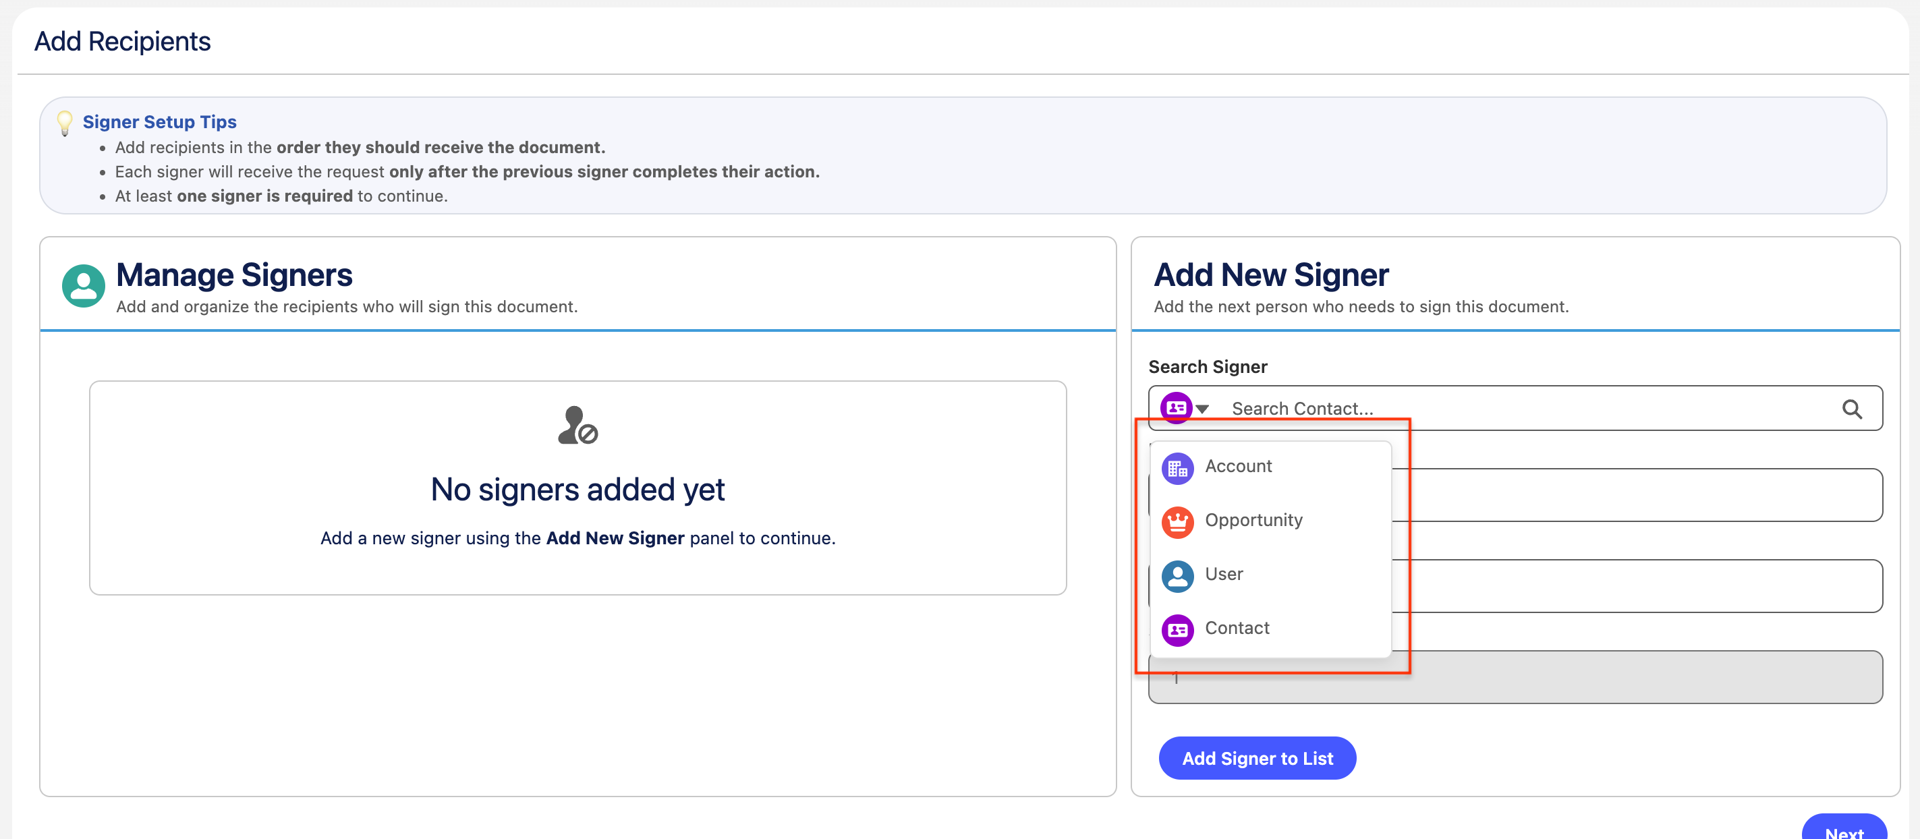
This configuration determines the information displayed when a user clicks Add Signer.
3. Configure the Default Signer Object
The top-level object defines the primary Salesforce object used for signer selection.
For example:
"Contact": {
This means that Contact is configured as a signer source.
Default Email Field
"defaultEmailField": "Email"
Defines the field used to retrieve the signer's email address when the signer is selected from the Contact object.
Default Name Field
"defaultNameField": "Name"
Defines the field used to display the signer's name.
Icon
"icon": "standard:contact"
Defines the Salesforce icon displayed for the Contact option in the signer-selection interface.
4. Configure Related Objects
The relatedToObjects section defines additional Salesforce objects that can be displayed as signer-selection options.
For example:
"relatedToObjects": [
You can add multiple related objects depending on your business requirements.
Each related object can define:
-
Object API Name
-
Name field
-
Email field
-
Icon
-
Lookup or child relationship field
-
Relationship type
5. Configure the Related Object
The objName property specifies the Salesforce object that should be available for selection.
Example:
{
  "objName": "Account"
}
This makes Account available as a related signer-selection option.
Name Field
"nameField": "Name"
Defines the field used to display the object's name in the signer-selection interface.
Email Field
"emailField": "Email"
Defines the field from which the signer email address should be retrieved.
6. Configure the Relationship Field
The lookupOrChildFieldName property defines the field used to establish the relationship between the configured objects.
For example:
"lookupOrChildFieldName": "AccountId"
This indicates that the Contact is related to the Account through the AccountId field.
This relationship allows the application to retrieve the appropriate signer information when selecting a signer from a related object.
7. Configure the Relationship Type
The relationType property identifies how the objects are related.
Parent Relationship
"relationType": "parent"
Use parent when the configured object is the parent of the signer/source object.
For example:
Contact → Account
where Contact contains the AccountId lookup.
Child Relationship
"relationType": "child"
Use child when the configured object represents a child relationship.
For example:
Opportunity → Contact
where the configured relationship is based on the appropriate lookup field.
If relationType is left as an empty string (""), the signer search is not restricted by a parent or child relationship. As a result, all available records from the configured object can be searched and selected as signers.
8. Configure Users as Signers
You can also configure Salesforce User as a signer option.
Example:
{
  "objName": "User",
  "nameField": "Name",
  "emailField": "Email",
  "icon": "standard:user"
}
This configuration allows users to select a Salesforce User as a signer.
The application will use:
-
Name → Signer Name
-
Email → Signer Email